WINK ONVIF Studio
Professional Camera Management Manual
Complete Guide for Security Professionals and System Integrators
Version 1.0 | 2025
WINK Streaming
1. Introduction
WINK ONVIF Studio is a comprehensive, professional-grade camera management tool designed for security professionals, system integrators, and IT administrators. This software provides complete control over ONVIF-compliant IP cameras, including discovery, configuration, streaming, and diagnostics.
About WINK ONVIF Studio
WINK ONVIF Studio represents the culmination of years of experience in video surveillance and camera integration. As a completely free tool, it democratizes access to professional camera management capabilities that were previously only available in expensive enterprise solutions.
Key Features
Universal Compatibility
Supports all ONVIF-compliant cameras from any manufacturer, with automatic detection of authentication methods and protocol versions.
Professional Tools
Advanced diagnostics, batch operations, and comprehensive configuration capabilities designed for professional deployments.
Cross-Platform Support
Native applications for Windows, macOS, and Linux ensure you can manage cameras from any workstation.
Target Audience
- Security Integrators: Quickly configure and test multiple cameras during installation
- IT Administrators: Manage corporate surveillance infrastructure efficiently
- Security Professionals: Monitor and maintain camera systems
- System Engineers: Diagnose and troubleshoot camera connectivity issues
Document Overview
This manual provides comprehensive guidance on using WINK ONVIF Studio effectively. Each chapter builds upon previous concepts, taking you from basic installation through advanced features and troubleshooting.
Note: This manual covers WINK ONVIF Studio version 1.0. Features may vary in different versions. Check www.wink.co for the latest documentation.
2. Getting Started
2.1 System Requirements
Minimum Requirements
| Component |
Windows |
macOS |
Linux |
| Operating System |
Windows 10 64-bit |
macOS 10.14 (Mojave) |
Ubuntu 20.04 LTS |
| Processor |
Intel Core i3 or equivalent |
| Memory |
4 GB RAM |
| Storage |
500 MB available space |
| Network |
Gigabit Ethernet recommended |
Recommended Requirements
- Intel Core i5 or better processor
- 8 GB RAM or more
- SSD storage for better performance
- Multiple network interfaces for complex deployments
- 4K display for managing multiple camera streams
Additional Software Requirements
Linux Users: VLC libraries must be installed for video streaming functionality:
sudo apt update
sudo apt install vlc libvlc-dev
2.2 Installation
Windows Installation
- Download the WINK ONVIF Studio installer from www.wink.co/wink-onvif-studio
- Run the installer as Administrator
- Follow the installation wizard:
- Accept the license agreement
- Choose installation directory (default recommended)
- Select Start Menu folder
- Create desktop shortcut (optional)
- Click "Install" to begin installation
- Launch WINK ONVIF Studio when installation completes
macOS Installation
- Download the appropriate version:
- Intel Macs: WINK-ONVIF-Studio-Intel.dmg
- Apple Silicon: WINK-ONVIF-Studio-ARM.dmg
- Open the DMG file
- Drag WINK ONVIF Studio to Applications folder
- First launch:
- Right-click the app and select "Open"
- Click "Open" in the security dialog
- Grant camera and network permissions when prompted
Linux Installation
Binary Installation
# Download the binary
wget https://downloads.wink.co/onvif-studio/linux/wink-onvif-studio

# Make executable
chmod +x wink-onvif-studio

# Run the application
./wink-onvif-studio
DEB Package Installation
# Download the DEB package
wget https://downloads.wink.co/onvif-studio/linux/wink-onvif-studio.deb

# Install the package
sudo dpkg -i wink-onvif-studio.deb

# Install dependencies if needed
sudo apt-get install -f

# Launch from terminal or application menu
wink-onvif-studio
2.3 First Launch
Welcome Screen
When you first launch WINK ONVIF Studio, you'll see a welcome banner showcasing WINK Streaming services. This banner appears for the first 5 launches to introduce you to our enterprise video solutions.
Banner Behavior:
- Launches 1-3: 15-second display timer (cannot be closed early)
- Launches 4-5: Can be closed immediately
- Launch 6+: No banner displayed
Initial Interface
The main window is divided into three primary sections:
- Camera List (Left Panel): Displays all discovered and manually added cameras in a tree view
- Tab Content (Center): Shows information and controls based on the selected tab
- Action Buttons (Right): Quick access to common operations
First Steps
To begin using WINK ONVIF Studio effectively:
- Check Network Settings: Ensure your computer is connected to the same network as your cameras
- Disable Firewall Temporarily: For initial discovery, temporarily disable firewall to ensure cameras can be found
- Run Discovery: Click the "Discover" button to find cameras on your network
- Review Results: Discovered cameras appear in the left panel with basic information
3. User Interface Overview
3.1 Main Window
The WINK ONVIF Studio interface is designed for efficiency and clarity, providing quick access to all features while maintaining a clean, professional appearance.
Window Layout
Menu Bar
- File: Import/export configurations, application preferences
- Edit: Camera operations, batch actions
- View: Interface customization, layout options
- Tools: Advanced utilities, diagnostics
- Help: Documentation, support, about
Status Bar
The bottom status bar provides real-time information:
- Connection status
- Number of cameras online/total
- Current operation progress
- Network interface in use
3.2 Camera List Panel
Tree View Structure
Cameras are displayed in a hierarchical tree structure showing:
📷 Camera Name (IP Address)
├── Status: Connected/Disconnected
├── Model: Manufacturer Model
├── Authentication: Method Used
└── Last Seen: Timestamp
Status Indicators
| Icon |
Status |
Description |
| 🟢 |
Connected |
Camera is online and authenticated |
| 🟡 |
Discovered |
Camera found but not authenticated |
| 🔴 |
Offline |
Camera unreachable or connection failed |
| ⚪ |
Unknown |
Manually added, status not checked |
Context Menu Options
Right-clicking a camera provides quick access to:
- Connect: Establish connection to camera
- Stream: Open live video viewer
- Configure: Access camera settings
- Test: Run diagnostics
- Properties: View detailed information
- Remove: Delete from list
3.3 Tab Structure
WINK ONVIF Studio organizes functionality into logical tabs:
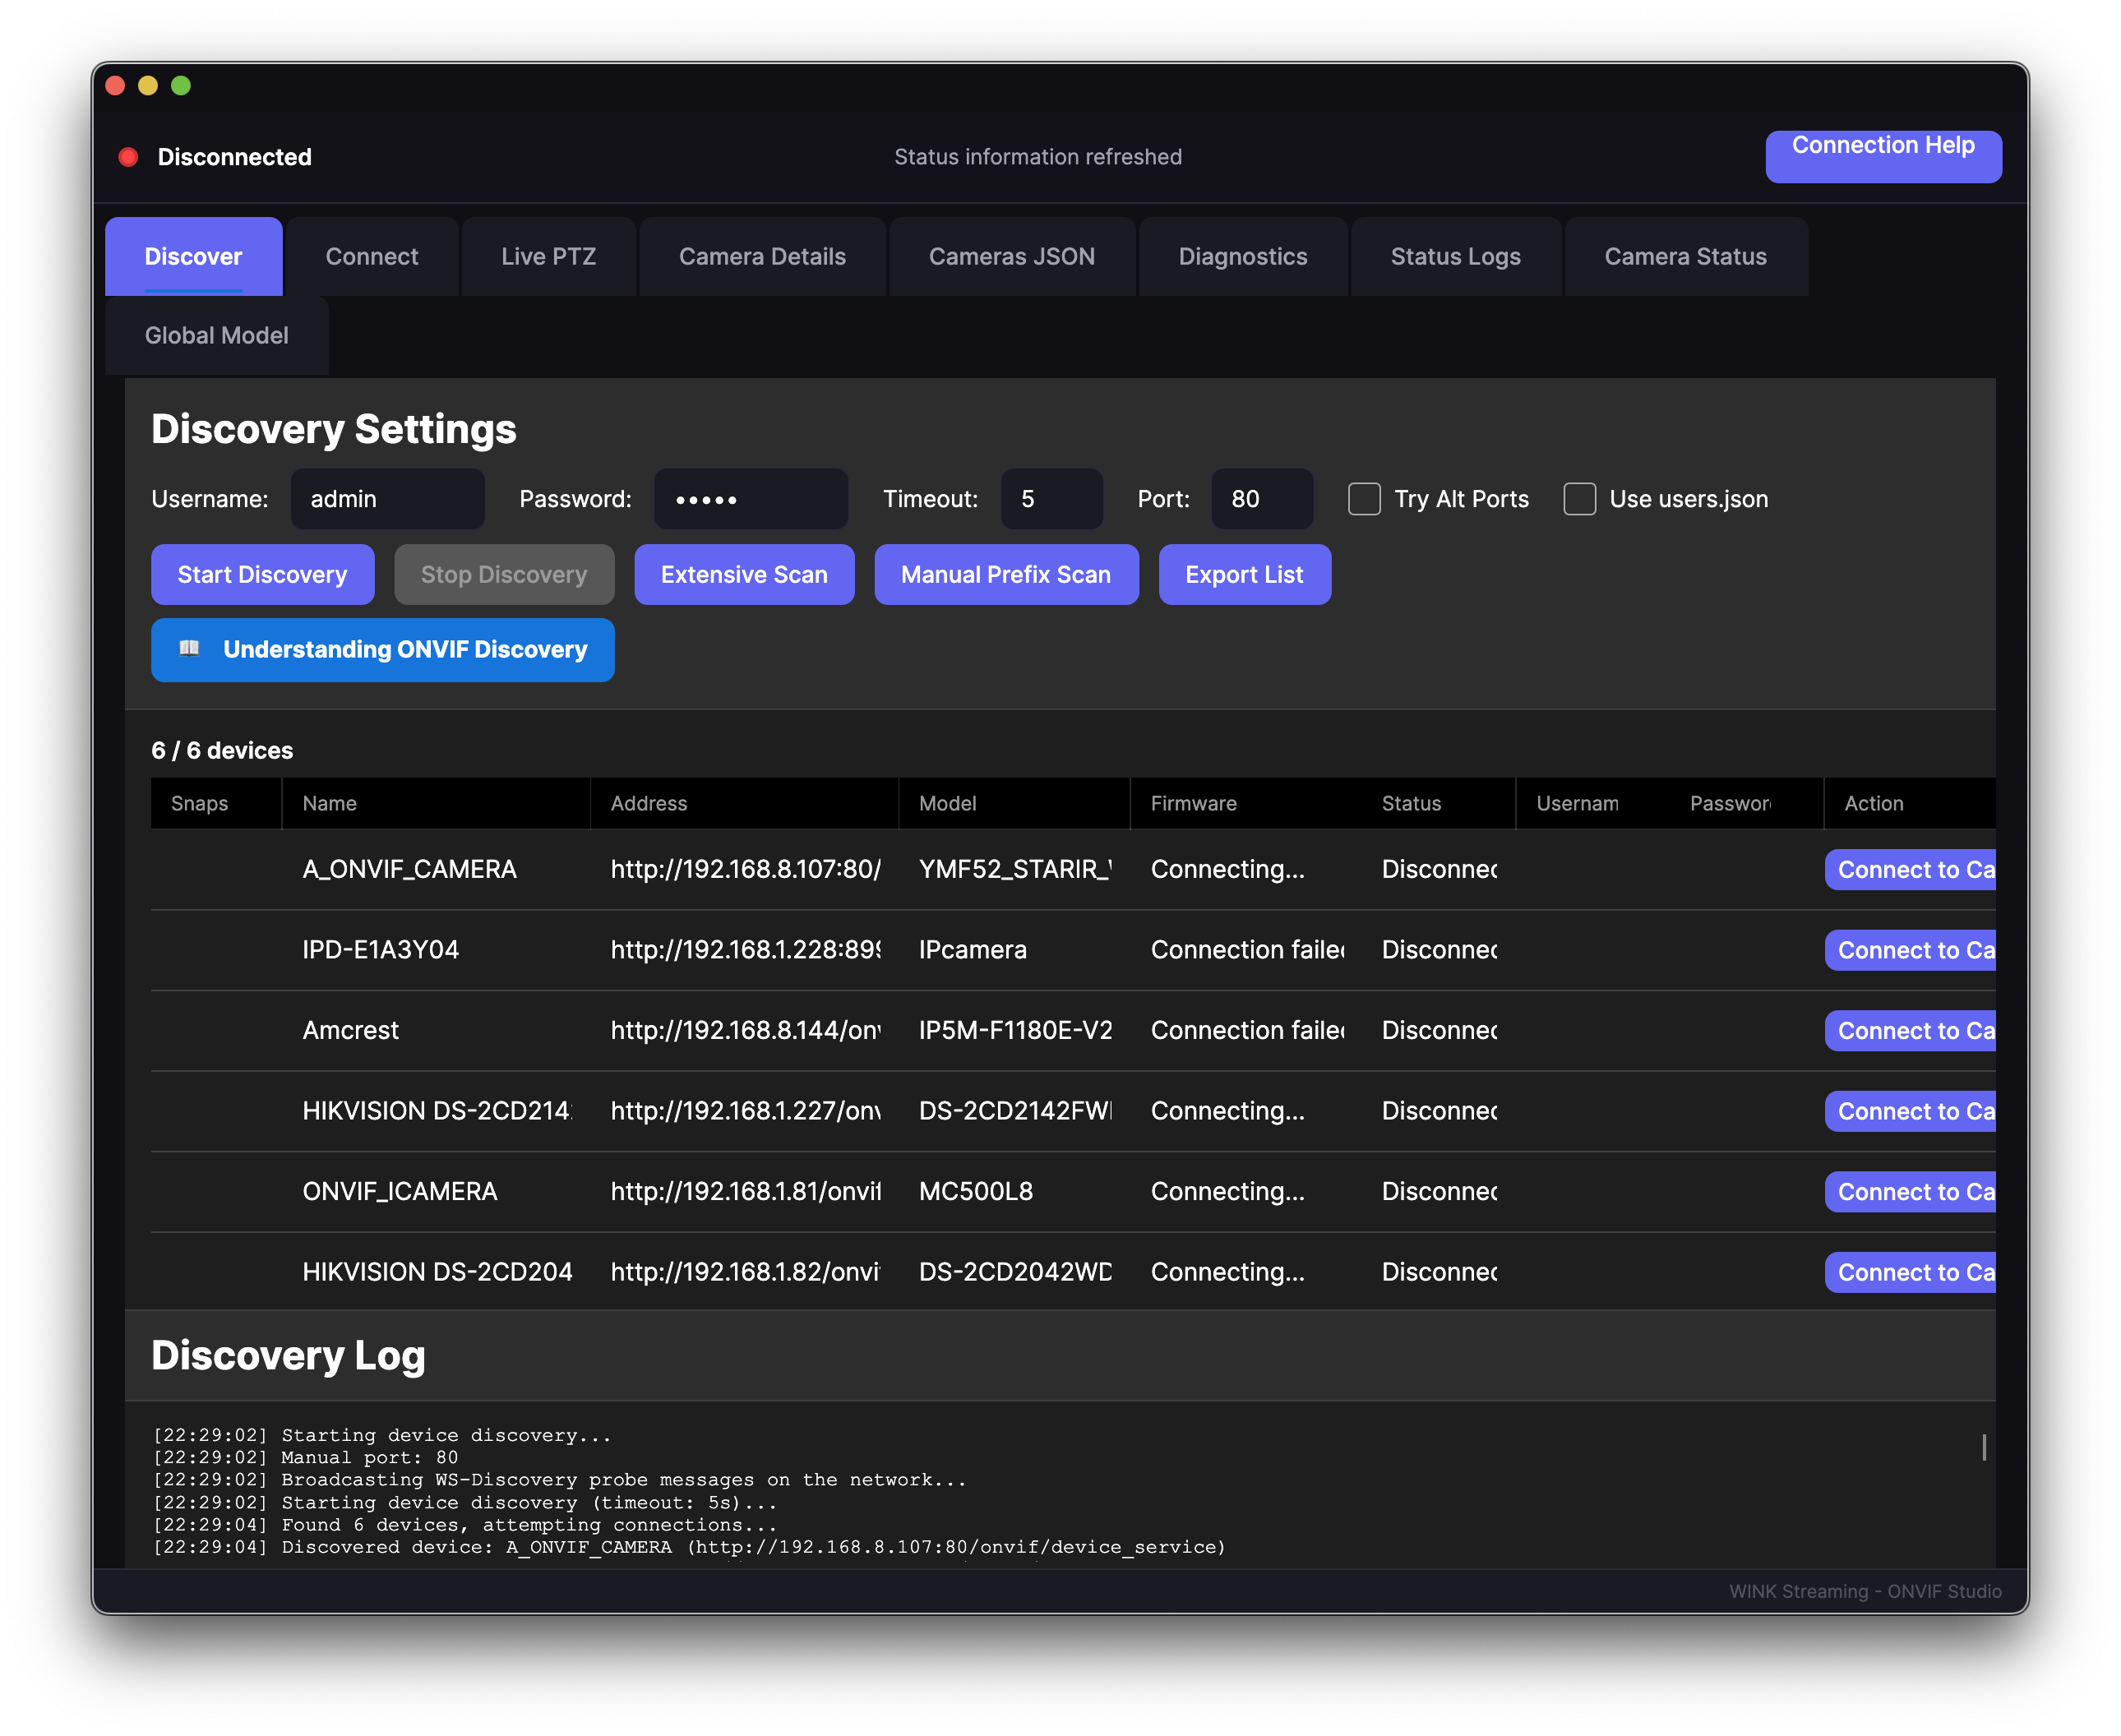
Discover Tab
Primary tab for finding cameras on your network:
- Automatic discovery controls
- Discovery options and settings
- Advanced discovery methods
- Discovery log and results
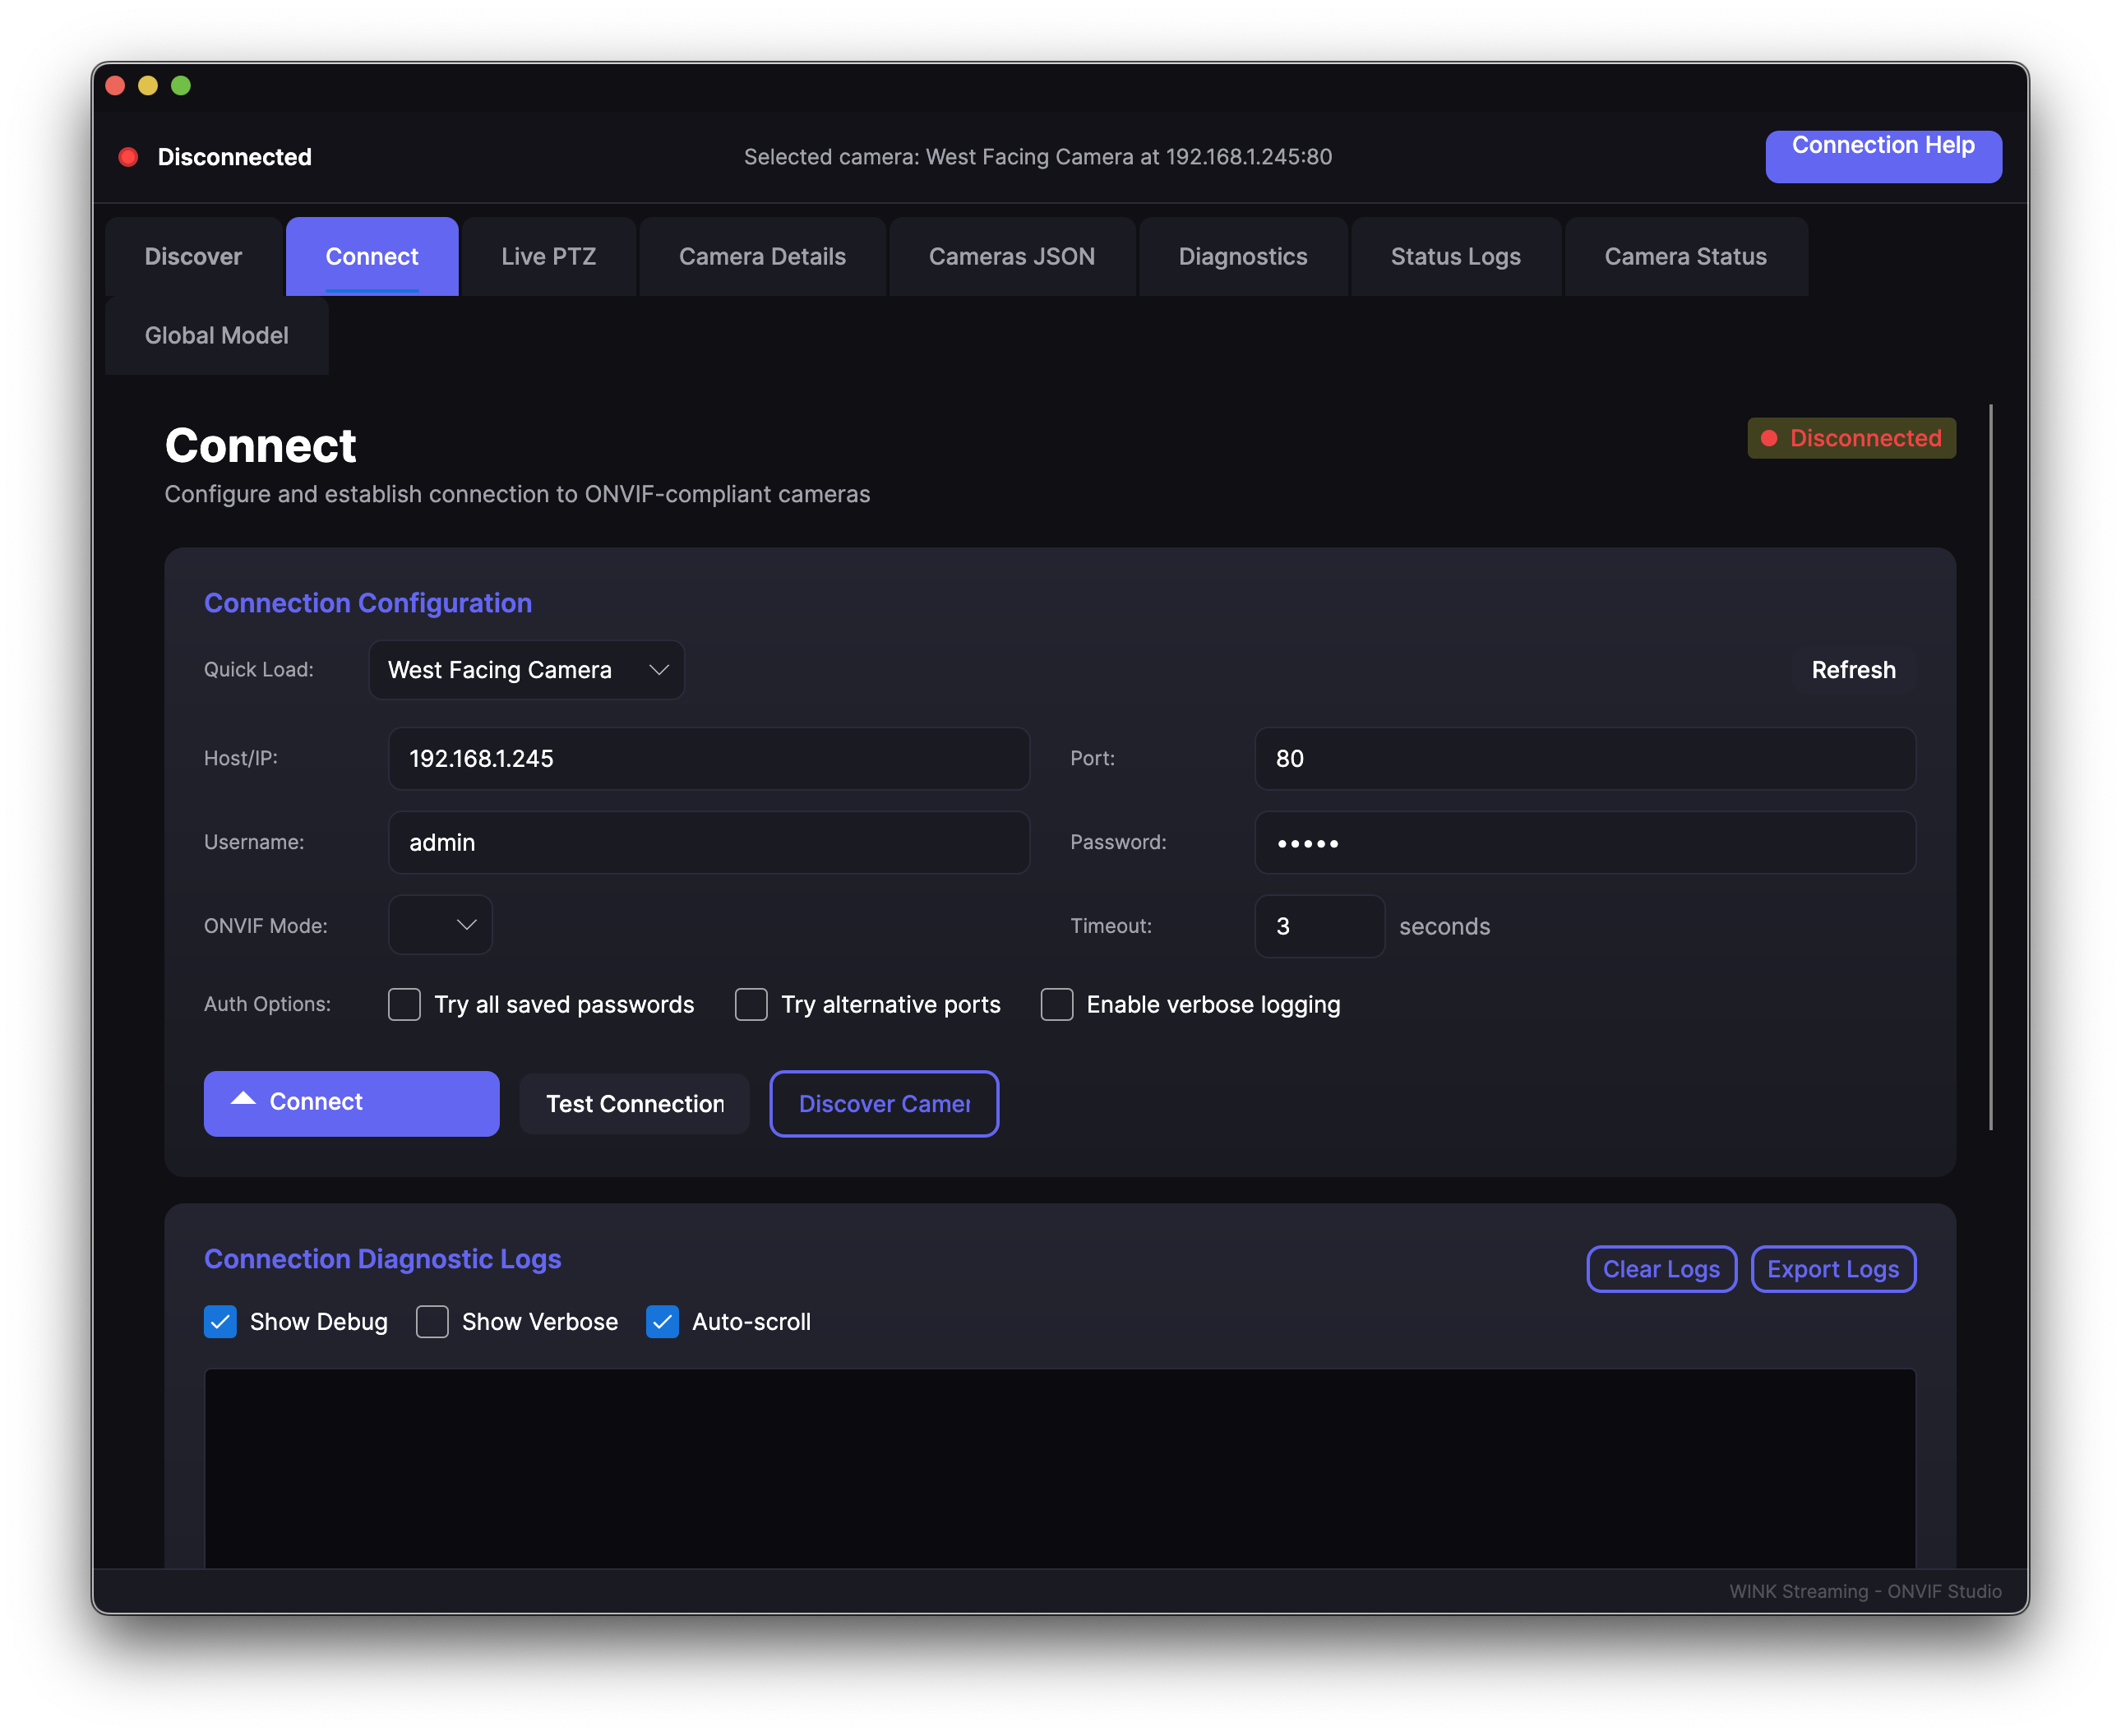
Connect Tab
Manage camera connections and authentication:
- Connection status display
- Authentication method selection
- Credential management
- Connection diagnostics
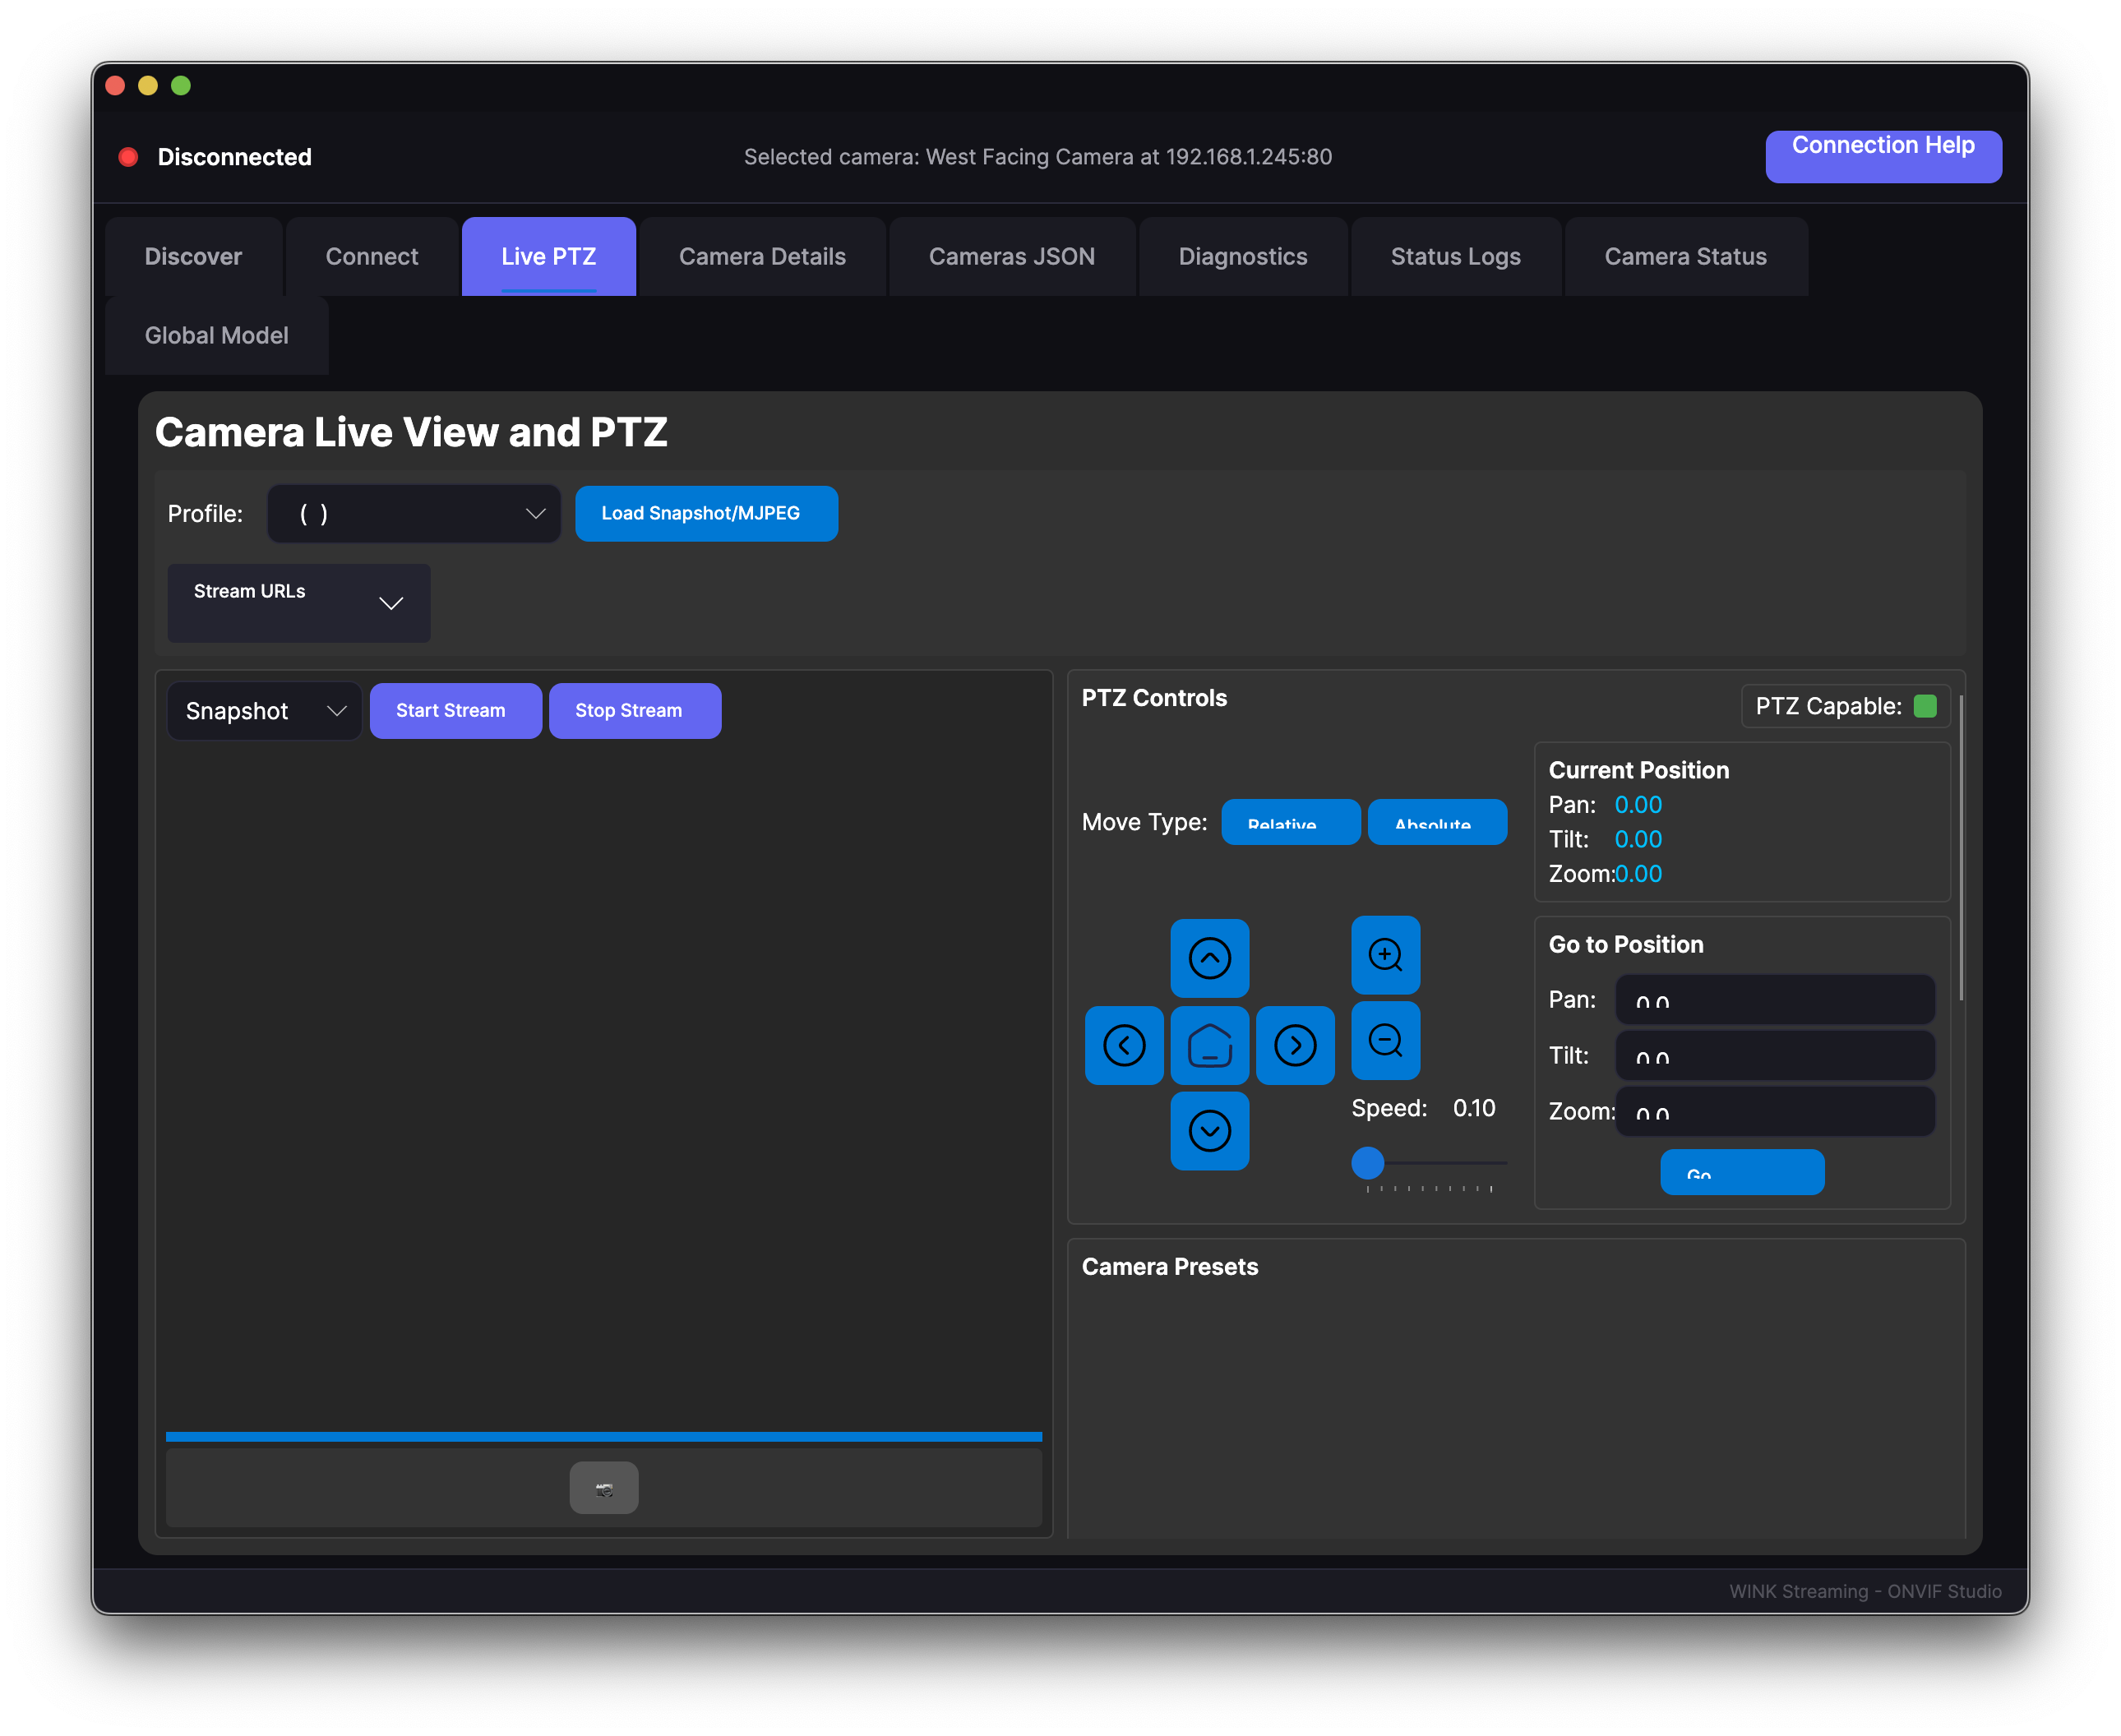
Live/PTZ Tab
Real-time video viewing and camera control:
- Live video display
- PTZ controls for supported cameras
- Preset management
- Snapshot and recording functions
Camera Details Tab
Comprehensive camera information and configuration:
- Device information
- Network configuration
- Video settings
- Service capabilities
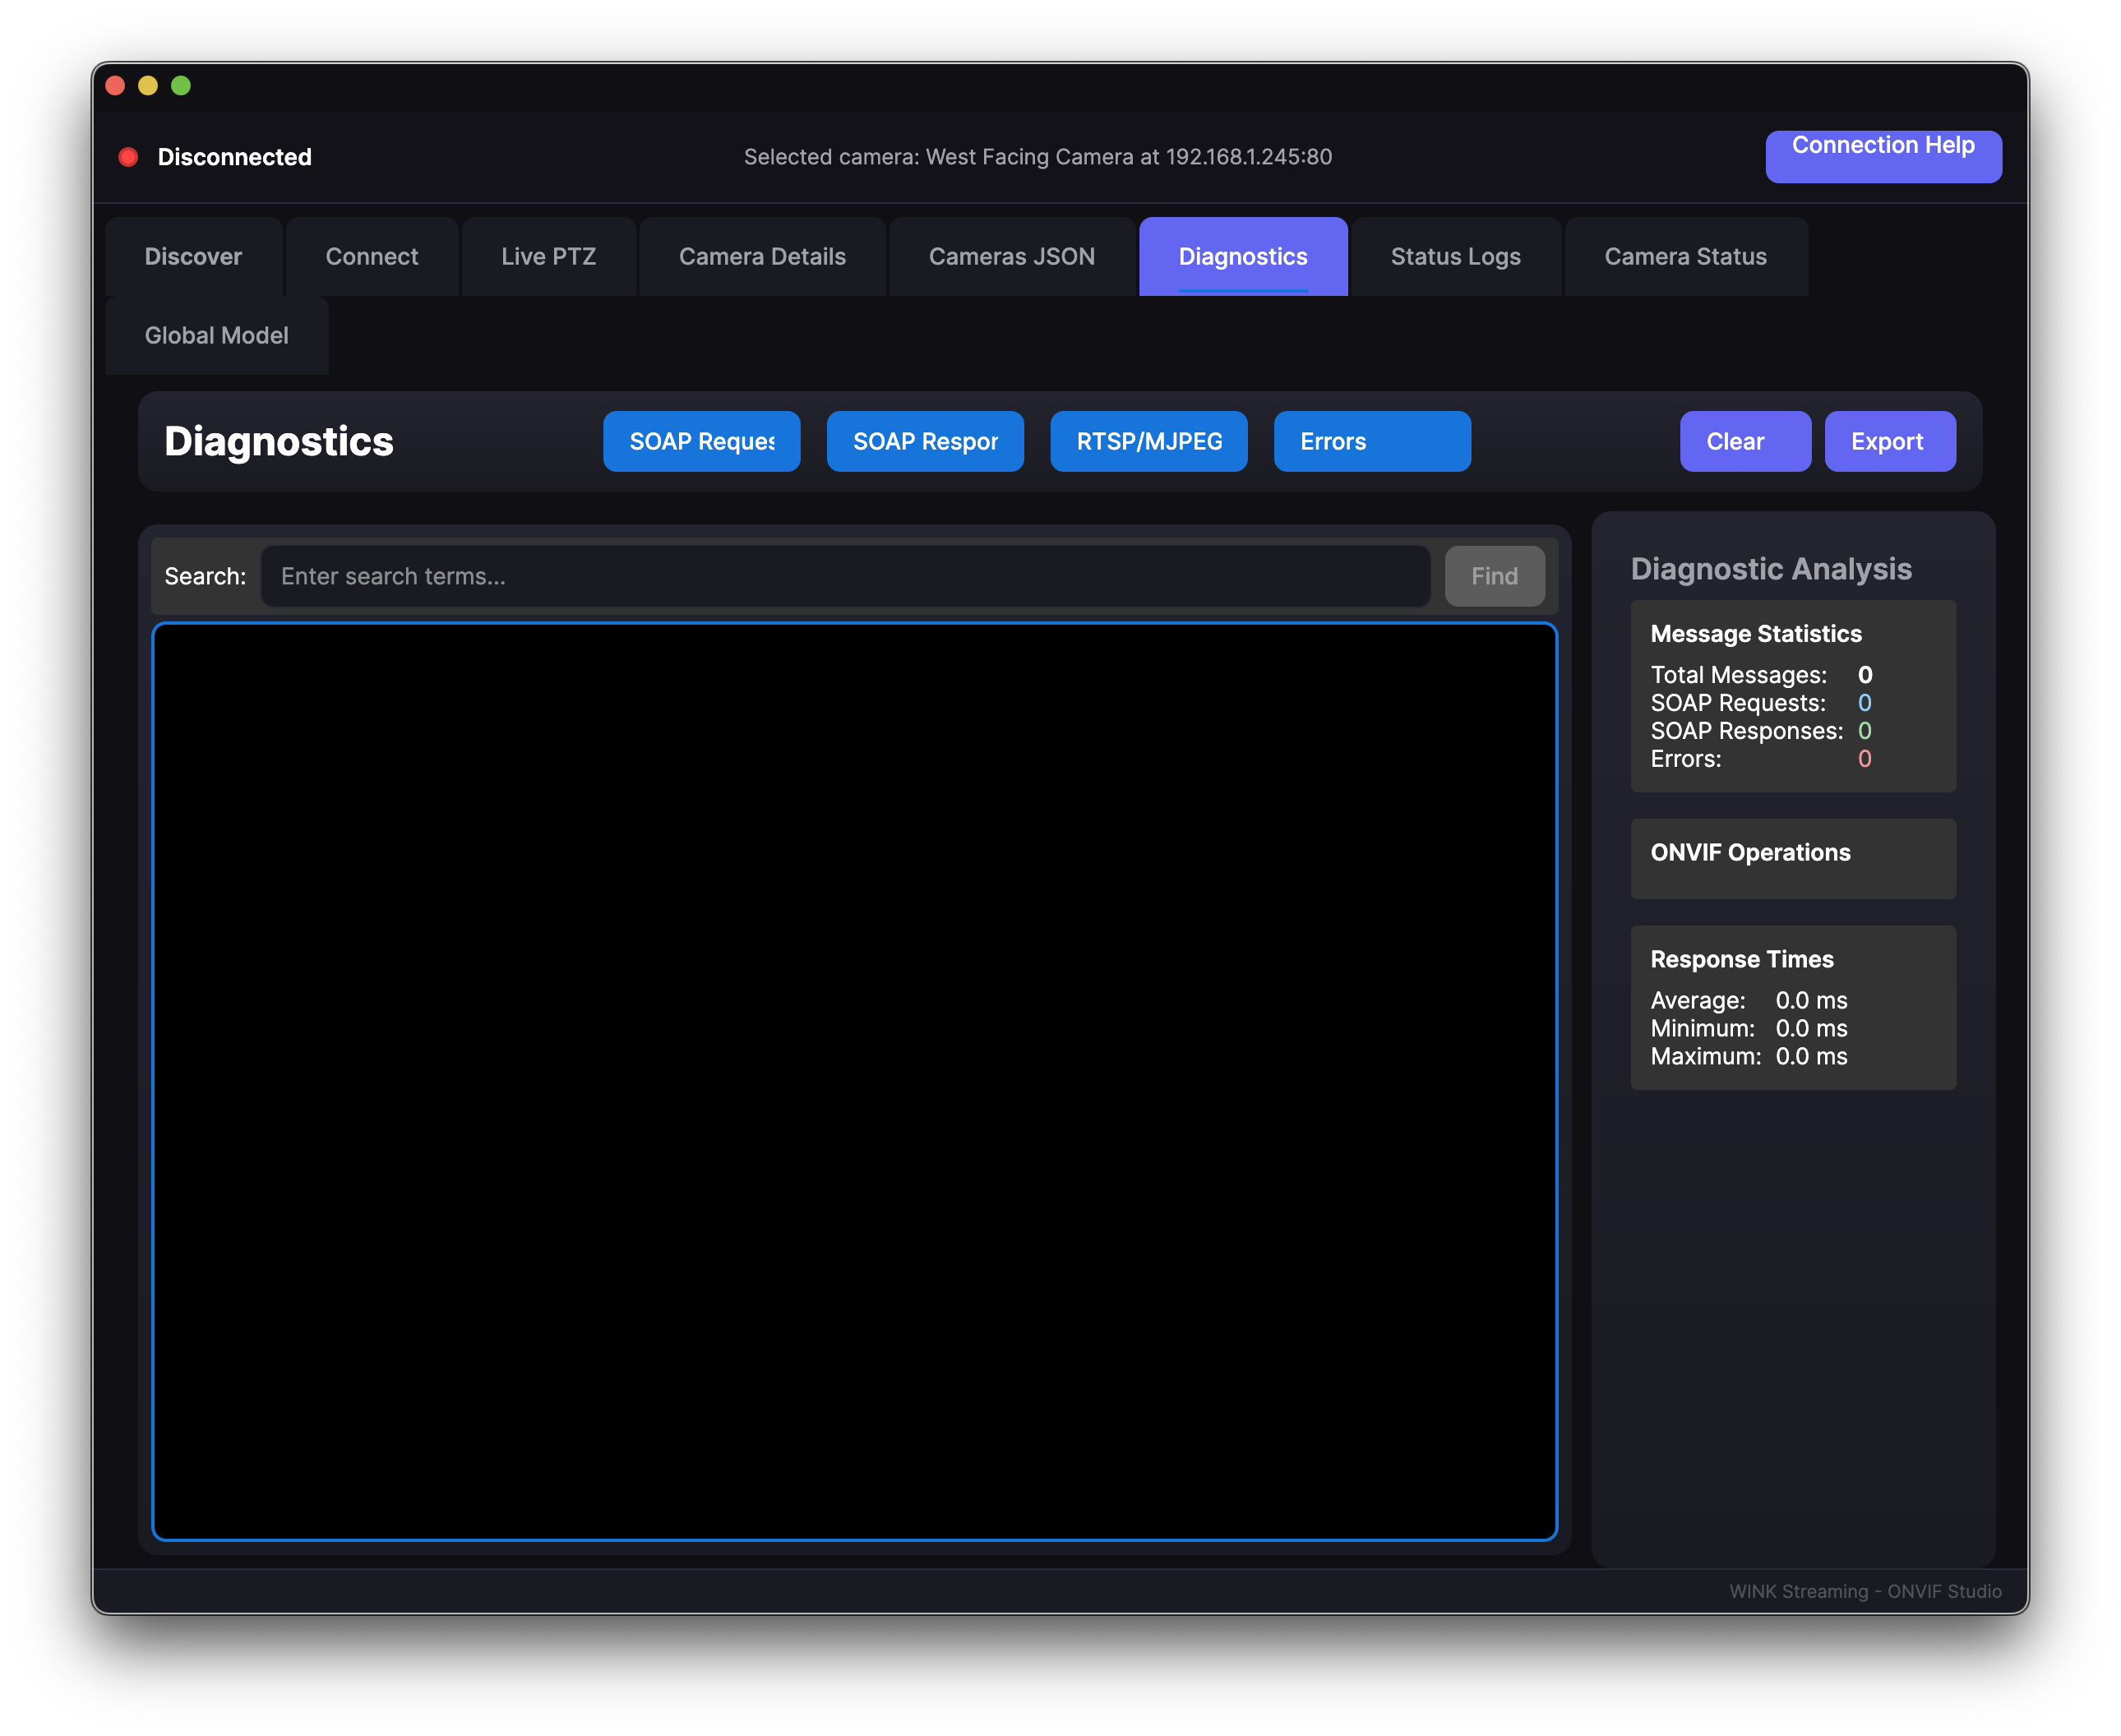
Diagnostics Tab
Testing and troubleshooting tools:
- Quick test functionality
- Detailed service testing
- SOAP message logging
- Network diagnostics
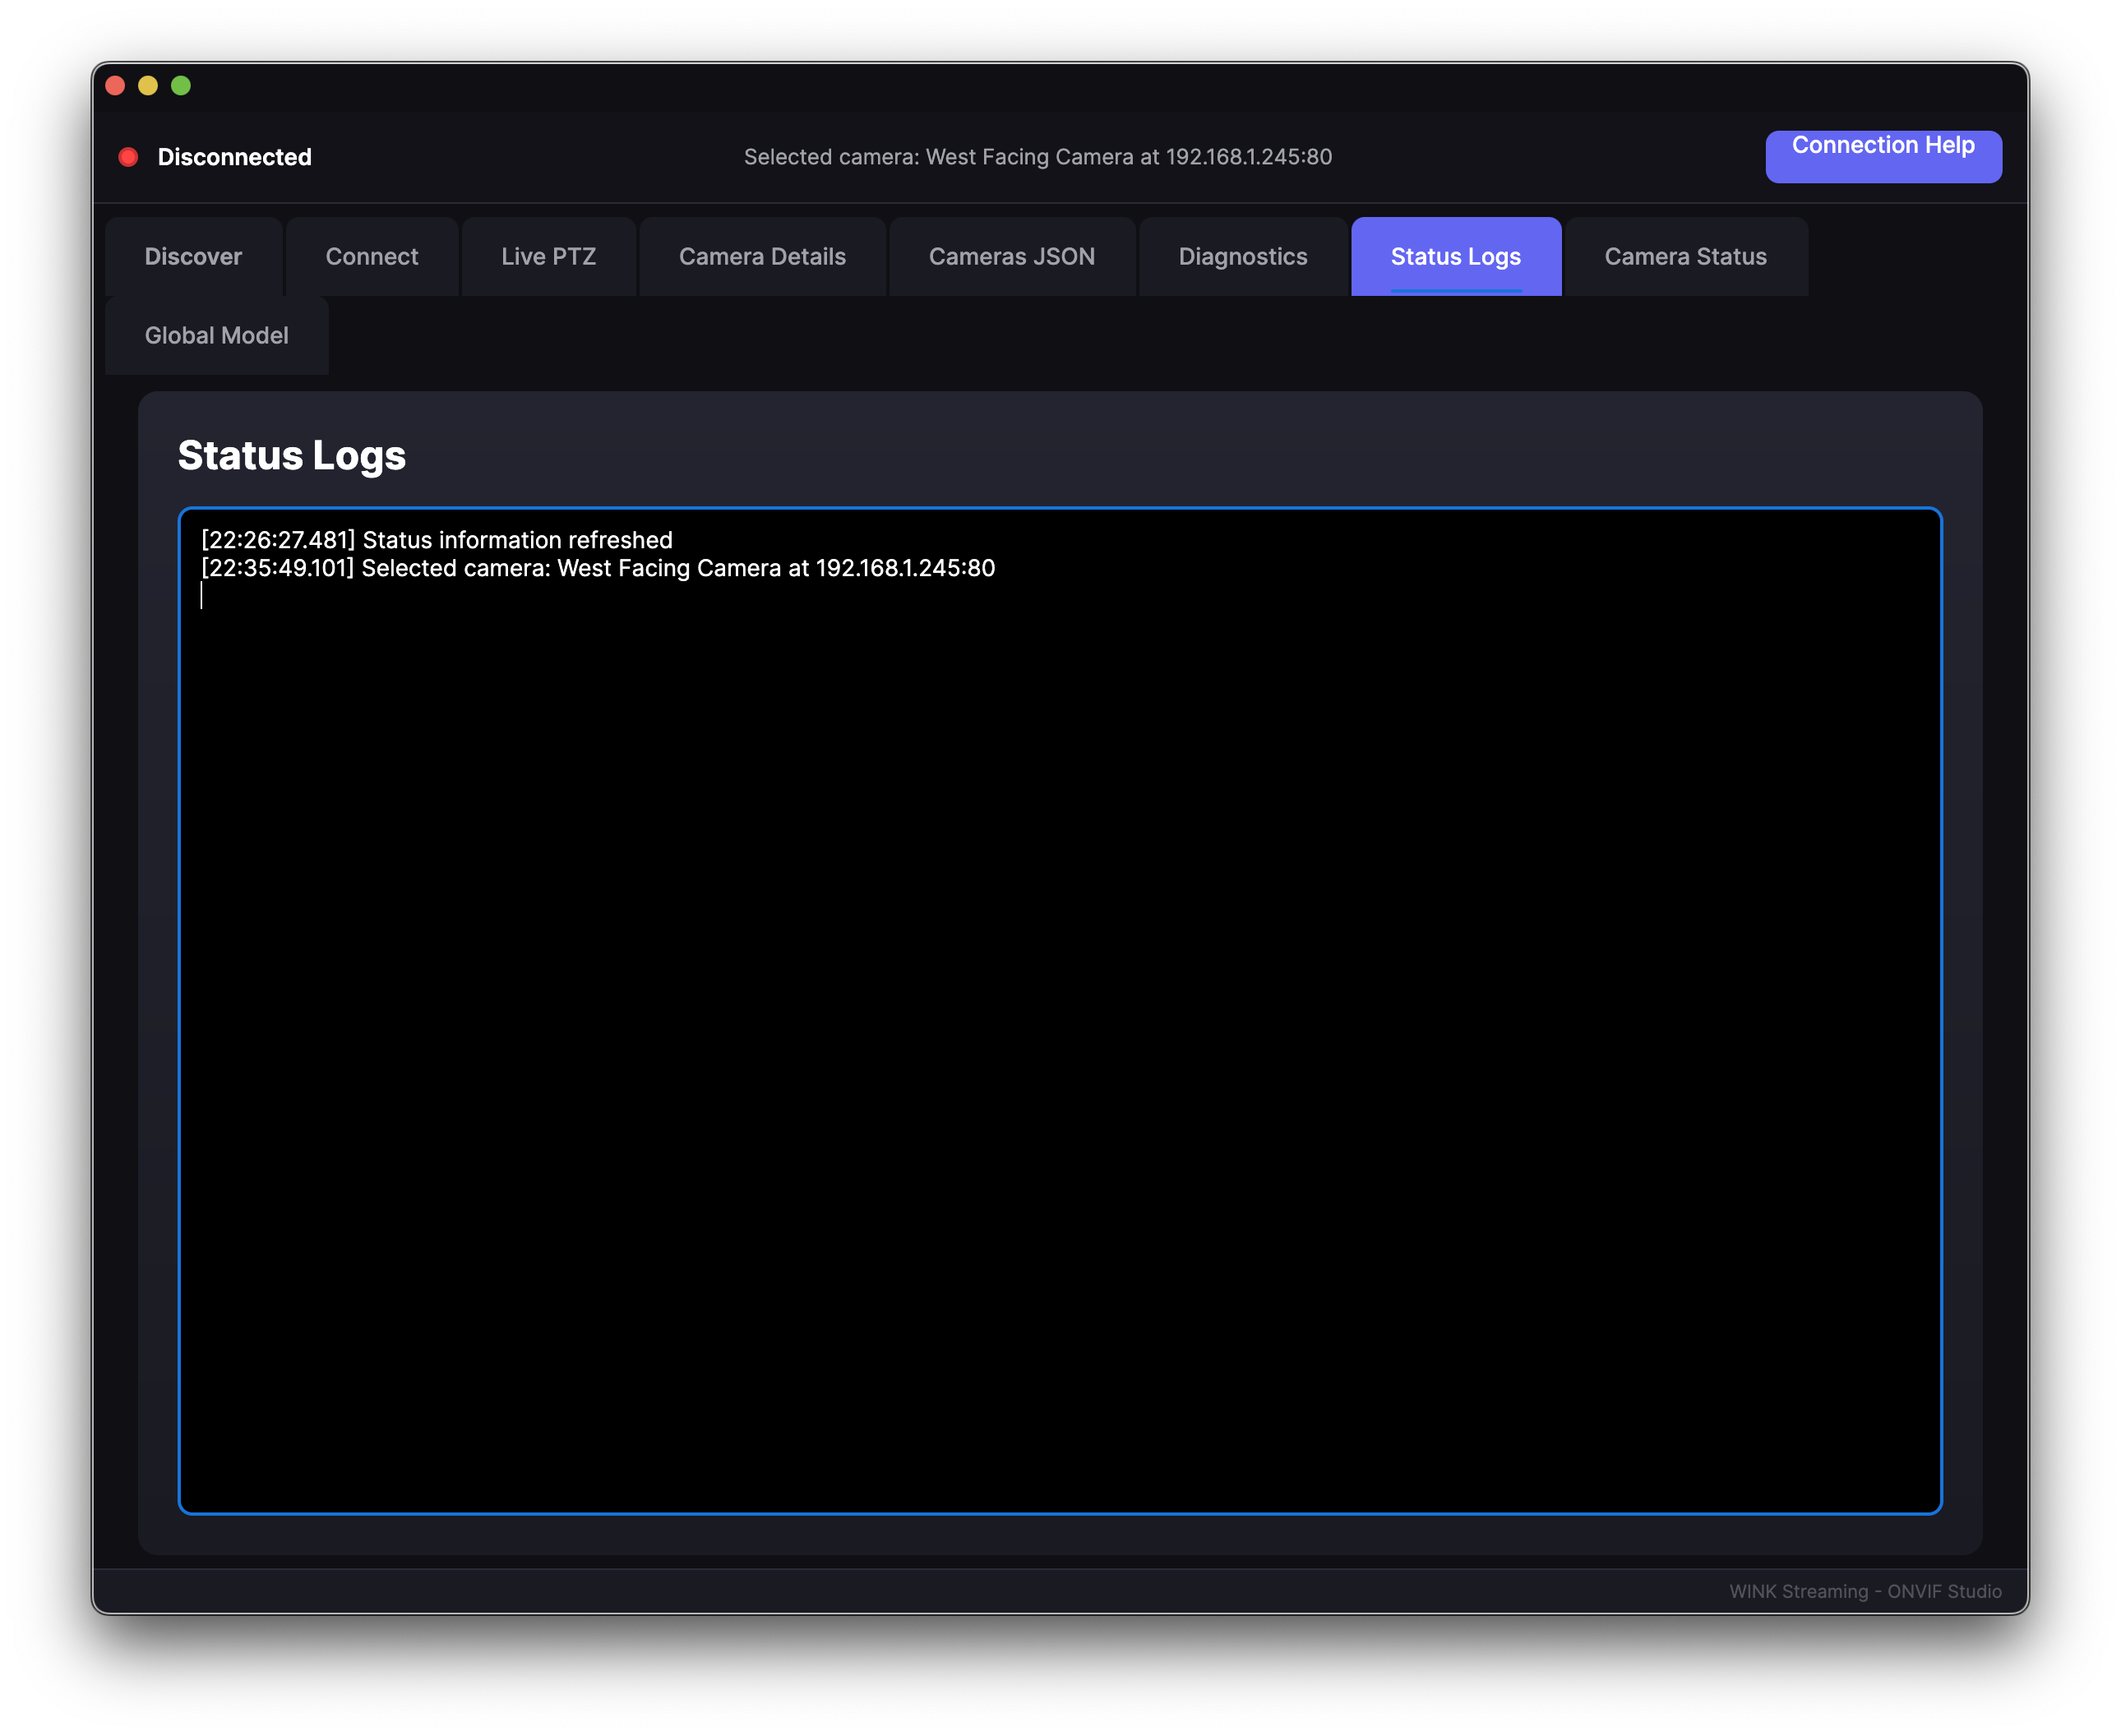
Status/Logs Tab
System monitoring and logging:
- Real-time operation logs
- Error tracking
- Debug information
- Export log functionality
4. Camera Discovery
Camera discovery is the foundation of any ONVIF management system. WINK ONVIF Studio provides multiple discovery methods to ensure you can find all cameras on your network, regardless of their configuration or network topology.
4.1 Automatic Discovery
Standard WS-Discovery
The primary discovery method uses the ONVIF WS-Discovery protocol:
- Click "Discover" Button: Initiates the discovery process
- Multicast Probe: Sends discovery packets to 239.255.255.250:3702
- Camera Response: ONVIF-compliant cameras respond with their information
- Results Display: Found cameras appear in the camera list
Discovery Process Log
[10:23:45] Starting WS-Discovery on interface 192.168.1.50
[10:23:45] Sending multicast probe to 239.255.255.250:3702
[10:23:46] Received response from 192.168.1.100
[10:23:46] Camera identified: AXIS P3245-LV
[10:23:46] Received response from 192.168.1.101
[10:23:46] Camera identified: Bosch FLEXIDOME IP 7000
[10:23:50] Discovery timeout reached
[10:23:50] Discovery complete: Found 2 cameras
Discovery Options
Network Interface Selection
Choose which network adapter to use for discovery. Essential for systems with multiple network connections.
Discovery Timeout
Adjust how long to wait for camera responses. Default is 10 seconds, but may need adjustment for larger networks.
Discovery Scope
Limit discovery to specific network segments or expand to include all accessible networks.
4.2 Manual Discovery Methods
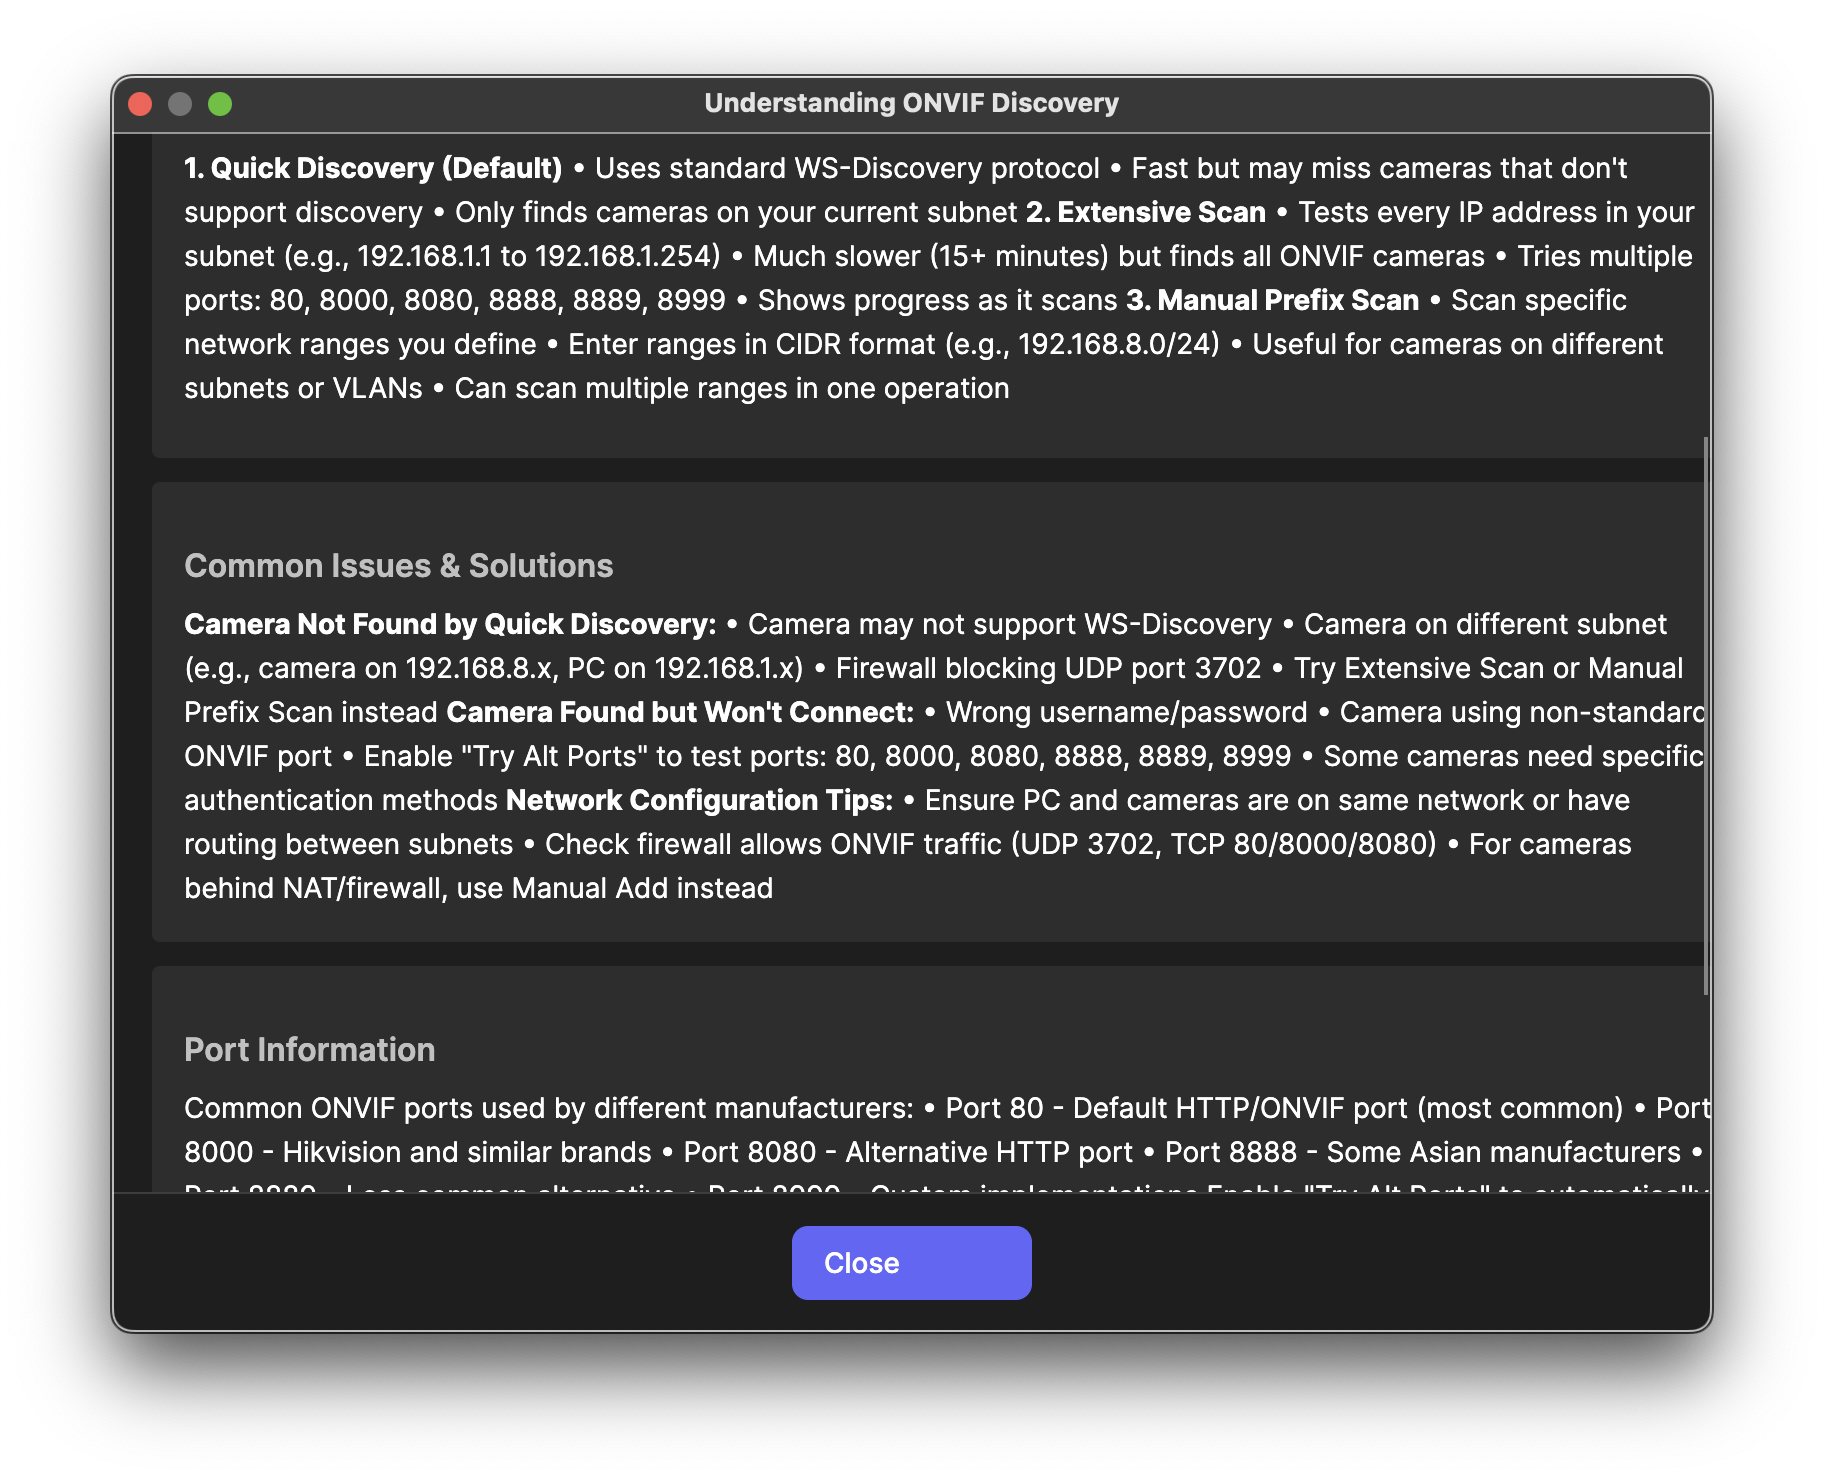
Understanding ONVIF Discovery
Click the "Understanding ONVIF Discovery" button to access comprehensive discovery documentation:
This help system covers:
- Protocol Details: How WS-Discovery works at the network level
- Common Issues: Why cameras might not be discovered
- Network Requirements: Firewall and routing considerations
- Manufacturer Quirks: Specific requirements for different brands
Extensive Scan
The Extensive Scan performs a comprehensive search of your network:
Warning: Extensive Scan can take 15-20 minutes for a /24 network. Plan accordingly and avoid running during production hours.
How Extensive Scan Works
- IP Range Detection: Automatically determines your subnet
- Sequential Scanning: Tests every IP address (e.g., 192.168.1.1-254)
- Multi-Port Testing: Checks common ONVIF ports:
- Port 80 (Default HTTP)
- Port 8000 (Hikvision default)
- Port 8080 (Alternative HTTP)
- Port 8888 (Common alternative)
- Port 8889 (Some manufacturers)
- Port 8999 (Legacy devices)
- Progress Display: Shows current IP being tested
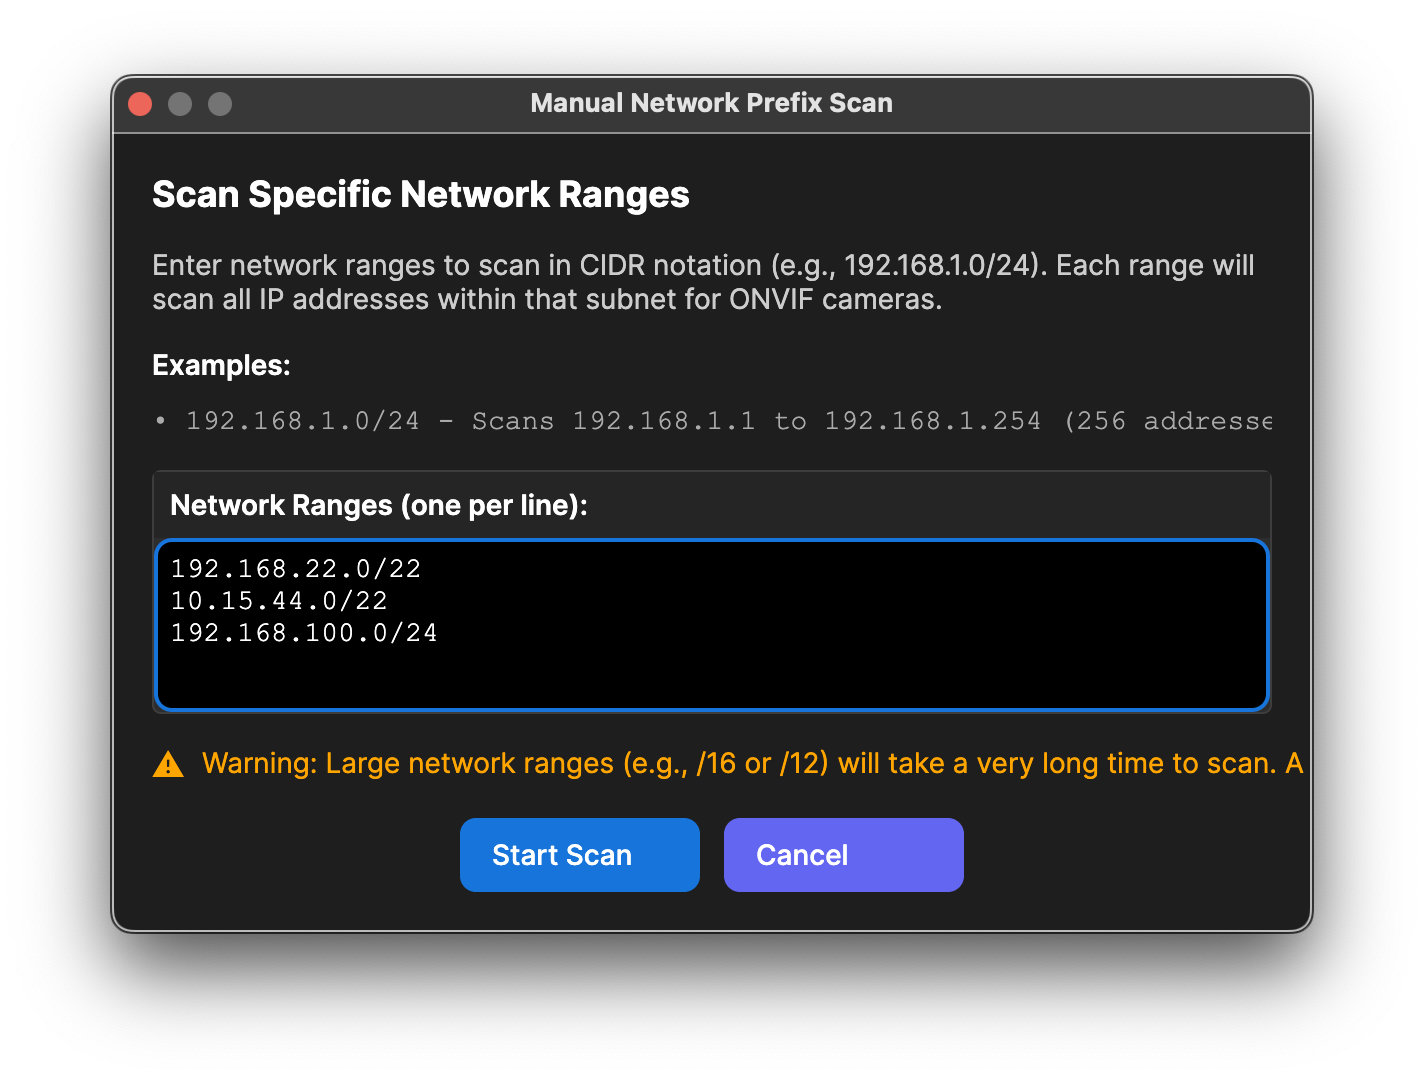
Manual Prefix Scan
For targeted discovery of specific network ranges:
Using Manual Prefix Scan
- Click "Manual Prefix Scan"
- Enter Network Ranges:
192.168.1.0/24
10.0.0.0/24
172.16.50.0/24
- Configure Options:
- Port selection
- Timeout per host
- Parallel connections
- Start Scan: Monitor progress in real-time
Manual Camera Addition
For cameras that cannot be discovered automatically:
- Click "Add Camera" Button
- Enter Camera Information:
| Field |
Description |
Example |
| Name |
Friendly name for identification |
Front Door Camera |
| IP Address |
Camera's network address |
192.168.1.200 |
| Port |
ONVIF service port |
8080 |
| Username |
Administrator username |
admin |
| Password |
Administrator password |
******** |
- Test Connection: Verify camera is accessible
- Save: Add to camera list
4.3 Understanding ONVIF Discovery
Network Requirements
For successful discovery, ensure:
- Same Subnet: Cameras and PC on same network segment
- Multicast Enabled: Network allows multicast traffic
- Firewall Rules: UDP port 3702 open for discovery
- ONVIF Enabled: Cameras have ONVIF service activated
Common Discovery Issues
Tip: If automatic discovery fails, try these steps in order:
- Disable firewall temporarily
- Use Extensive Scan
- Try Manual Prefix Scan with specific ranges
- Add cameras manually
Cameras Not Appearing
- Different Subnet: Use Manual Prefix Scan for other ranges
- VLAN Isolation: Ensure routing between VLANs
- Firewall Blocking: Check both Windows and network firewalls
- ONVIF Disabled: Enable in camera web interface
Partial Discovery
- Authentication Required: Some cameras need login for full info
- Limited ONVIF Support: Camera may support subset of features
- Firmware Issues: Update camera firmware
5. Connecting to Cameras
5.1 Authentication Methods
WINK ONVIF Studio supports all standard ONVIF authentication methods, automatically detecting and using the appropriate method for each camera.
Supported Authentication Types
WS-Security (WSSE)
The most secure ONVIF authentication method using username tokens with digest passwords and timestamps. Prevents replay attacks and password sniffing.
HTTP Digest Authentication
Standard HTTP authentication using MD5 hashing. Widely supported by older cameras and provides reasonable security.
HTTP Basic Authentication
Simple username/password authentication. Less secure but sometimes required for legacy devices. Credentials sent in Base64 encoding.
Authentication Process
WINK ONVIF Studio uses an intelligent authentication system:
- Initial Probe: Test connection without authentication
- Method Detection: Analyze response to determine required authentication
- Sequential Testing: Try methods in order of security preference
- Success Caching: Remember successful method for future connections
Authentication Sequence
Connection attempt to 192.168.1.100:80
├── Try SOAP 1.2 + WSSE ──────► Success ✓
├── Try SOAP 1.2 + Digest ────► (Skipped)
├── Try SOAP 1.2 + Basic ─────► (Skipped)
├── Try SOAP 1.1 + WSSE ──────► (Skipped)
└── Connection established with SOAP 1.2 + WSSE
5.2 Connection Process
Establishing a Connection
- Select Camera: Click on camera in the list
- Enter Credentials:
- Username: Camera administrator account
- Password: Administrator password
- Save Credentials: Optional, encrypted storage
- Click Connect: Initiates connection process
- Monitor Progress: Watch status in log window
Connection Status Indicators
| Status |
Indicator |
Meaning |
Next Steps |
| Connecting |
🔄 Spinner |
Connection in progress |
Wait for completion |
| Connected |
✅ Check |
Successfully authenticated |
Access all features |
| Failed |
❌ Cross |
Connection unsuccessful |
Check diagnostics |
| Partial |
⚠️ Warning |
Limited functionality |
Review capabilities |
Post-Connection Actions
Once connected, WINK ONVIF Studio automatically:
- Retrieves device information
- Queries available services
- Fetches camera capabilities
- Gets streaming profiles
- Checks PTZ support
5.3 Troubleshooting Connections
Common Connection Problems
Authentication Failures
Important: Many cameras require a specific ONVIF user account separate from the web interface admin account.
Problem: "Authentication Failed" error
Solutions:
- Verify username and password are correct
- Check if camera requires ONVIF-specific user:
- Access camera web interface
- Navigate to User Management
- Create ONVIF user with appropriate permissions
- Try default credentials:
- admin/admin
- admin/(blank)
- root/pass
- Check manufacturer defaults
Connection Timeouts
Problem: "Connection Timeout" error
Solutions:
- Verify network connectivity:
ping 192.168.1.100
- Check correct ONVIF port:
- Try common ports: 80, 8000, 8080, 8888
- Check camera documentation
- Use port scanner to find open ports
- Increase timeout setting:
- Settings → Connection → Timeout
- Increase to 30 seconds for slow networks
Service Not Found
Problem: "No ONVIF Services Found"
Solutions:
- Ensure ONVIF is enabled:
- Access camera web interface
- Find ONVIF/Web Services settings
- Enable ONVIF service
- Restart camera if required
- Update camera firmware:
- Check manufacturer website
- Download latest firmware
- Follow update procedure
- Try legacy connection mode:
- Settings → Advanced → Legacy Mode
- Enables compatibility with older ONVIF versions
Using Diagnostics Tab
The Diagnostics tab provides detailed connection troubleshooting:
Diagnostic Tests
- Network Test: Ping and port accessibility
- ONVIF Probe: Service endpoint discovery
- Authentication Test: Try all auth methods
- Capability Query: Retrieve supported features
- SOAP Logging: View raw XML messages
6. Live Video Streaming
6.1 Setting Up Streams
WINK ONVIF Studio provides integrated video streaming capabilities using VLC libraries for maximum compatibility and performance.
Starting a Live Stream
- Connect to Camera: Ensure camera shows connected status
- Select Live/PTZ Tab: Switch to streaming interface
- Choose Profile:
- Main Stream: High quality, full resolution
- Sub Stream: Lower bandwidth, reduced resolution
- Mobile Stream: Optimized for remote viewing
- Click Play: Initiates video stream
Stream Configuration Options
| Setting |
Options |
Description |
| Protocol |
RTSP, RTP/RTSP, RTP/HTTP |
Transport protocol for video stream |
| Transport |
UDP, TCP, HTTP |
Network transport method |
| Buffer |
0-5000ms |
Stream buffering for smooth playback |
| Hardware Decode |
On/Off |
Use GPU for video decoding |
Multi-Stream Viewing
View multiple cameras simultaneously:
- Open first camera stream
- Right-click another camera
- Select "Open in New Window"
- Arrange windows as needed
- Use Window → Tile to organize
6.2 PTZ Controls
PTZ Interface Overview
For cameras with Pan/Tilt/Zoom capabilities, comprehensive controls are provided:
Directional Controls
           [↑]
        [↖] [⬆] [↗]
     [←] [◼] [→]     [+] Zoom In
        [↙] [⬇] [↘]     [-] Zoom Out
           [↓]
Click arrows for movement, center square for home position
PTZ Features
Movement Speed Control
- Slider: Adjust pan/tilt speed (1-100%)
- Fine Control: Hold Shift for slower movement
- Continuous: Hold button for continuous motion
Preset Positions
- Go to Preset: Click numbered button (1-9)
- Set Preset:
- Position camera as desired
- Right-click preset number
- Select "Set Current Position"
- Clear Preset: Right-click → Clear
- Rename Preset: Right-click → Rename
Advanced PTZ Functions
Note: Advanced features depend on camera capabilities. Not all cameras support all functions.
- Tours: Automated movement between presets
- Create custom tour sequences
- Set dwell time per position
- Configure transition speed
- Patterns: Record manual movements
- Start recording
- Move camera manually
- Stop and save pattern
- Replay on demand
- Auto-Tracking: Follow moving objects (if supported)
- Privacy Masks: Block sensitive areas
6.3 Snapshots and Recording
Taking Snapshots
Capture still images from the video stream:
- Method 1: Click camera icon in video window
- Method 2: Right-click video → Take Snapshot
- Method 3: Press 'S' key when video window focused
Snapshot Settings
- Format: JPEG, PNG, BMP
- Quality: 70-100% for JPEG
- Location: Configure save directory
- Naming: Automatic with timestamp or custom
Video Recording
Record live video streams for later review:
Starting Recording
- Ensure stream is active
- Click record button (red circle)
- Recording indicator appears
- Click stop button to end
Recording Options
| Setting |
Options |
Recommendation |
| Format |
MP4, AVI, MKV |
MP4 for compatibility |
| Codec |
H.264, H.265, Copy |
Copy to avoid re-encoding |
| Audio |
Include/Exclude |
Include if available |
| Max Duration |
No limit, 1-60 min |
Set limit for auto-split |
Tip: Use "Copy" codec to record the original stream without re-encoding, saving CPU and maintaining quality.
7. Camera Configuration
WINK ONVIF Studio provides comprehensive camera configuration capabilities, allowing you to modify settings without accessing each camera's web interface.
7.1 Network Settings
IP Configuration
Caution: Changing network settings can make the camera unreachable. Ensure you have physical access to the camera before making changes.
Static IP Configuration
- Select camera from list
- Navigate to Camera Details tab
- Click "Network Configuration"
- Select "Static IP"
- Enter network details:
- IP Address: Unique address in your subnet
- Subnet Mask: Typically 255.255.255.0
- Gateway: Your router's IP address
- Primary DNS: DNS server address
- Secondary DNS: Backup DNS (optional)
- Click "Apply Changes"
- Camera will reboot with new settings
DHCP Configuration
- Select "DHCP" option
- Enable "DHCP Client"
- Optionally set hostname
- Apply changes
- Note new IP from DHCP server
Port Configuration
| Service |
Default Port |
Common Alternatives |
Purpose |
| HTTP |
80 |
8080, 8000 |
Web interface & ONVIF |
| HTTPS |
443 |
8443 |
Secure web access |
| RTSP |
554 |
8554 |
Video streaming |
| ONVIF |
80 |
8000, 8080 |
ONVIF services |
7.2 Video Settings
Video Profiles
Most cameras support multiple video profiles for different use cases:
Main Stream Profile
- Resolution: Maximum (e.g., 4K, 1080p)
- Frame Rate: 25-30 fps
- Bitrate: 4-8 Mbps
- Use Case: Recording, main viewing
Sub Stream Profile
- Resolution: Reduced (e.g., D1, CIF)
- Frame Rate: 10-15 fps
- Bitrate: 512-1024 Kbps
- Use Case: Multi-camera viewing, mobile
Encoding Settings
Codec Selection
- H.264: Universal compatibility, moderate compression
- H.265/HEVC: Better compression, requires more processing
- MJPEG: Low latency, high bandwidth
Bitrate Control
- CBR (Constant): Fixed bitrate, predictable bandwidth
- VBR (Variable): Better quality, variable bandwidth
- Target Bitrate: Set based on network capacity
GOP Settings
- I-Frame Interval: Typically 1-2 seconds
- Shorter GOP: Better for PTZ, more bandwidth
- Longer GOP: Better compression, seek delays
7.3 Image Settings
Basic Image Adjustments
| Setting |
Range |
Default |
Effect |
| Brightness |
0-100 |
50 |
Overall image lightness |
| Contrast |
0-100 |
50 |
Difference between light/dark |
| Saturation |
0-100 |
50 |
Color intensity |
| Sharpness |
0-100 |
50 |
Edge enhancement |
Advanced Image Features
Wide Dynamic Range (WDR)
- Balances bright and dark areas
- Essential for entrances, windows
- May reduce frame rate
- Levels typically 1-3 or percentage
Day/Night Settings
- Auto: Camera decides based on light
- Day: Force color mode
- Night: Force B&W with IR
- Schedule: Time-based switching
Noise Reduction
- 2D NR: Spatial noise reduction
- 3D NR: Temporal noise reduction
- Higher values = smoother image, possible blur
- Balance with lighting conditions
7.4 Date & Time Configuration
Time Synchronization Options
Important: Accurate time is critical for forensic video evidence and multi-camera synchronization.
Manual Time Setting
- Select "Manual" time mode
- Enter date and time
- Select timezone
- Enable/disable daylight saving
- Apply settings
NTP Configuration
- Enable "NTP Sync"
- Configure NTP servers:
- Primary: pool.ntp.org
- Secondary: time.google.com
- Custom: Your local NTP server
- Set sync interval (typically 1-24 hours)
- Apply and verify sync status
Sync with PC Time
- Click "Sync with PC"
- Confirm timezone matches
- Apply immediately
- Useful for initial setup
8. Diagnostics & Testing
Comprehensive diagnostics ensure your cameras are functioning correctly and help troubleshoot issues quickly.
8.1 Quick Test
The Quick Test provides a rapid health check of camera functionality:
Running Quick Test
- Select camera(s) from list
- Click "Test" button
- View results in diagnostics window
Quick Test Results
=== Quick Test Results: Office Camera (192.168.1.100) ===
✓ Network Connectivity     : OK (Response time: 12ms)
✓ ONVIF Service           : Available (Version 2.6)
✓ Authentication          : WSSE authentication successful
✓ Device Information      : Retrieved successfully
✓ Media Service           : Available (3 profiles)
✓ PTZ Service            : Available (Continuous + Presets)
✓ Event Service          : Available
✓ Stream URL             : rtsp://192.168.1.100:554/stream1
⚠ Analytics Service      : Not supported
✓ Recording Service      : Available

Overall Status: PASS (9/10 tests passed)
Test Duration: 2.3 seconds
Understanding Test Results
| Test |
What It Checks |
Common Issues |
| Network Connectivity |
Basic network reach |
Firewall, wrong IP |
| ONVIF Service |
ONVIF endpoint available |
ONVIF disabled, wrong port |
| Authentication |
Credentials work |
Wrong password, user permissions |
| Device Information |
Can retrieve camera info |
Partial ONVIF support |
| Media Service |
Streaming capabilities |
No configured profiles |
8.2 Detailed Diagnostics
Network Diagnostics
Ping Test
Pinging 192.168.1.100...
Reply from 192.168.1.100: bytes=32 time=1ms TTL=64
Reply from 192.168.1.100: bytes=32 time=1ms TTL=64
Reply from 192.168.1.100: bytes=32 time=1ms TTL=64
Reply from 192.168.1.100: bytes=32 time=1ms TTL=64

Ping statistics for 192.168.1.100:
    Packets: Sent = 4, Received = 4, Lost = 0 (0% loss)
    Average time = 1ms
Port Scan
Port Scan Results for 192.168.1.100:
Port 80    : Open (HTTP/ONVIF)
Port 443   : Closed
Port 554   : Open (RTSP)
Port 8000  : Closed
Port 8080  : Closed
ONVIF Service Testing
Service Discovery
Tests each ONVIF service endpoint:
- Device Service: Core functionality
- Media Service: Streaming configuration
- PTZ Service: Pan/Tilt/Zoom control
- Events Service: Motion, alarms
- Analytics Service: Video analytics
- Recording Service: Edge recording
Capability Testing
Detailed capability enumeration:
=== Device Capabilities ===
Network:
  ✓ IPFilter
  ✓ ZeroConfiguration
  ✓ IPVersion6
  ✗ DynDNS
  ✓ Dot11Configuration

System:
  ✓ DiscoveryResolve
  ✓ DiscoveryBye
  ✓ RemoteDiscovery
  ✓ SystemBackup
  ✓ FirmwareUpgrade
SOAP Message Logging
View raw ONVIF communication:
Tip: SOAP logging is invaluable for troubleshooting authentication and compatibility issues.
Request Example
<soap:Envelope xmlns:soap="http://www.w3.org/2003/05/soap-envelope">
  <soap:Header>
    <wsse:Security>
      <wsse:UsernameToken>
        <wsse:Username>admin</wsse:Username>
        <wsse:Password Type="...#PasswordDigest">...</wsse:Password>
        <wsse:Nonce>...</wsse:Nonce>
        <wsu:Created>2025-01-15T10:30:00Z</wsu:Created>
      </wsse:UsernameToken>
    </wsse:Security>
  </soap:Header>
  <soap:Body>
    <tds:GetDeviceInformation/>
  </soap:Body>
</soap:Envelope>
8.3 Batch Testing
Test multiple cameras simultaneously for efficiency:
Performing Batch Tests
- Select multiple cameras (Ctrl+Click)
- Click "Batch Test"
- Choose test types:
- Basic connectivity
- Authentication
- Stream availability
- PTZ functionality
- Click "Start Batch Test"
Batch Test Results
| Camera |
IP Address |
Connect |
Auth |
Stream |
PTZ |
Status |
| Front Door |
192.168.1.100 |
✓ 1.2s |
WSSE |
✓ |
✓ |
Pass |
| Parking Lot |
192.168.1.101 |
✓ 0.8s |
Digest |
✓ |
✗ |
Pass |
| Warehouse |
192.168.1.102 |
✗ Timeout |
- |
- |
- |
Fail |
| Reception |
192.168.1.103 |
✓ 2.1s |
Basic |
✓ |
✓ |
Pass |
Exporting Test Results
Save test results for documentation:
- CSV Export: Spreadsheet analysis
- PDF Report: Professional documentation
- JSON Export: Integration with other tools
- Email Report: Send to stakeholders
9. Advanced Features
9.1 Batch Operations
Batch operations enable efficient management of multiple cameras simultaneously, essential for large deployments.
Batch Configuration
Selecting Cameras for Batch Operations
- Individual Selection: Ctrl+Click each camera
- Range Selection: Click first, Shift+Click last
- Select All: Ctrl+A
- Filter Selection: Use search to filter, then select
Available Batch Operations
Time Synchronization
- Select cameras to sync
- Tools → Batch Configure → Time Sync
- Choose sync method:
- Sync to PC time
- Configure NTP settings
- Set specific time
- Apply to all selected
User Management
- Create user template
- Select target cameras
- Apply user configuration:
- Add new users
- Update passwords
- Modify permissions
- Remove users
Network Configuration
Warning: Use with caution to avoid losing camera access
- DNS server updates
- NTP server configuration
- Gateway modifications
- DHCP/Static switching
Batch Firmware Updates
Critical: Always backup camera settings before firmware updates. Test on one camera before batch updating.
- Preparation:
- Download firmware from manufacturer
- Verify firmware compatibility
- Backup current settings
- Select Cameras:
- Group by model/manufacturer
- Verify same firmware version
- Update Process:
- Tools → Firmware Update
- Select firmware file
- Review compatibility report
- Start update process
- Monitor Progress:
- Track individual camera status
- Handle failures gracefully
- Verify cameras come back online
9.2 User Management
Understanding Camera Users
Most cameras support multiple user levels:
| User Level |
Typical Permissions |
Use Case |
| Administrator |
Full access to all features |
System configuration |
| Operator |
PTZ control, view settings |
Security personnel |
| User/Viewer |
View live video only |
General monitoring |
| Anonymous |
Limited or no access |
Public streams |
Managing Users
Adding Users
- Select camera
- Navigate to Camera Details → Users
- Click "Add User"
- Configure user:
Username: john.doe
Password: ********
User Level: Operator
Permissions:
  ✓ View Live Video
  ✓ PTZ Control
  ✗ Modify Settings
  ✗ User Management
  ✓ Snapshot
  ✓ Audio
- Save user configuration
Security Best Practices
Security Recommendations:
- Change all default passwords immediately
- Use strong passwords (12+ characters, mixed case, numbers, symbols)
- Create individual accounts (no shared credentials)
- Regular password rotation (90 days)
- Disable unnecessary accounts
- Enable account lockout after failed attempts
9.3 Event Monitoring
ONVIF Events Overview
Monitor real-time events from cameras supporting ONVIF events:
- Motion Detection: Movement in defined areas
- Tamper Detection: Camera obstruction or movement
- Audio Detection: Sound threshold exceeded
- Storage Events: Recording status, disk full
- System Events: Reboot, configuration changes
Setting Up Event Monitoring
- Open Event Monitor: Tools → Event Monitor
- Select Cameras: Choose cameras to monitor
- Configure Events:
- Select event types
- Set notification preferences
- Configure logging options
- Start Monitoring: Begin real-time monitoring
Event Display
=== Event Monitor ===
[10:45:23] Front Door - Motion Detection Started
           Area: Region1
           Confidence: High

[10:45:28] Parking Lot - Vehicle Detected
           Type: Car
           Direction: Entering

[10:45:45] Front Door - Motion Detection Ended
           Duration: 22 seconds

[10:46:12] Warehouse - Tamper Alert
           Type: Camera Moved
           Severity: High

[10:46:30] Reception - Audio Event
           Level: 85dB
           Duration: 3 seconds
Event Actions
Configure automatic responses to events:
- Email Notification: Send alert emails
- Snapshot Capture: Save image on event
- Recording Trigger: Start recording
- PTZ Action: Move to preset position
- External Integration: Webhook notifications
10. Troubleshooting Guide
This comprehensive troubleshooting guide helps resolve common issues quickly.
Connection Issues
Problem: "Connection Timeout"
Symptoms:
- Camera doesn't respond to connection attempts
- Timeout error after 10-30 seconds
- Camera appears in discovery but won't connect
Solutions:
- Verify Network Connectivity:
ping 192.168.1.100
If no response, check:
- Camera power and network cable
- Network switch/router status
- VLAN configuration
- Check Firewall Settings:
- Windows Firewall exceptions
- Third-party antivirus/firewall
- Network firewall rules
- Verify ONVIF Port:
- Try common ports: 80, 8000, 8080, 8888
- Check camera documentation
- Use port scanner to find open ports
Problem: "Authentication Failed"
Symptoms:
- Error message about invalid credentials
- Connection fails despite correct password
- Works in web browser but not ONVIF
Solutions:
- Verify Credentials:
- Check for typos in username/password
- Ensure caps lock is off
- Try copy/paste from password manager
- Create ONVIF User:
- Access camera web interface
- Navigate to User Management
- Create dedicated ONVIF user
- Assign appropriate permissions
- Check Authentication Method:
- Some cameras require specific auth types
- Try forcing different methods in settings
- Enable legacy authentication if available
Discovery Issues
Problem: "No Cameras Found"
Solutions:
- Network Configuration:
- Ensure PC and cameras on same subnet
- Check for network isolation settings
- Verify multicast is enabled
- Firewall Issues:
- Temporarily disable all firewalls
- Allow UDP port 3702
- Permit multicast traffic
- Try Alternative Methods:
- Use Extensive Scan
- Manual Prefix Scan
- Add cameras manually
Streaming Issues
Problem: "Cannot Display Video Stream"
Solutions:
- Check VLC Installation (Linux):
sudo apt update
sudo apt install vlc libvlc-dev
- Verify Stream URL:
- Test in VLC directly
- Check RTSP port (usually 554)
- Try different stream profiles
- Network Issues:
- Check bandwidth availability
- Test with lower resolution stream
- Switch from UDP to TCP transport
Platform-Specific Issues
Windows Issues
| Issue |
Solution |
| Won't start |
Run as Administrator, check .NET Framework |
| Defender blocks |
Add exception for WINK ONVIF Studio |
| Network adapter missing |
Update network drivers, restart |
macOS Issues
| Issue |
Solution |
| App won't open |
Right-click → Open, allow in Security settings |
| No network access |
Grant permissions in Privacy settings |
| M1 compatibility |
Ensure Rosetta 2 installed |
Linux Issues
| Issue |
Solution |
| Missing dependencies |
Install VLC and development libraries |
| Permission denied |
Add user to video/audio groups |
| No video display |
Check DISPLAY variable, X11 forwarding |
11. Appendix
11.1 Keyboard Shortcuts
Global Shortcuts
| Action |
Windows/Linux |
macOS |
| Discover Cameras |
Ctrl+D |
⌘+D |
| Add Camera |
Ctrl+A |
⌘+A |
| Connect |
Ctrl+C |
⌘+C |
| Stream Video |
Ctrl+S |
⌘+S |
| Refresh List |
F5 |
⌘+R |
| Settings |
Ctrl+, |
⌘+, |
| Quit |
Ctrl+Q |
⌘+Q |
Camera List Navigation
| Action |
Key |
| Next Camera |
↓ |
| Previous Camera |
↑ |
| Connect to Selected |
Enter |
| Delete Camera |
Delete |
| Rename Camera |
F2 |
| Properties |
Alt+Enter |
Video Window Shortcuts
| Action |
Key |
| Play/Pause |
Space |
| Snapshot |
S |
| Start/Stop Recording |
R |
| Fullscreen |
F11 |
| Exit Fullscreen |
Esc |
| Zoom In |
+ |
| Zoom Out |
- |
PTZ Control Shortcuts
| Action |
Key |
Note |
| Pan Left |
← |
Hold for continuous |
| Pan Right |
→ |
Hold for continuous |
| Tilt Up |
↑ |
Hold for continuous |
| Tilt Down |
↓ |
Hold for continuous |
| Zoom In |
+ |
Page Up alternative |
| Zoom Out |
- |
Page Down alternative |
| Home Position |
Home |
Return to default |
| Preset 1-9 |
1-9 |
Go to preset |
11.2 Common ONVIF Ports
Standard Ports by Manufacturer
| Manufacturer |
Default ONVIF Port |
Alternative Ports |
| Axis |
80 |
8080 |
| Bosch |
80 |
8080 |
| Dahua |
80 |
8080 |
| Hanwha (Samsung) |
80 |
8080 |
| Hikvision |
80 |
8000, 8080 |
| Panasonic |
80 |
8080 |
| Sony |
80 |
8080 |
| Uniview |
80 |
8080 |
| Vivotek |
80 |
8080 |
Service Ports
| Service |
Default Port |
Protocol |
Purpose |
| HTTP/ONVIF |
80 |
TCP |
Web interface, ONVIF |
| HTTPS |
443 |
TCP |
Secure web access |
| RTSP |
554 |
TCP/UDP |
Video streaming |
| Discovery |
3702 |
UDP |
WS-Discovery multicast |
| Alternative HTTP |
8000-8999 |
TCP |
Vendor-specific |
11.3 Supported Features Matrix
ONVIF Profile Support
| Profile |
Features |
WINK Support |
| Profile S |
Streaming, PTZ, Audio, Metadata |
✓ Full Support |
| Profile G |
Recording, Storage, Playback |
✓ Full Support |
| Profile C |
Access Control |
⚠ Read Only |
| Profile A |
Advanced Access Control |
⚠ Read Only |
| Profile T |
Advanced Video Streaming |
✓ Full Support |
| Profile M |
Metadata & Analytics |
✓ Full Support |
Feature Compatibility
| Feature |
Basic |
Professional |
Enterprise |
| Discovery |
✓ |
✓ |
✓ |
| Authentication |
✓ |
✓ |
✓ |
| Live Streaming |
✓ |
✓ |
✓ |
| PTZ Control |
Basic |
✓ |
✓ |
| Presets |
1-9 |
1-99 |
Unlimited |
| Recording |
✗ |
✓ |
✓ |
| Events |
✗ |
Basic |
✓ |
| Analytics |
✗ |
✗ |
✓ |
Note: WINK ONVIF Studio is provided as a Professional-grade tool with all features enabled at no cost.
Thank You
Thank you for choosing WINK ONVIF Studio for your camera management needs.
For additional support and resources, visit:
www.wink.co
Email: onvifstudio@wink.co
© 2025 WINK Streaming. All rights reserved.