APIBridge.Metro
Professional GUI for Genetec Security Center Integration
Complete User Manual
Version 0.7.3.23
January 2025
WINK Streaming
Authorized Partner of Genetec Security Center
1. Introduction
Welcome to APIBridge.Metro, the professional graphical user interface for integrating with Genetec Security Center. This manual provides comprehensive guidance for installation, configuration, and operation of the application.
APIBridge.Metro is designed to simplify the management of cameras, analog monitors, and other security entities within your Genetec Security Center environment. It provides an intuitive interface for tasks that previously required command-line operations or manual configuration.
About WINK Streaming
WINK Streaming is an authorized partner of Genetec Security Center, specializing in video management and streaming solutions. Our tools are designed to enhance and extend the capabilities of Security Center installations.
2. Product Overview
Key Features
- Professional GUI Interface: Modern, intuitive interface built with WPF and MahApps.Metro
- Comprehensive Entity Management: View and manage cameras, analog monitors, and video units
- Automated Monitor Association: Distribute cameras across monitors evenly
- Data Export: Export configurations in XML format for documentation and backup
- Windows Service Integration: Automated monitoring with email or HTTP notifications
- Secure Credential Storage: Uses Windows DPAPI for encrypted credential storage
Target Audience
This application is designed for:
- Security Center administrators
- System integrators
- Technical support personnel
- Anyone managing Genetec Security Center deployments
Version Information
| Component |
Version |
| APIBridge.Metro |
0.7.3.23 |
| Target Framework |
.NET Framework 4.8 |
| Supported Genetec SDK |
5.9, 5.10, 5.11, 5.12 |
| Default SDK Version |
5.12 |
3. System Requirements
Minimum Requirements
- Operating System: Windows 10 (64-bit) or Windows Server 2016 or later
- Processor: Intel Core i3 or equivalent
- Memory: 4 GB RAM
- Storage: 500 MB available disk space
- .NET Framework: 4.8 or later
- Network: TCP/IP connection to Genetec Security Center
Recommended Requirements
- Operating System: Windows 11 or Windows Server 2022
- Processor: Intel Core i5 or better
- Memory: 8 GB RAM or more
- Storage: 1 GB available disk space
- Display: 1920x1080 resolution or higher
Genetec Security Center Requirements
- Security Center Version: 5.9 or later
- SDK License: Part # GSC-1SDK-WINK-FORGE
- SDK User Account: With appropriate permissions (see Configuration section)
- Network Access: Port 5500 (TCP) to Security Center server
Important: The Genetec Security Center SDK must be installed on the same machine as APIBridge.Metro. The SDK is not included with the application and must be obtained separately from Genetec.
4. Installation Guide
Prerequisites
- Ensure all system requirements are met
- Install Genetec Security Center SDK (version 5.9 or later)
- Obtain administrator privileges on the target machine
- Verify network connectivity to Security Center server
Installation Steps
- Download the Application
- Obtain the latest APIBridge.Metro installer from WINK Streaming
- Verify the file integrity using provided checksums
- Install the Genetec SDK
- Default location:
C:\Program Files (x86)\Genetec Security Center 5.12 SDK
- Ensure all SDK components are installed
- Run the Installer
- Right-click the installer and select "Run as administrator"
- Follow the installation wizard prompts
- Accept the license agreement
- Choose installation directory (default recommended)
- Complete Installation
- Allow installer to create desktop shortcuts
- Launch application when installation completes
Post-Installation
- Verify application launches successfully
- Check that all tabs are visible in the interface
- Confirm SDK version in Settings tab
- Review activity log for any initialization errors
5. Genetec Security Center Configuration
Before using APIBridge.Metro, you must configure appropriate user accounts and permissions in Genetec Security Center. This section provides detailed instructions for setting up the required SDK user.
5.1 Creating the SDK User
APIBridge.Metro requires a dedicated SDK user account with specific permissions to access Security Center data.
Step 1: Open Config Tool
- Launch Genetec Config Tool on your Security Center server
- Log in with administrator credentials
- Navigate to the User Management section
Step 2: Create New User
- Click "Add User" or right-click and select "New User"
- Enter the following information:
- Username: winkSDK
- First Name: WINK
- Last Name: SDK User
- Password: (Set a strong password)
- Email: (Optional, for notifications)
- Enable "User can log on using the SDK" option
- Set "Password never expires" if appropriate for your security policy
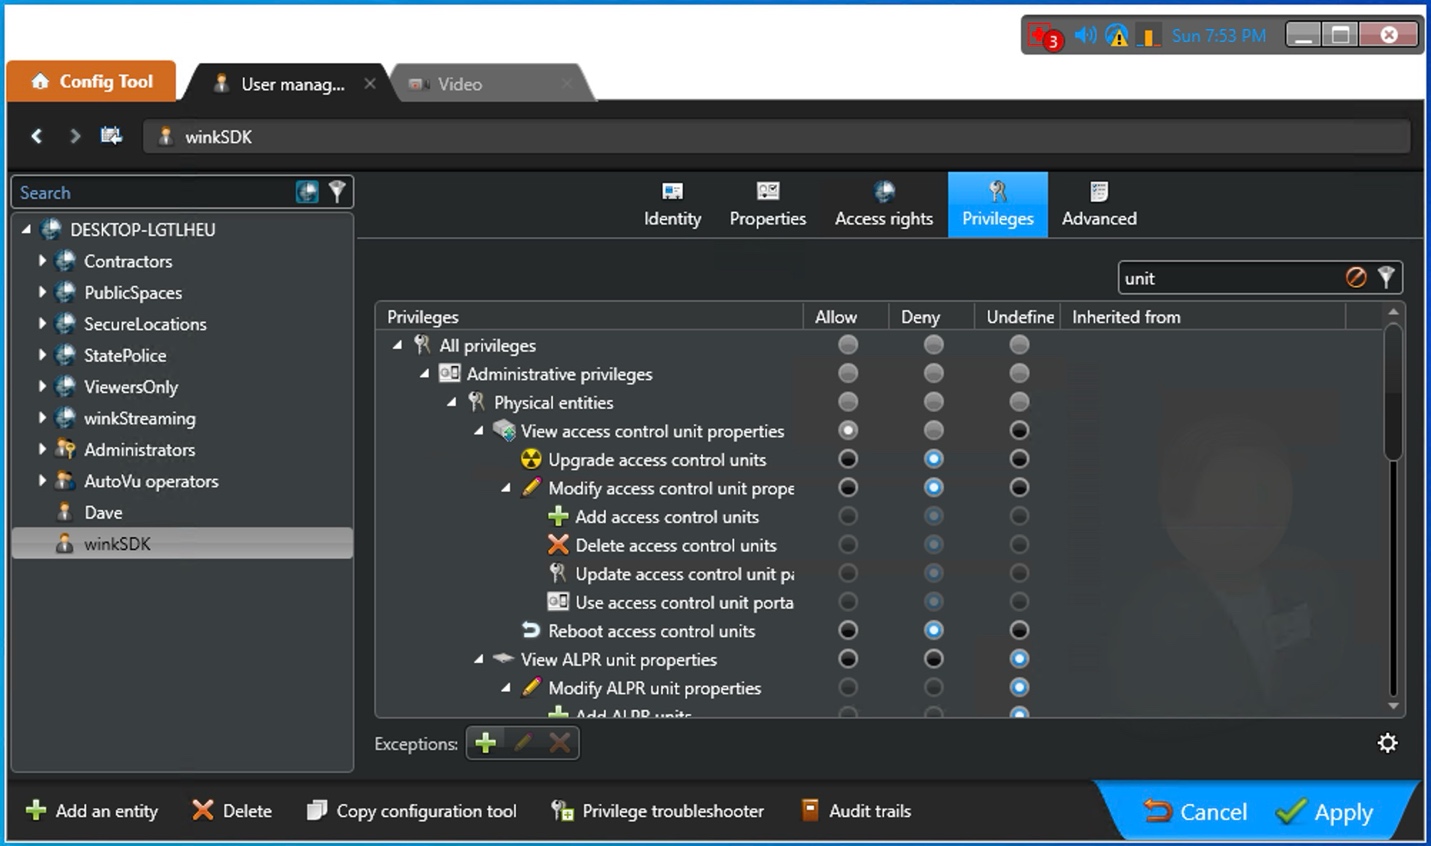
Figure 1: Creating the winkSDK user in Genetec Config Tool
Note: The username "winkSDK" is recommended but not required. You can use any username that follows your organization's naming conventions.
5.2 Configuring Permissions
The SDK user requires specific permissions to access and manage Security Center entities. Follow these steps to configure the necessary privileges.
Required Permissions
| Permission Category |
Specific Permission |
Purpose |
| General |
Log on using the SDK |
Required for SDK authentication |
| Entities |
View all entity types |
Access cameras, monitors, video units |
| Video |
View video units |
Required for IP address retrieval |
| Video |
View cameras |
List and manage cameras |
| Video |
View analog monitors |
Access decoder information |
| Video |
Modify analog monitor properties |
Update monitor names |
| Hardware |
View hardware configuration |
Access IP and MAC addresses |
| Custom Fields |
View custom fields |
If using custom attributes |
| Geographic |
View geographical locations |
For GPS-enabled cameras |
Setting Permissions
- In Config Tool, select the winkSDK user
- Navigate to the "Privileges" tab
- Enable each required permission by checking the appropriate boxes
- Pay special attention to:
- "View role properties"
- "View role resources"
- "View access control unit properties"
- "Modify ALPR unit properties" (if applicable)
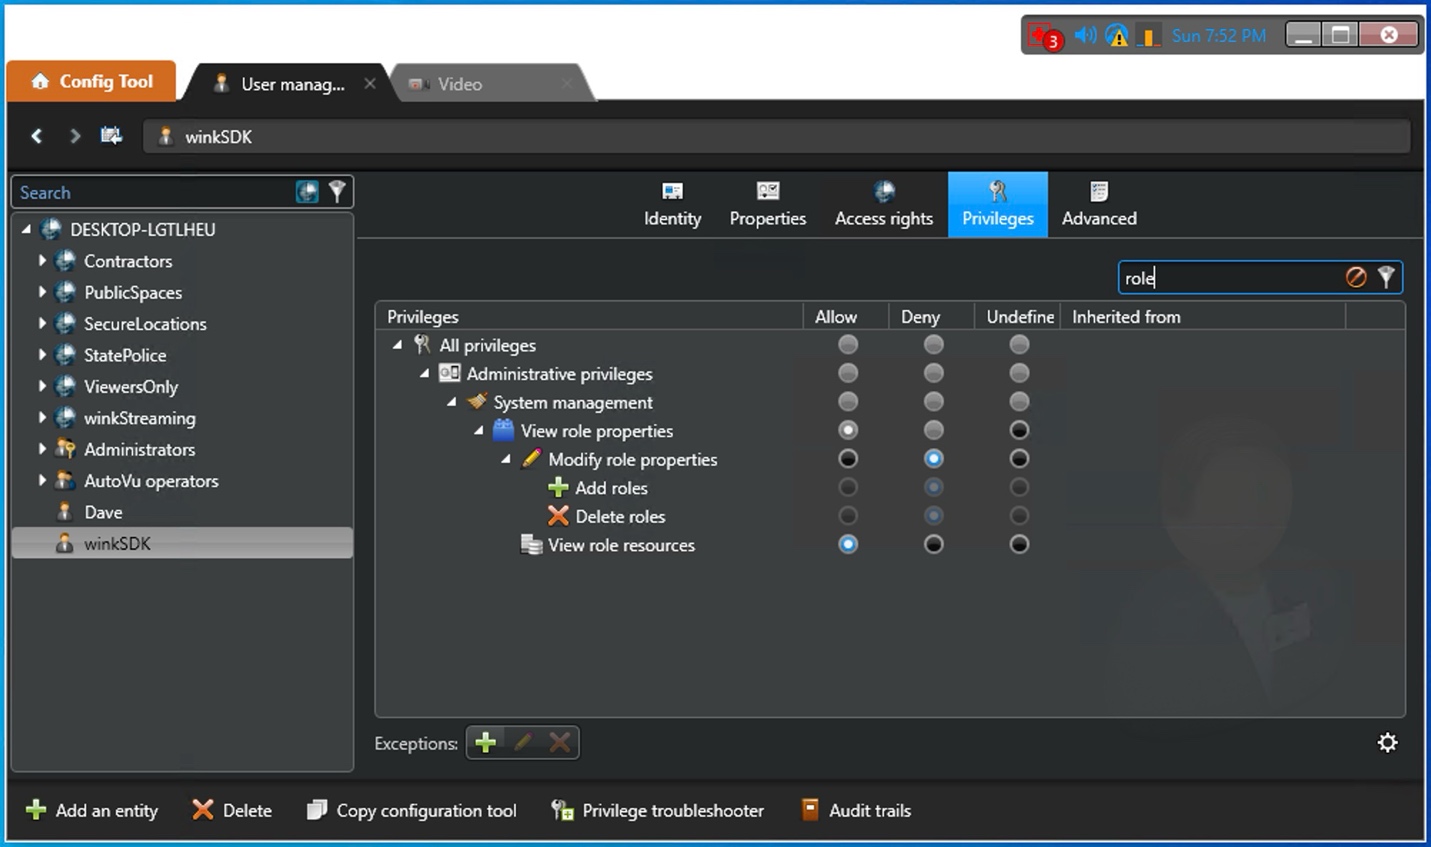
Figure 2: Configuring role permissions for the SDK user
Figure 3: Setting unit permissions
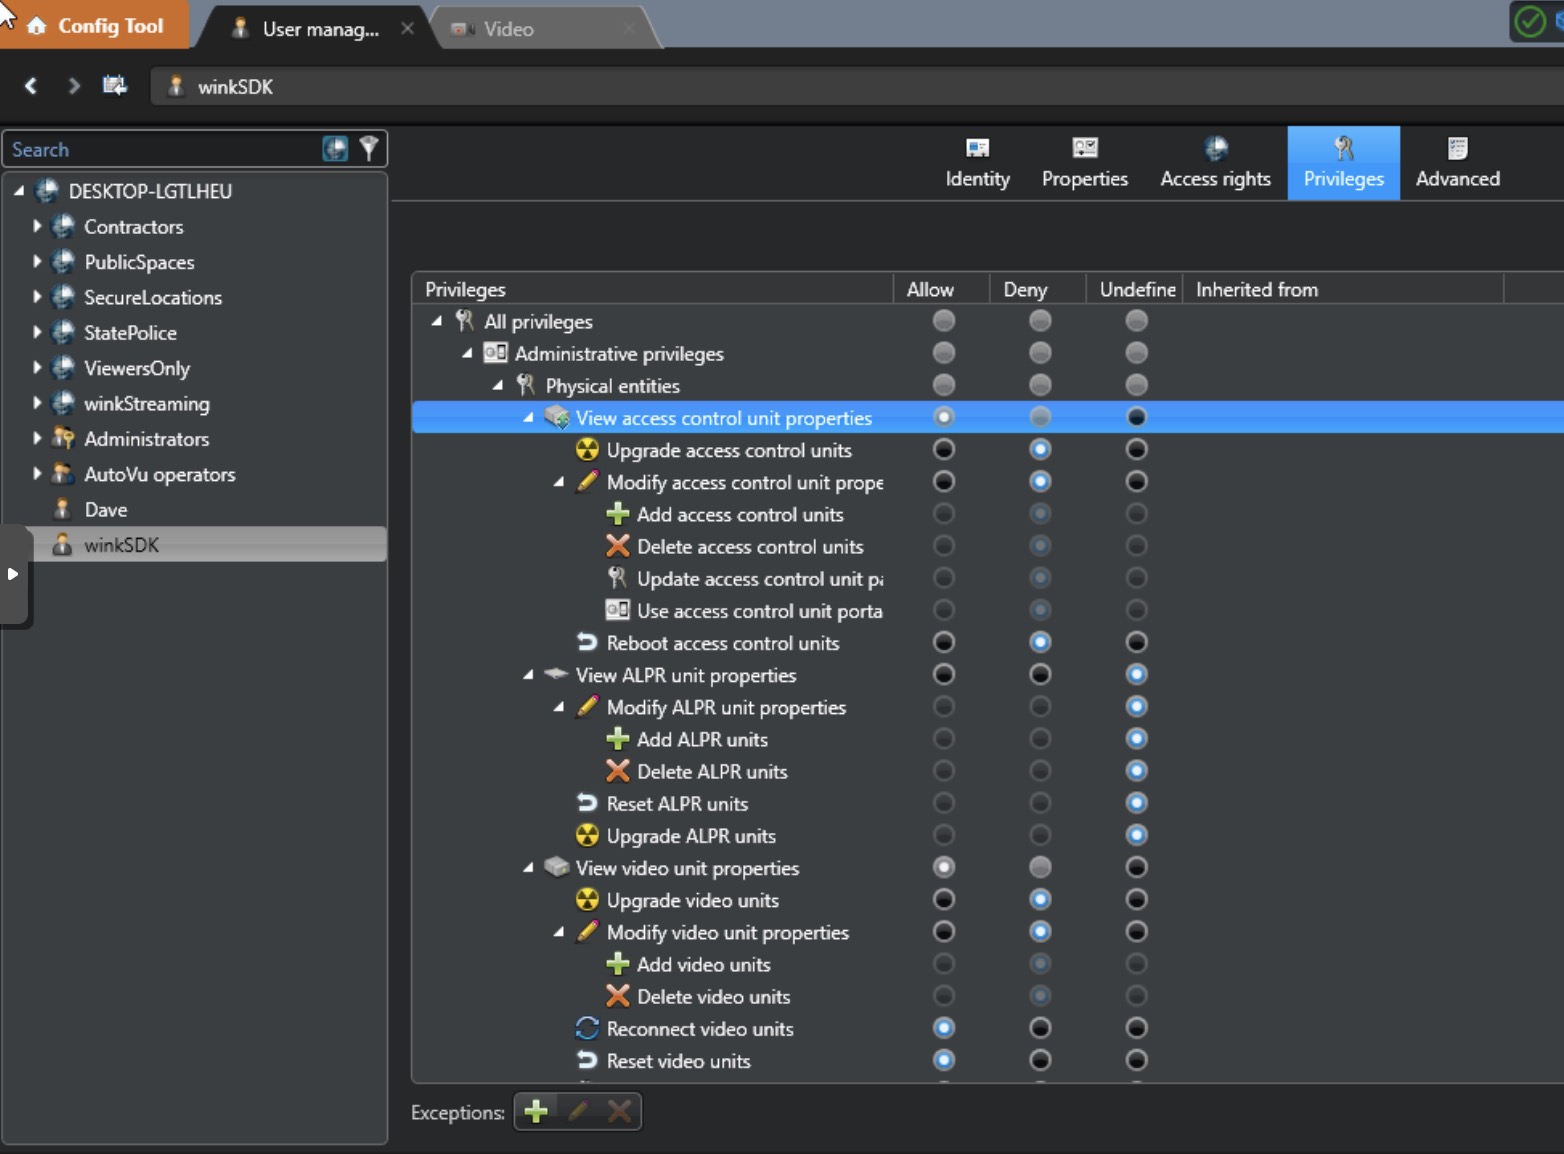
Figure 4: Additional unit permissions configuration

Figure 5: Camera units and cameras permissions
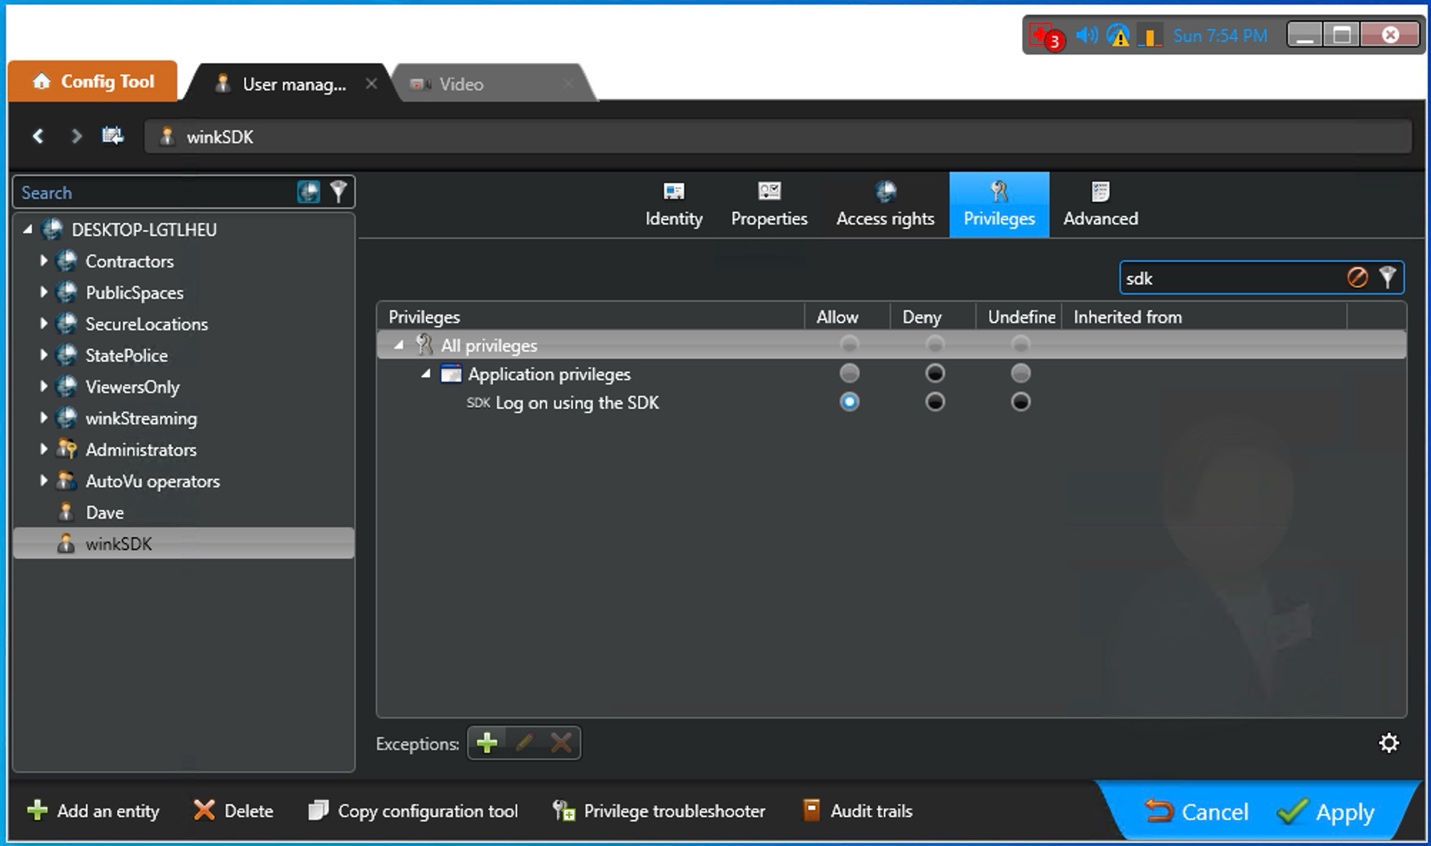
Figure 6: SDK-specific privileges configuration
Warning: Insufficient permissions will result in missing data or functionality. If IP addresses appear blank in exports, verify that "View video units" permission is enabled.
5.3 Setting Up Partitions
For enhanced security and organization, it's recommended to create a dedicated partition for WINK Streaming operations.
Creating a Partition
- In Config Tool, navigate to "System" → "Partitions"
- Click "Add Partition" or right-click and select "New Partition"
- Configure the partition:
- Name: winkStreaming
- Description: WINK Streaming SDK Access
- Parent Partition: (Select appropriate parent)
- Save the partition configuration
Assigning User to Partition
- Select the winkSDK user
- Navigate to the "Partitions" tab
- Add the winkStreaming partition to the user's accessible partitions
- Set appropriate permission levels within the partition
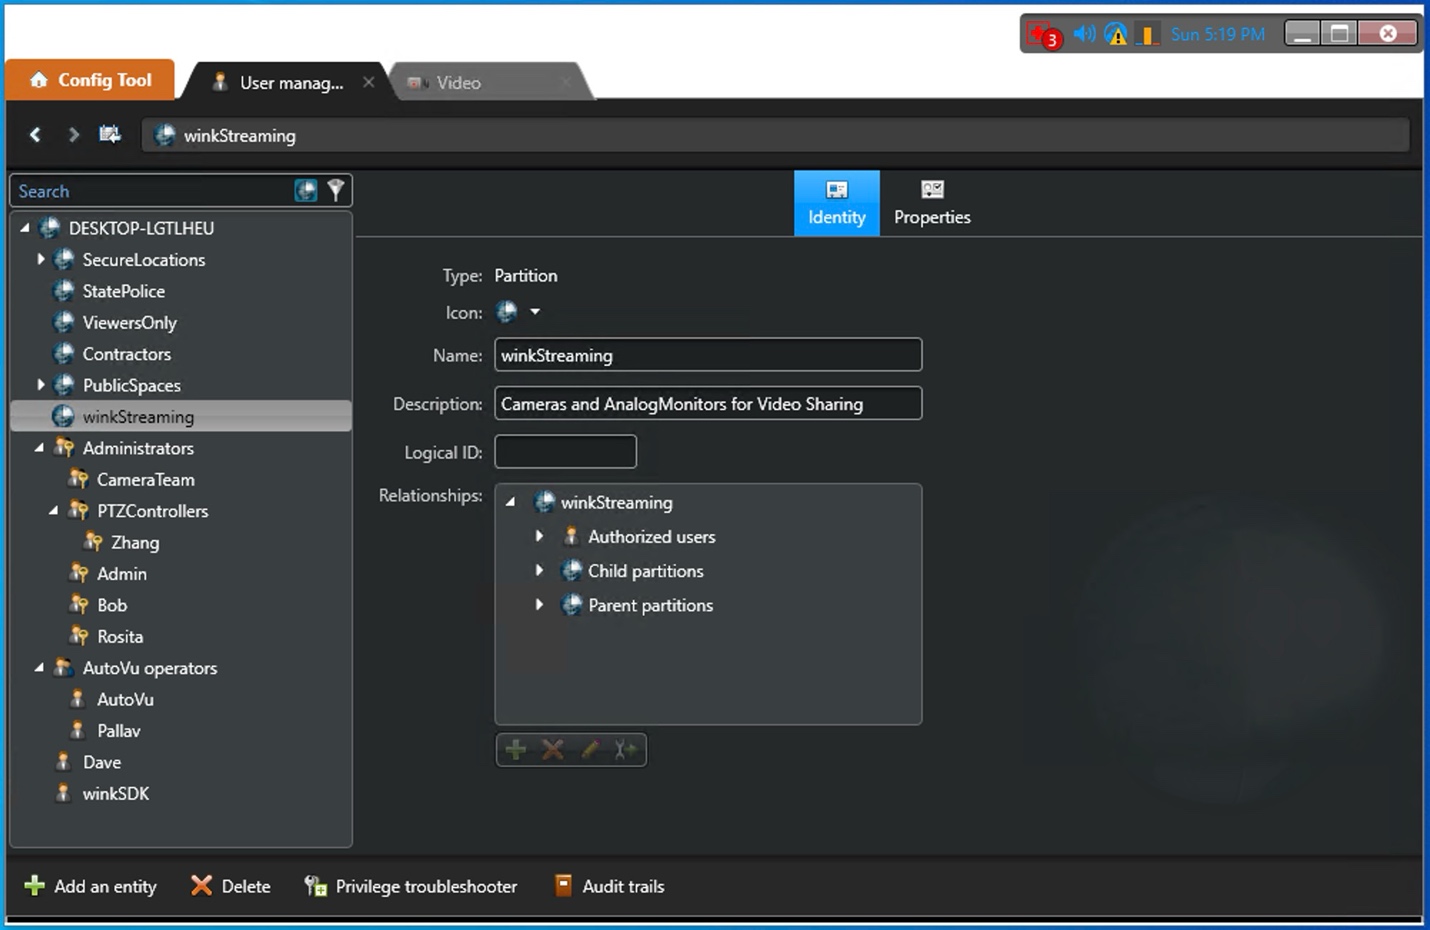
Figure 7: Creating a partition in Config Tool
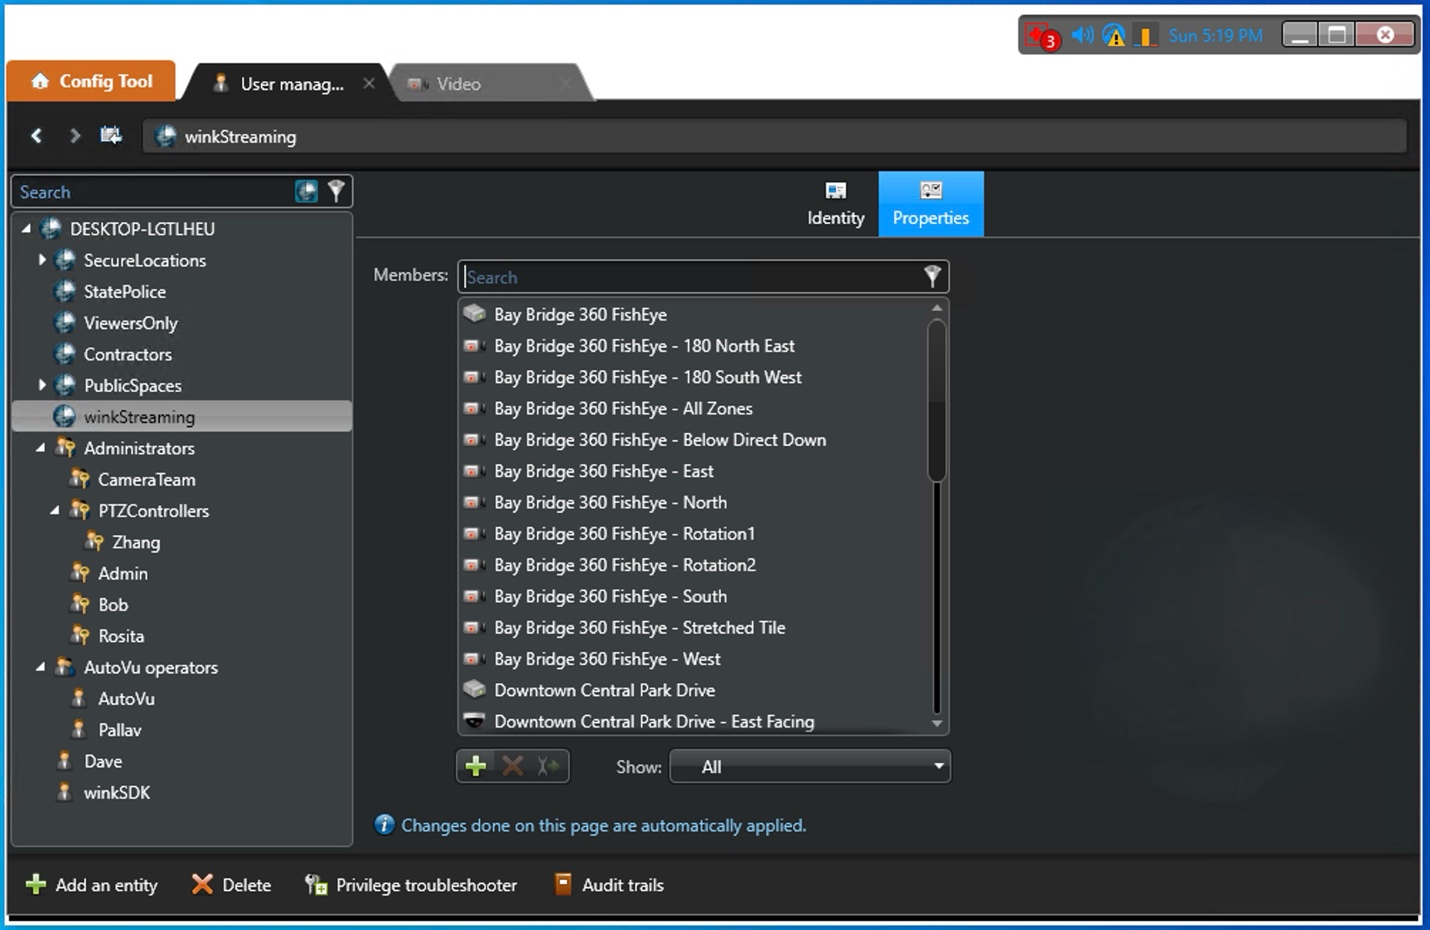
Figure 8: Adding entities to the partition
Partition Benefits
- Security Isolation: Limits SDK user access to specific entities
- Audit Trail: Easier tracking of SDK operations
- Resource Management: Control which cameras and monitors are accessible
- Multi-tenant Support: Separate different client configurations
Note: Partition configuration is optional but recommended for production environments. In test environments, you may grant access to the root partition for simplicity.
5.4 Configuring Analog Monitors
If you're using analog monitors (virtual decoders), proper configuration in Security Center is essential for the association features in APIBridge.Metro.
Creating Analog Monitors
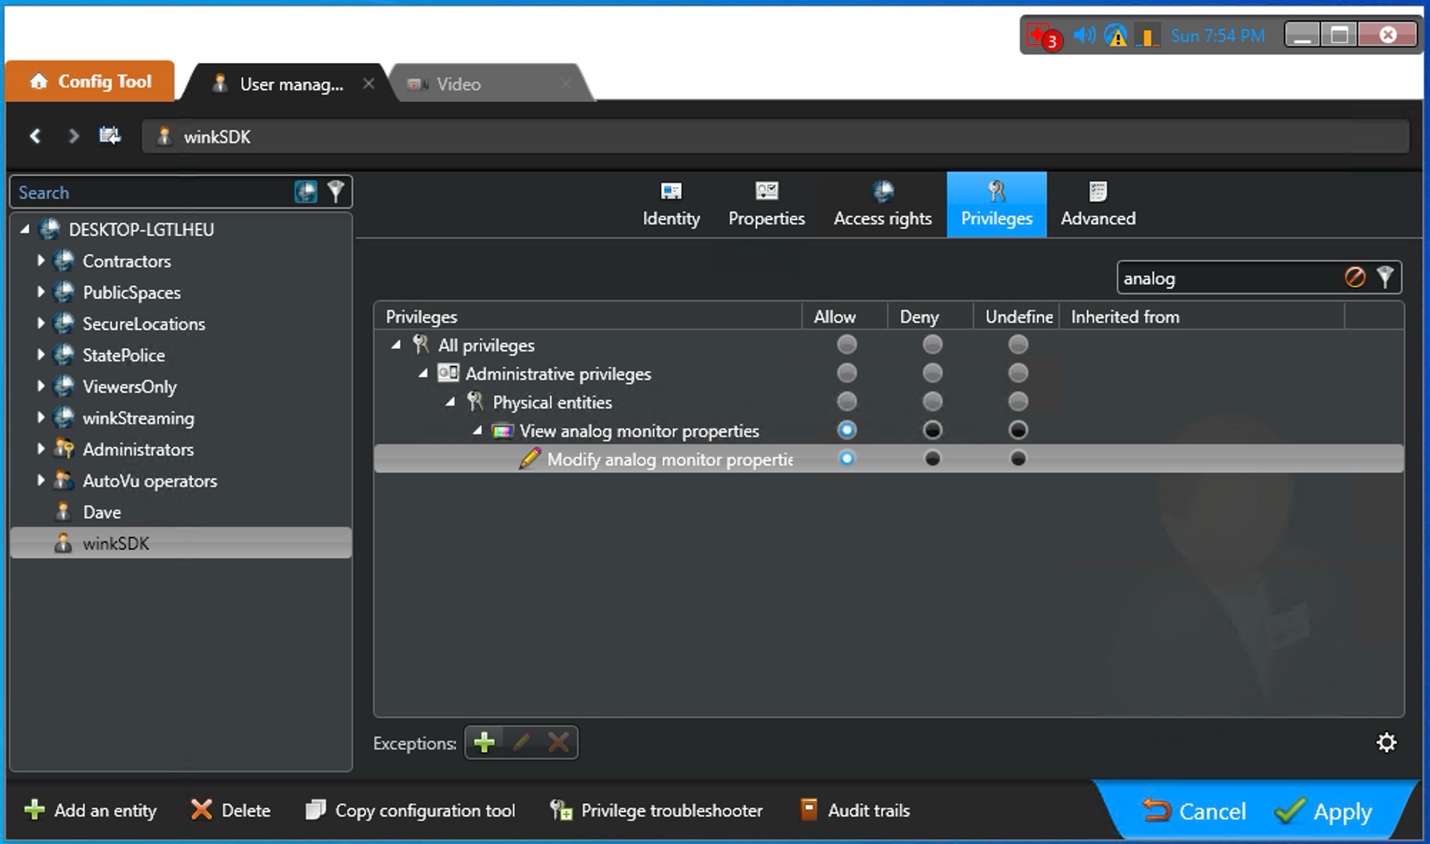
Figure 9: Creating analog monitors in Security Center
Naming Convention
Follow a consistent naming pattern for analog monitors:
- Use prefix like "WF" followed by numbers (WF001, WF002, WF003)
- Include UDP port or channel in the name for clarity
- Example: "WF001 - 8000" where 8000 is the UDP port

Figure 10: Analog monitor naming convention examples
Renaming Monitors
When renaming monitors through APIBridge.Metro:
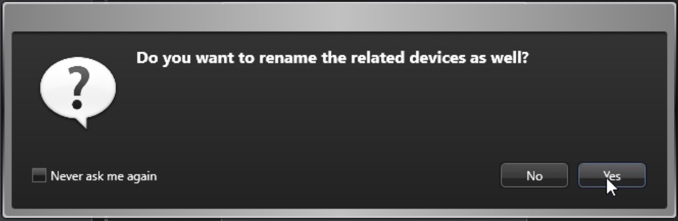
Figure 11: Confirmation dialog when renaming related devices
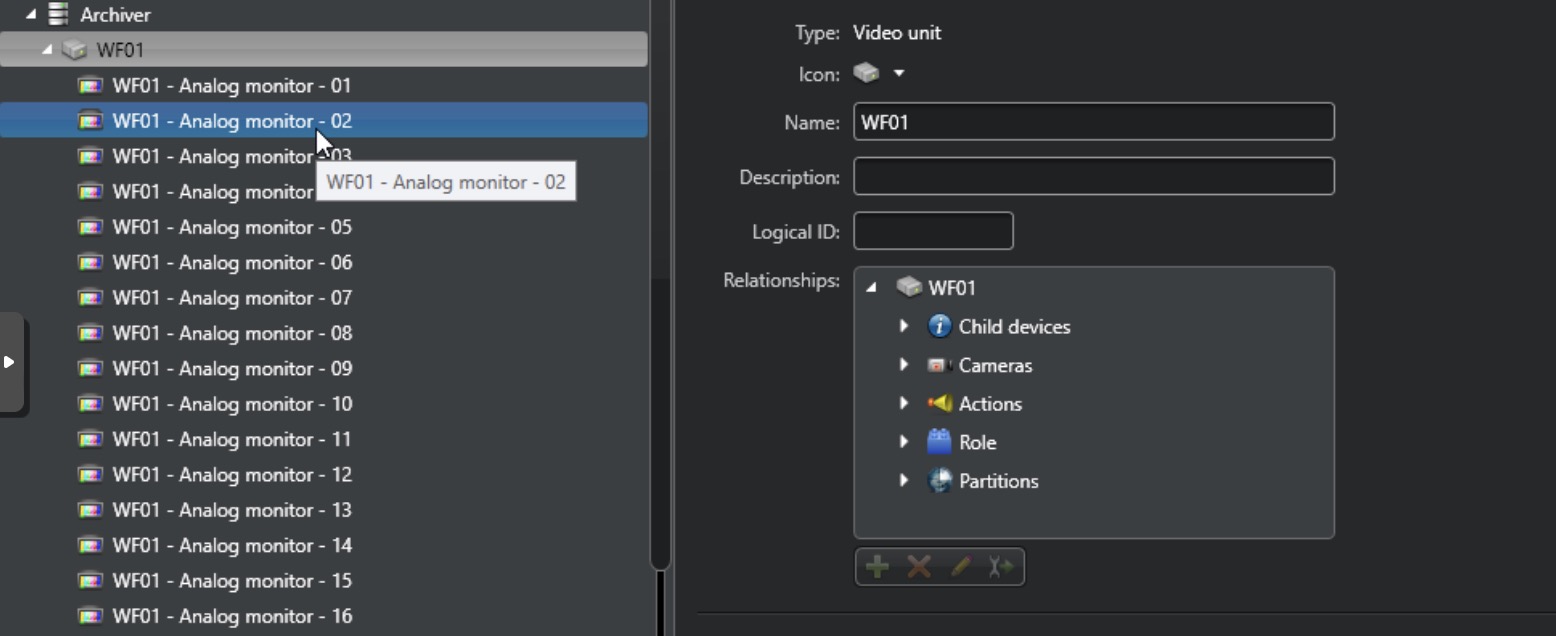
Figure 12: Results after renaming analog monitors
6. Getting Started
6.1 First Launch
When you first launch APIBridge.Metro, you'll see the main interface with the following components:

Figure 13: APIBridge.Metro main interface on first launch
Interface Components
- Header: Shows WINK Streaming logo and connection status
- Navigation Panel: Left sidebar with numbered steps and utility tabs
- Content Area: Main area displaying current tab content
- Activity Log: Bottom panel showing real-time operation logs
- Footer: Links to privacy policy and company information
Initial Setup Checklist
- Verify Genetec SDK is installed (check Settings tab)
- Ensure you have Security Center connection details:
- Server hostname or IP address
- SDK username and password
- Port number (default: 5500)
- Check network connectivity to Security Center server
- Review the help tips banner for important information
Important: Do not proceed with connection until you have verified all prerequisites and have the correct SDK user credentials.
6.2 Connectivity Verification
Before attempting to connect and perform operations, use the Connectivity & Permissions Verification tab to ensure your environment is properly configured.
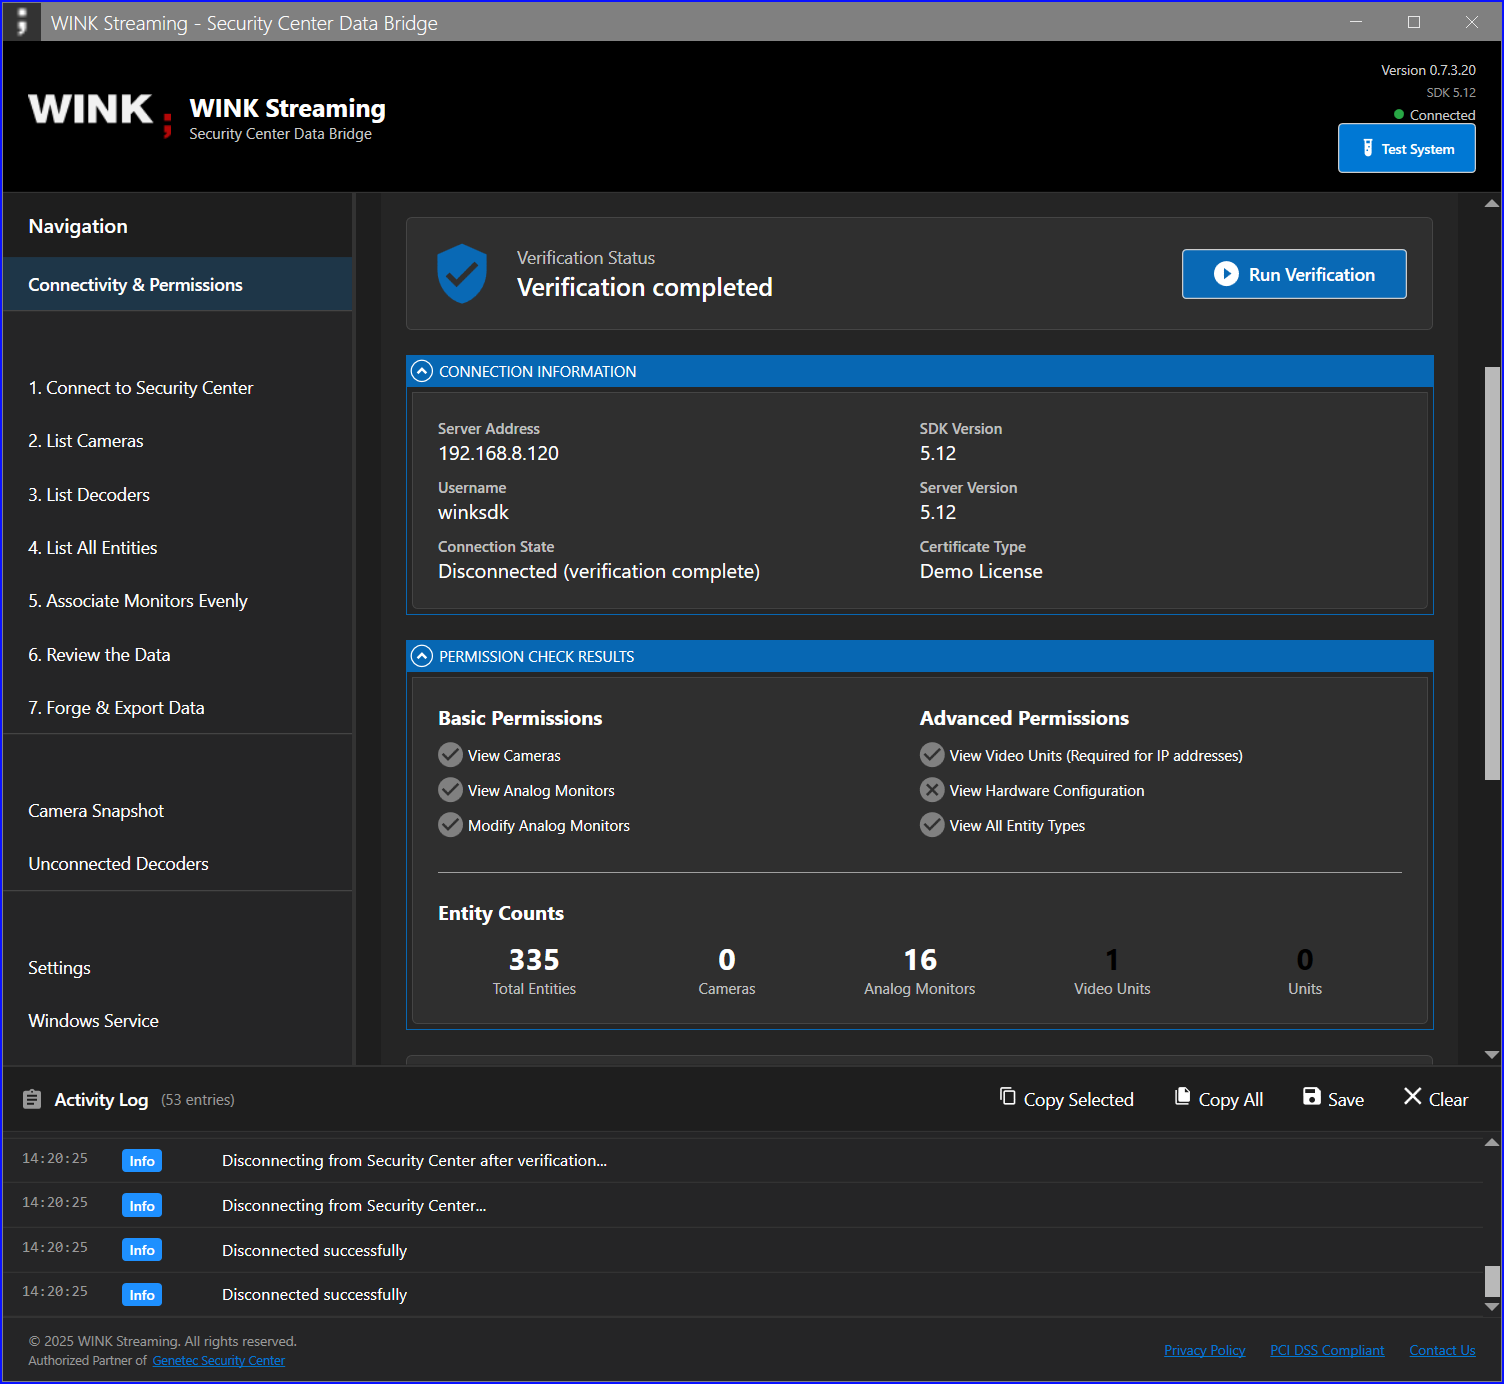
Figure 14: Connectivity & Permissions Verification tab
Running Connectivity Test
- Click on "Connectivity & Permissions Verification" in the navigation panel
- Enter your connection details:
- Hostname/IP: Security Center server address
- Username: SDK user (e.g., winkSDK)
- Password: SDK user password
- Domain Auth: Check if using Windows authentication
- Click "Run Verification" button
- Review the results in the verification report
Understanding Test Results
| Test Item |
Expected Result |
If Failed |
| Connection Status |
Connected |
Check server address and network |
| View Cameras |
✓ Permitted |
Enable camera viewing permission |
| View Analog Monitors |
✓ Permitted |
Enable monitor viewing permission |
| View Video Units |
✓ Permitted |
Critical for IP addresses - enable permission |
| Modify Properties |
✓ Permitted |
Required for monitor associations |
Warning: If "View Video Units" permission is not granted, IP addresses will not be available in exports and monitor listings.
6.3 Connecting to Security Center
After verifying connectivity, proceed to establish a full connection to Security Center.
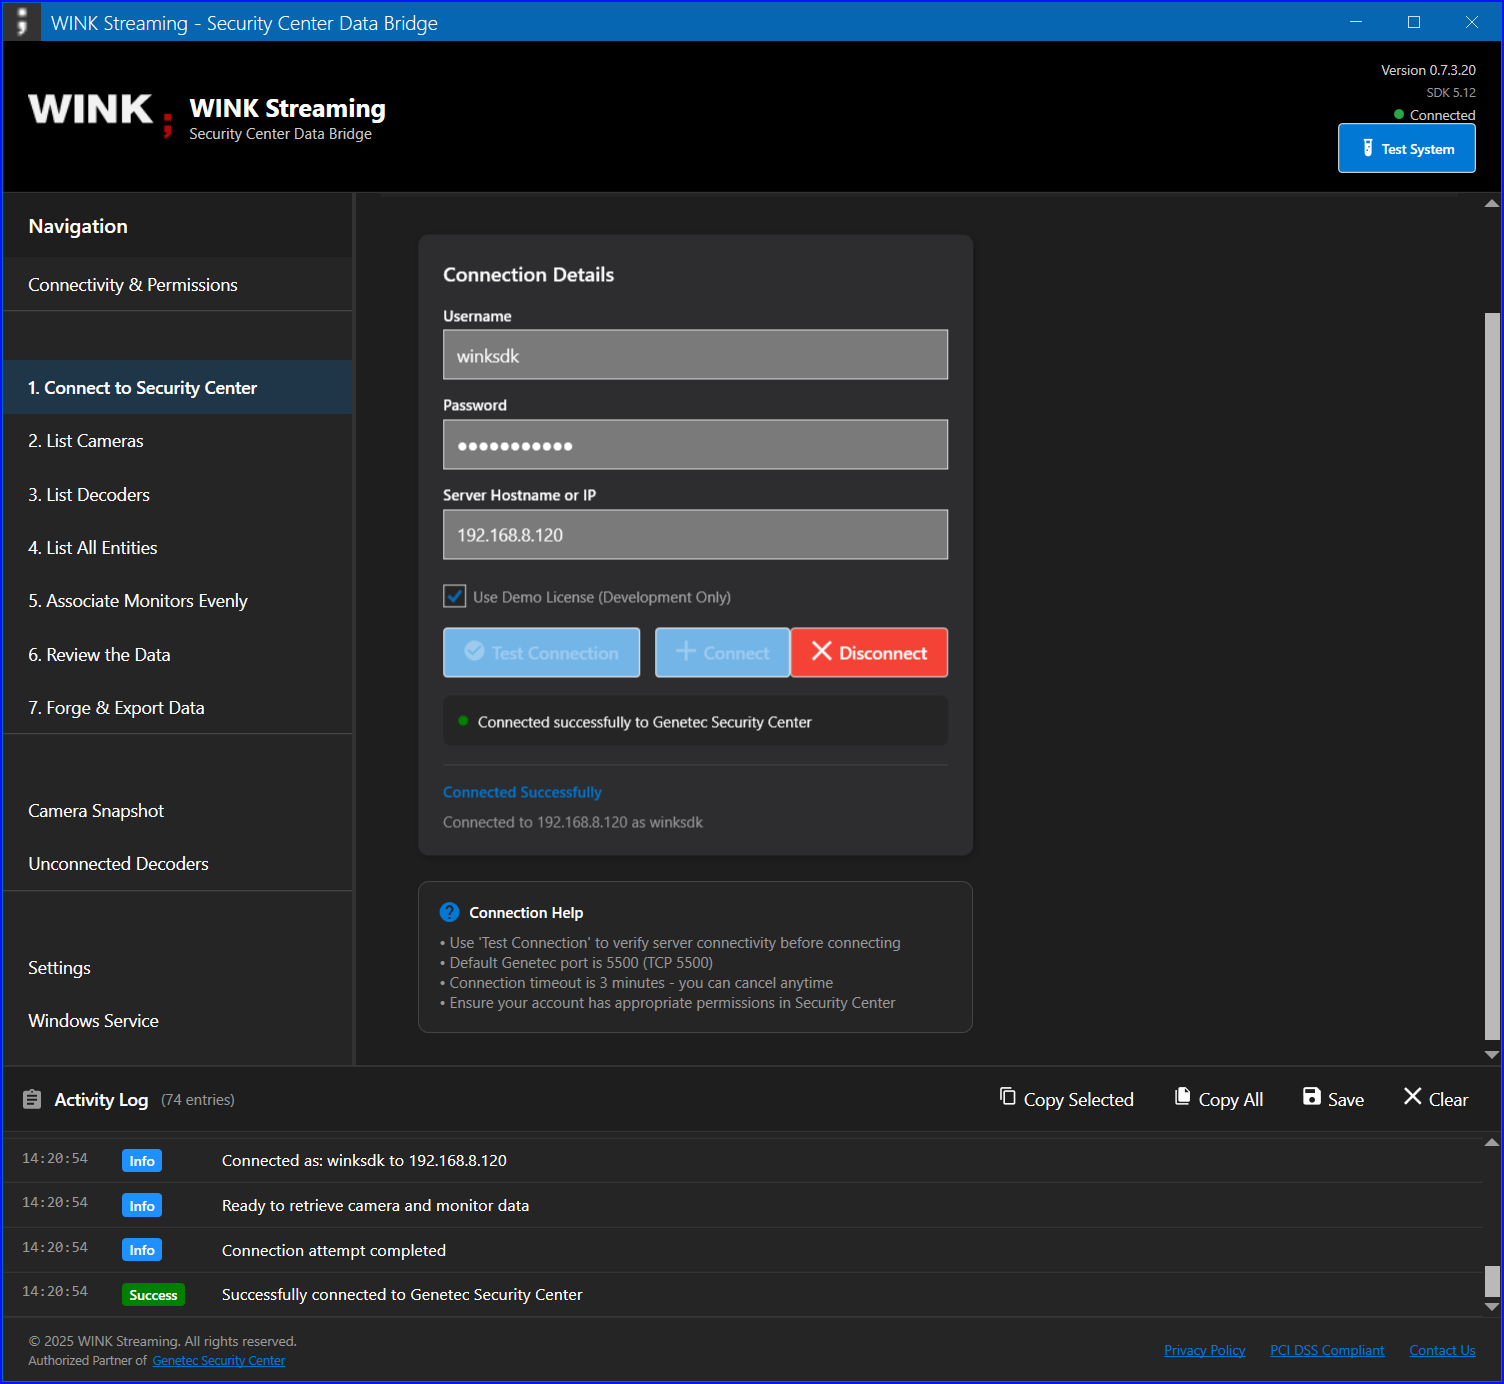
Figure 15: Step 1 - Connect to Security Center
Connection Process
- Navigate to "Step 1: Connect to Security Center"
- Enter connection details:
- Hostname or IP: Your Security Center server
- Username: SDK user credentials
- Password: SDK user password
- Port: 5500 (default)
- Optional: Click "Test Connection" to verify before full connection
- Click "Connect" to establish connection
- Monitor the Activity Log for connection status
Connection States
- Disconnected (Red): No active connection
- Connecting (Yellow): Connection in progress
- Connected (Green): Successfully connected
Troubleshooting Connection Issues
| Error Message |
Possible Cause |
Solution |
| InvalidCredential |
Wrong username/password |
Verify credentials in Config Tool |
| NetworkError |
Cannot reach server |
Check network and firewall settings |
| SDKNotFound |
SDK not installed |
Install Genetec SDK |
| CertificateError |
License issue |
Contact support for certificate |
Note: In debug builds, a "Use Demo License" checkbox appears for development purposes. This is not available in production builds.
7. Features
7.1 List Cameras
The List Cameras feature provides a comprehensive view of all cameras in your Security Center system.
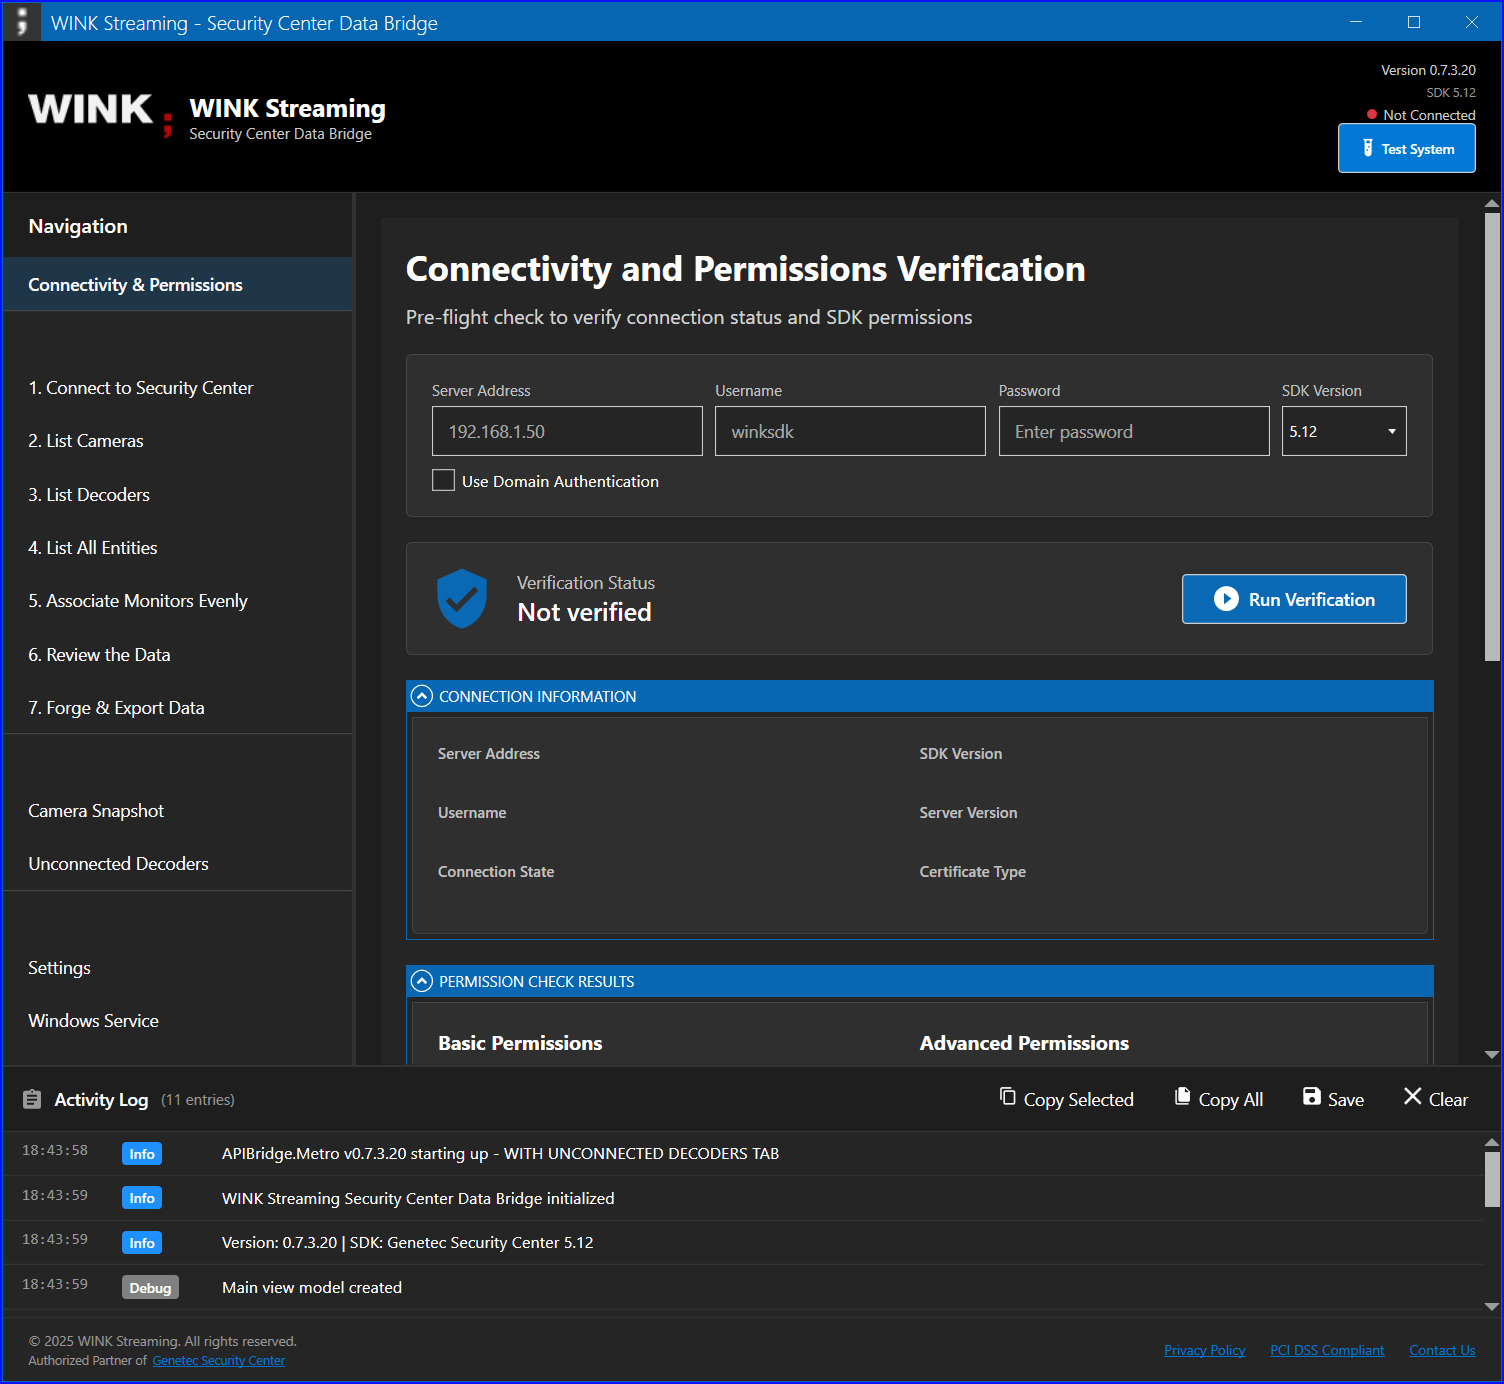
Figure 16: Step 2 - List Cameras interface
Available Information
- Name: Camera display name
- Description: Additional camera details
- Status: Online/Offline indicator
- Resolution: Video resolution (e.g., 1920x1080)
- Model: Camera model information
- Manufacturer: Camera manufacturer
Features
- Sorting: Click column headers to sort
- Filtering: Use search box to filter cameras
- Export: Export list to CSV format
- Refresh: Update camera list from server
Usage Tips
- Double-click a camera row to view additional details
- Use Ctrl+Click to select multiple cameras
- Right-click for context menu options
- Export regularly for documentation purposes
7.2 List Decoders
The List Decoders feature displays all analog monitors (decoders) in your system with their current configurations.
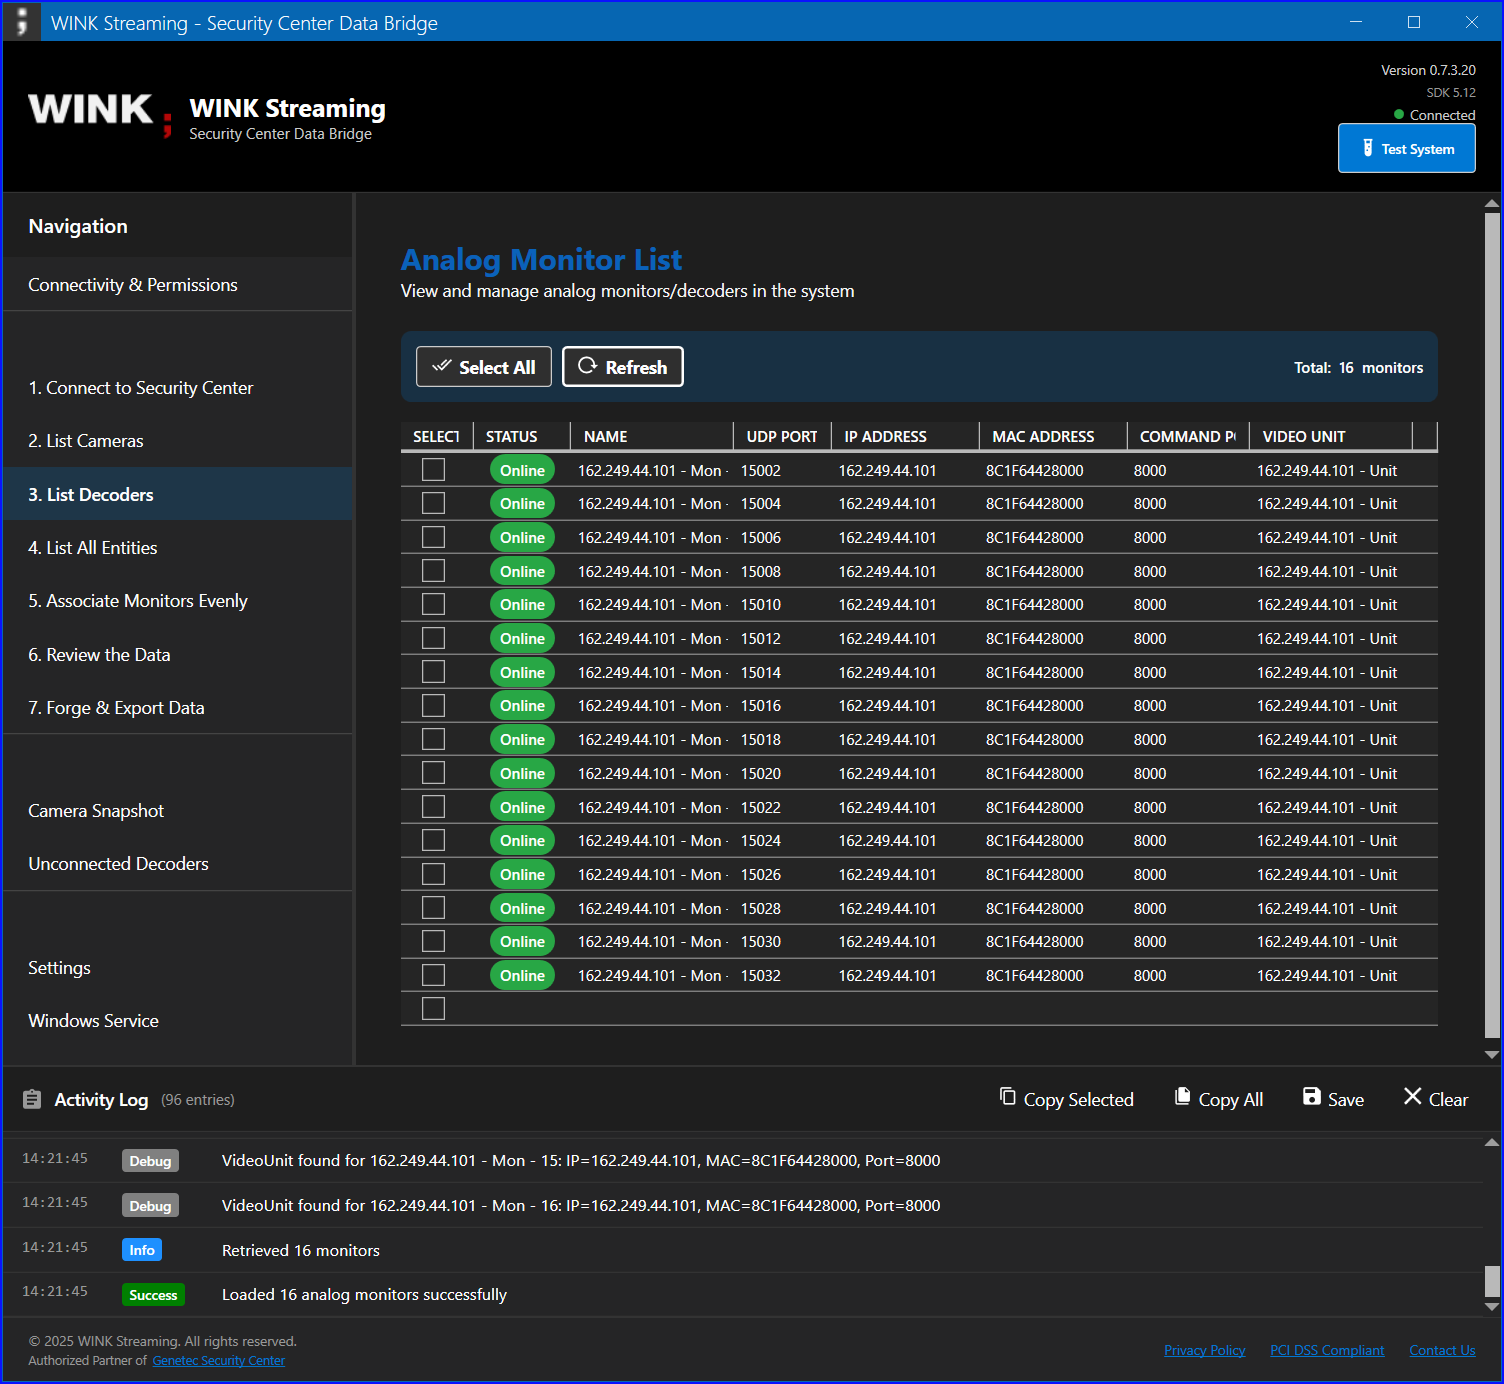
Figure 17: Step 3 - List Decoders showing analog monitors
Decoder Information
| Field |
Description |
| Monitor Name |
Display name of the analog monitor |
| UDP Port |
Network port for video stream |
| Video Unit |
Parent video unit name |
| IP Address |
Network address of video unit |
| MAC Address |
Hardware address of video unit |
| Connected Camera |
Currently associated camera (if any) |
| Status |
Online/Offline indicator |
Common Use Cases
- Identify unconnected monitors
- Verify monitor configurations
- Check network settings
- Export for network documentation
Note: If IP addresses appear blank, verify that the SDK user has "View video units" permission in Security Center.
7.3 List Entities
The List Entities feature provides a comprehensive view of all entity types in Security Center.
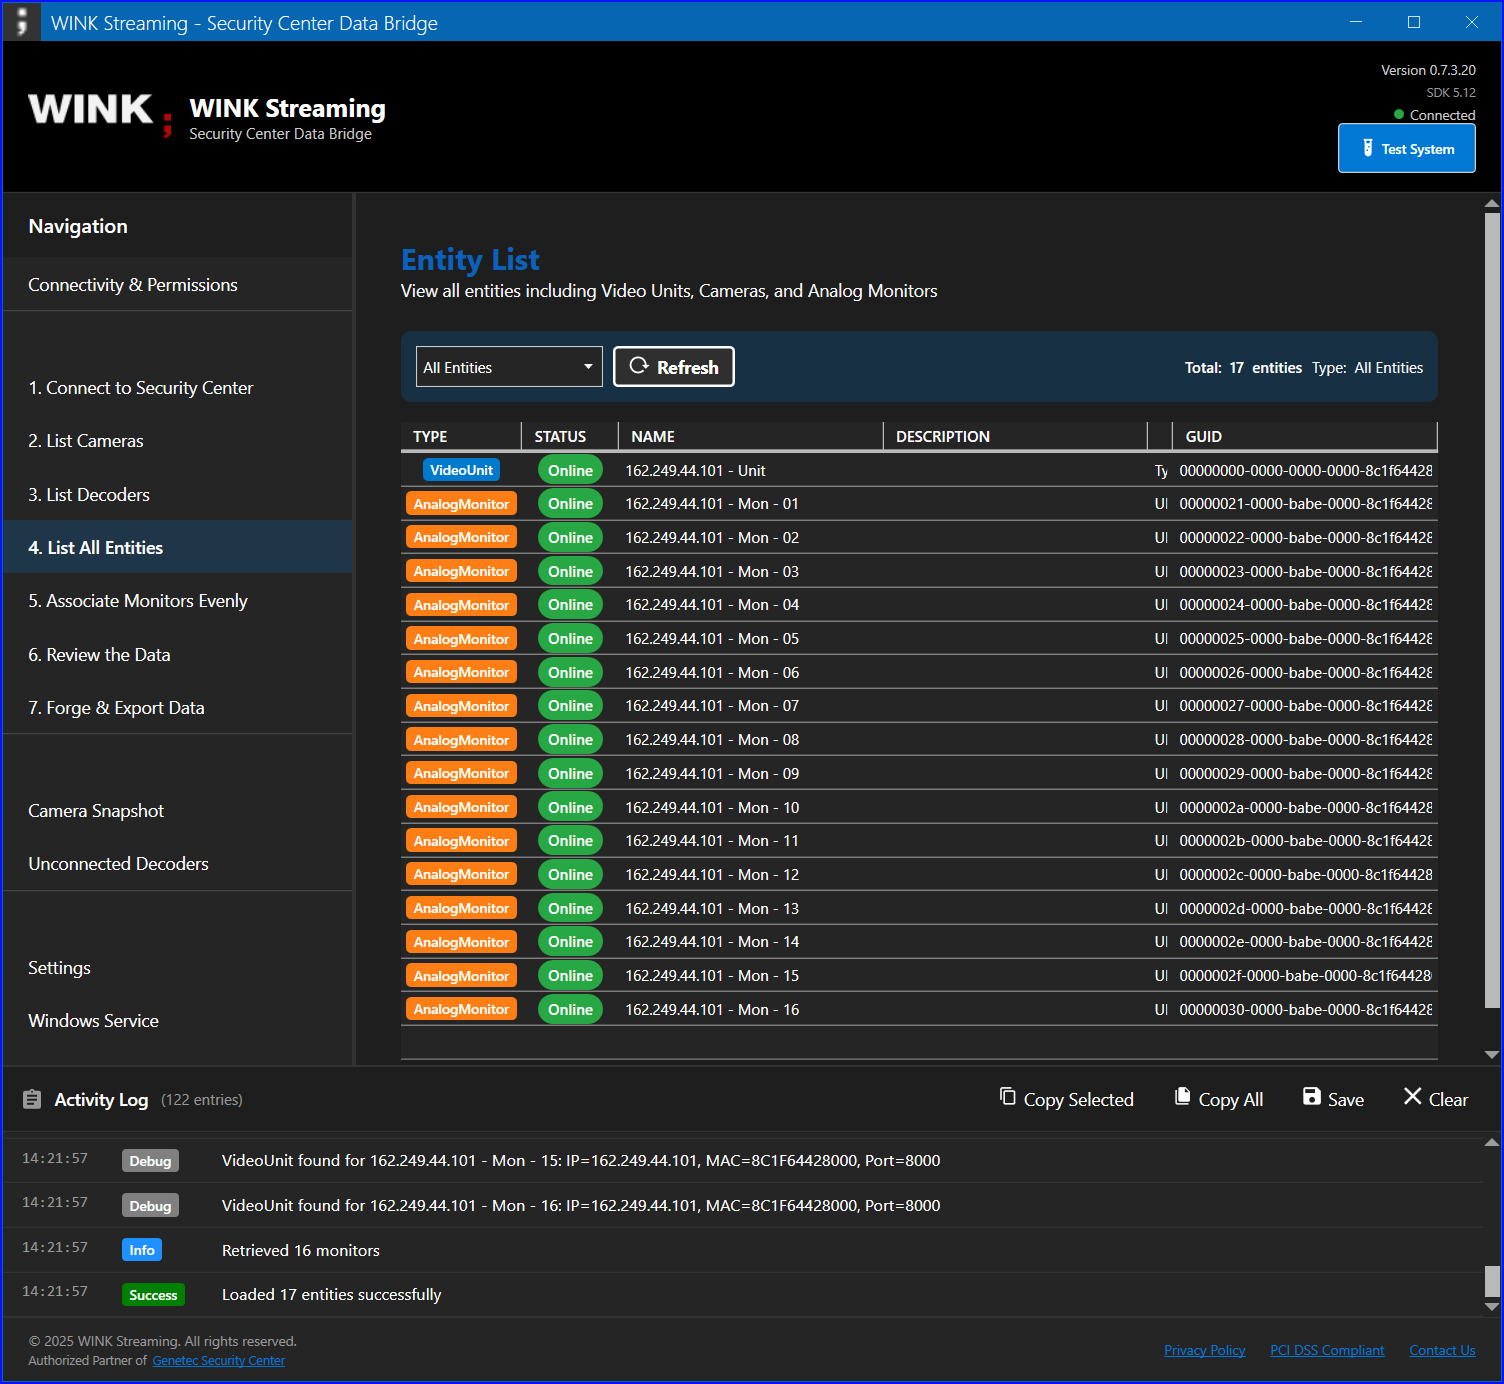
Figure 18: Step 4 - List Entities showing all entity types
Entity Types
- Cameras: All video sources
- Analog Monitors: Decoder devices
- Video Units: Hardware units containing decoders
- Alarms: System alarms and events
- Areas: Logical groupings
- Doors: Access control points
- Custom Entities: User-defined types
Entity Details
For each entity, the following information is available:
- GUID (Unique identifier)
- Name and description
- Type classification
- Parent entity relationships
- Custom field values
- Current status
Navigation
- Use tabs to switch between entity types
- Expand tree nodes to view hierarchies
- Search across all entities
- Export selected entity types
7.4 Associate Monitors
The Associate Monitors feature automates the distribution of cameras across analog monitors.
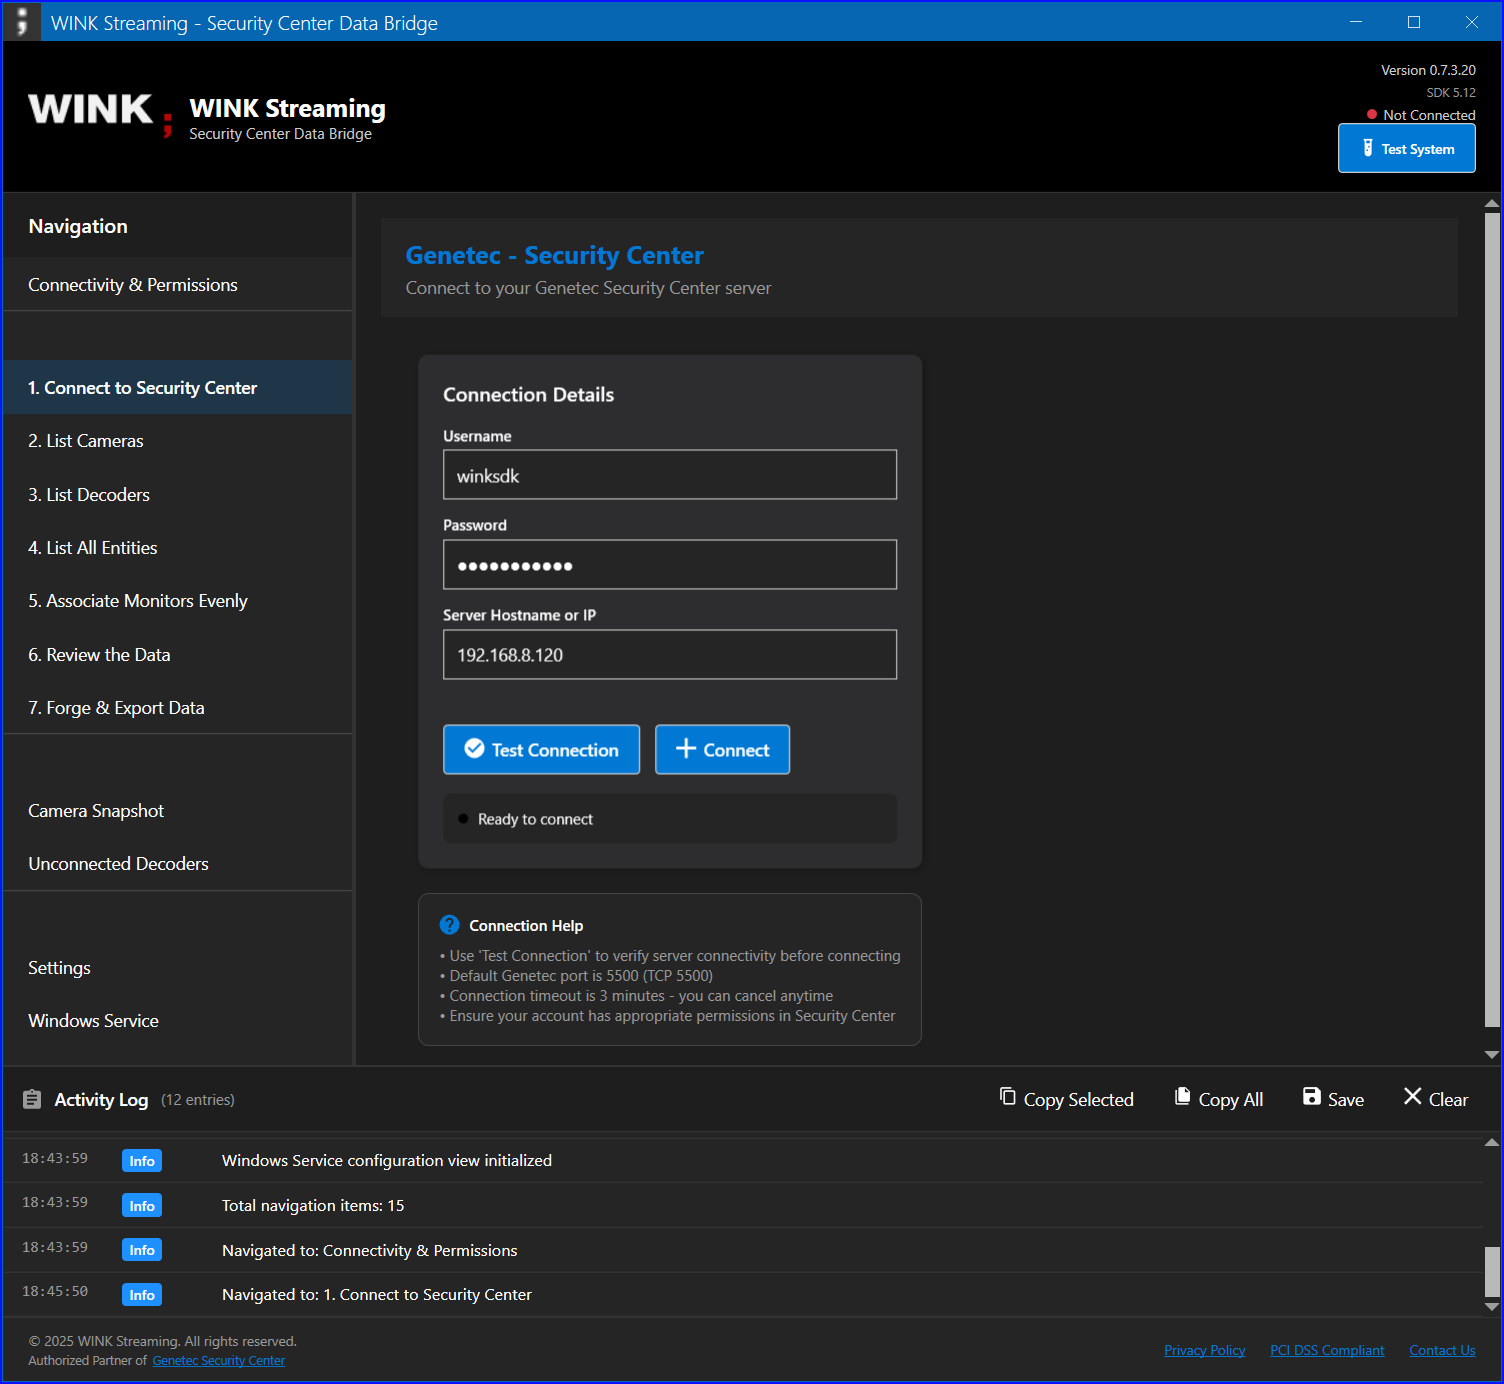
Figure 19: Step 5 - Associate Monitors Evenly
How It Works
- Load Current Configuration: Retrieves all cameras and monitors
- Calculate Distribution: Evenly distributes cameras across monitors
- Preview Changes: Shows proposed associations before applying
- Apply Updates: Updates monitor names to reflect associations
Association Process
| Step |
Action |
Result |
| 1 |
Click "Preview Associations" |
See proposed distribution |
| 2 |
Review assignments |
Verify camera-monitor pairs |
| 3 |
Enable "Only WF-prefixed" |
Filter specific monitors |
| 4 |
Click "Apply Associations" |
Update monitor names |
Important Limitations
SDK Limitation: The Genetec SDK 5.12 does not support programmatic video routing. This feature updates monitor names to indicate intended associations. Actual video routing must be configured manually in Security Desk.
Naming Convention
After association, monitor names follow this format:
[Camera Name] - [Monitor Prefix]-[UDP Port]
Example: Front Entrance - WF301-8001
7.5 Review Data
The Review Data tab provides a comprehensive overview of your current configuration.
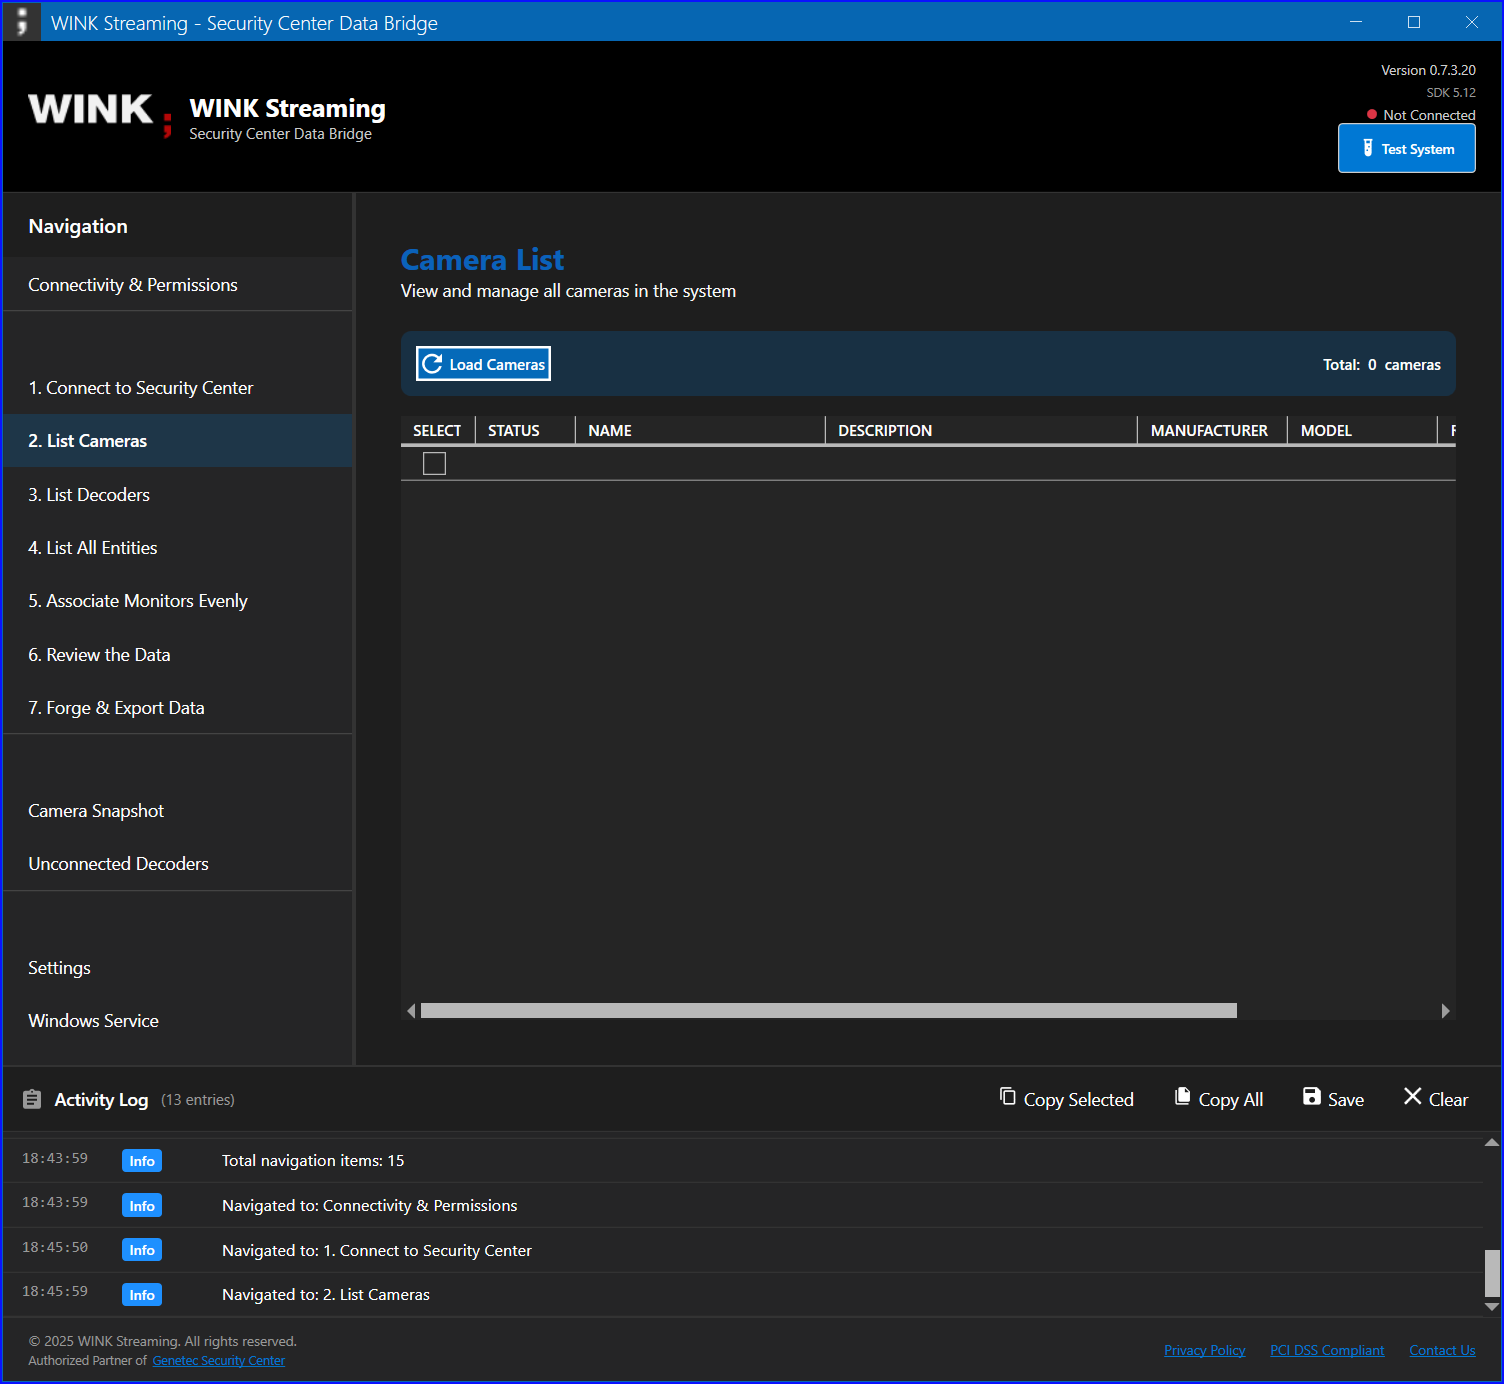
Figure 20: Step 6 - Review Data with tabbed interface
Review Sections
Cameras Tab
- Complete list of all cameras
- Status indicators
- Configuration details
- Export to CSV option
Monitors Tab
- All analog monitors
- Current associations
- Network information
- Connection status
Associations Tab
- Current camera-monitor pairs
- Unassociated devices
- Association history
- Configuration summary
Data Validation
Use this tab to:
- Verify configurations before export
- Identify configuration issues
- Check for unassociated devices
- Review system completeness
7.6 Export Data
The Export Data feature generates comprehensive XML documentation of your Security Center configuration.
Export Format
The export uses the "Forge" XML format with hierarchical structure:
<wink report_time="2025-01-24T10:30:00" generation_duration="2.5s">
    <monitors decoder_count="10" camera_count="40">
        <monitor_device ipaddress="192.168.1.100" macaddress="00:11:22:33:44:55">
            <monitor_unit>
                <decoder name="WF301-8001" udpport="8001">
                    <connectedcamera name="Front Entrance">
                        <!-- 58+ camera attributes -->
                    </connectedcamera>
                </decoder>
            </monitor_unit>
        </monitor_device>
    </monitors>
</wink>
Export Options
- Include Cameras: Export camera details
- Include Decoders: Export monitor information
- Include Offline: Include disconnected devices
- Custom Fields: Export user-defined attributes
Export Location
Files are saved to: %USERPROFILE%\Documents\GenetecForge_[timestamp].xml
Note: The XML export includes all 58+ camera attributes including PTZ settings, recording configuration, GPS location, and more.
8. Windows Service Configuration
8.1 Service Setup
The Windows Service enables automated monitoring and notification of Security Center changes.
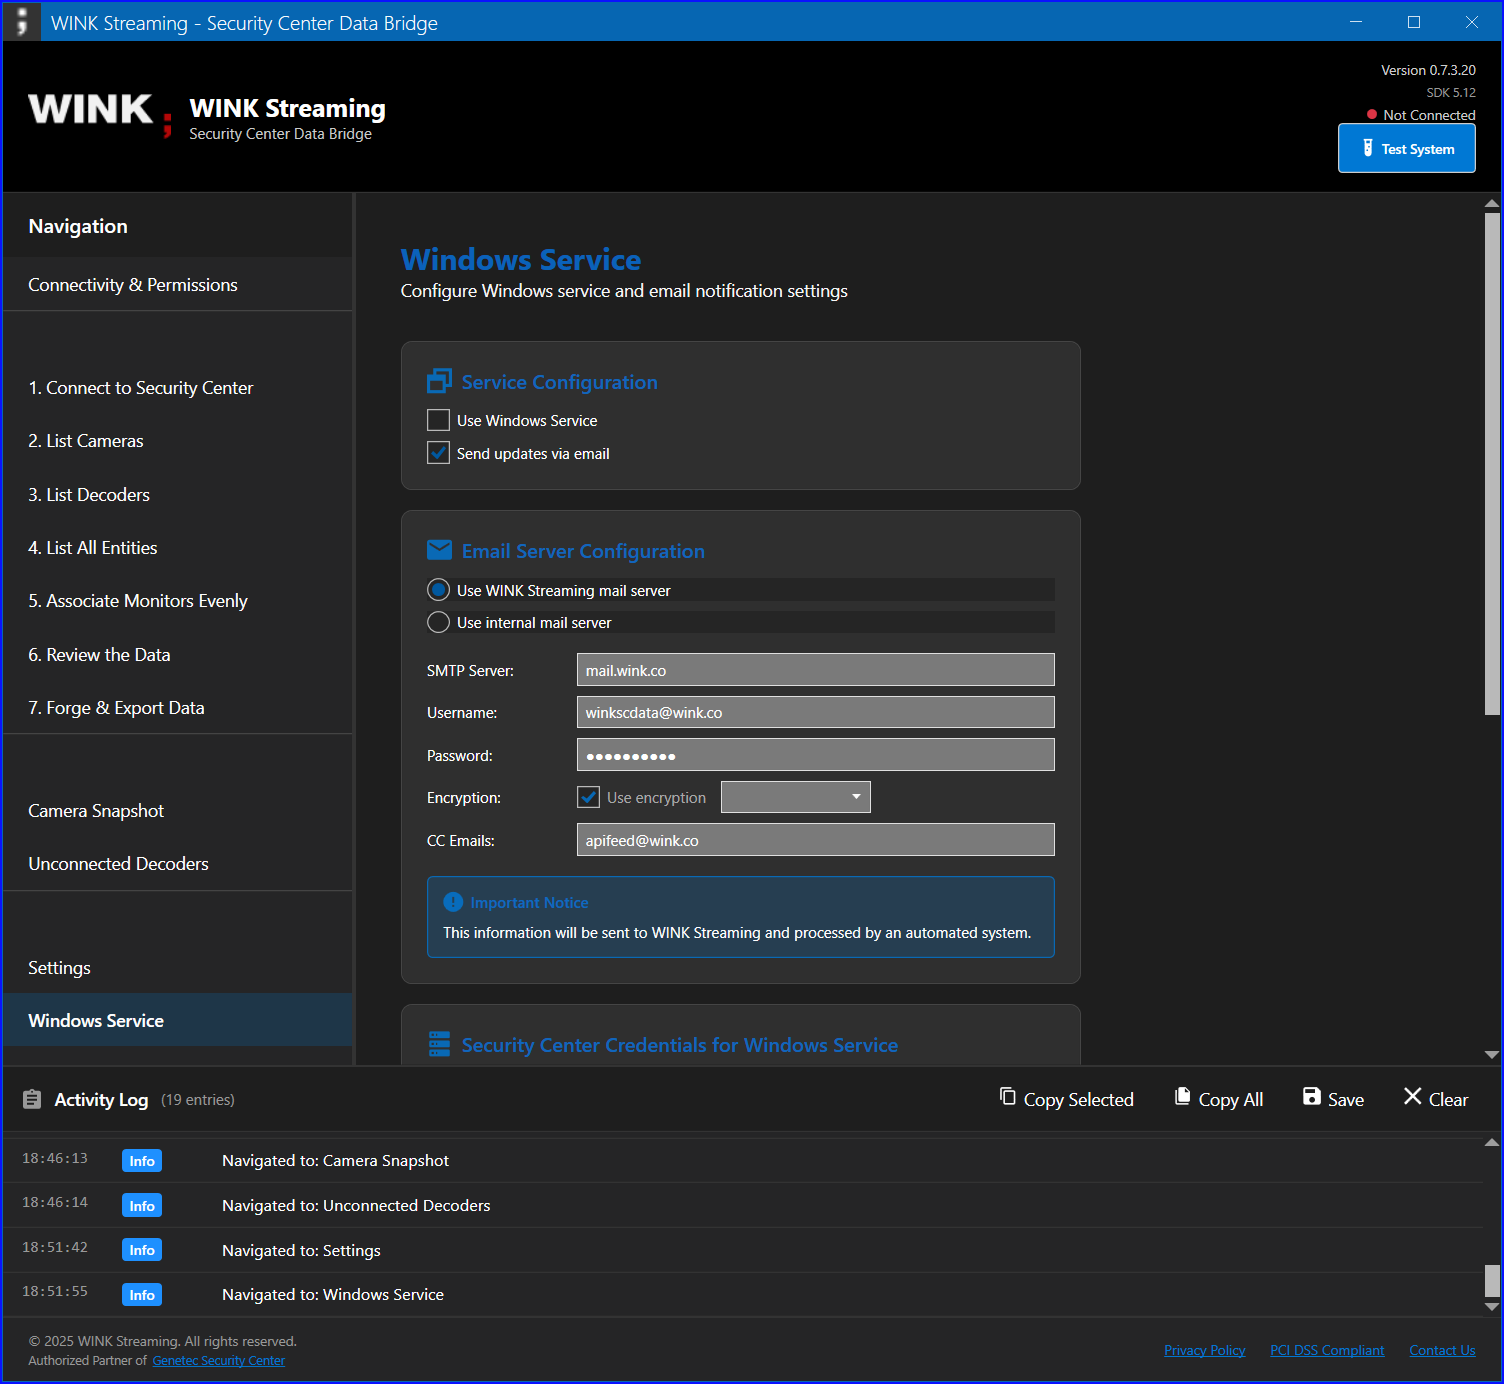
Figure 22: Windows Service configuration tab
Service Features
- Automated Monitoring: Checks for changes every 20 minutes
- Change Detection: Identifies new, modified, or removed entities
- Notifications: Email or HTTP POST on changes
- History Tracking: Maintains 7-day change history
Configuration Steps
- Enable "Use Windows Service" checkbox
- Select delivery method:
- Email notifications
- Post to URL (Media Router)
- Configure delivery settings
- Enter Security Center credentials
- Generate authentication key
- Click "Install Windows Service"
Service Information
| Property |
Value |
| Service Name |
WINKSCDataMonitor |
| Display Name |
WINK Security Center Data Monitor |
| Startup Type |
Automatic |
| Run As |
Local System |
| Check Interval |
20 minutes |
8.2 Delivery Methods
Email Notifications
Configure email delivery for change notifications:
Email Settings
- SMTP Server: Your mail server address
- Port: 587 (TLS) or 465 (SSL)
- Username: Email account username
- Password: Email account password (encrypted)
- Encryption: SSL/TLS, STARTTLS, or None
- To Address: Recipient email
- CC Addresses: Additional recipients (comma-separated)
Default WINK Configuration
| Setting |
Value |
| Server |
mail.wink.co |
| Port |
587 |
| Username |
winkscdata@wink.co |
| Encryption |
SSL/TLS |
| CC |
apifeed@wink.co |
HTTP POST (Media Router)
Configure HTTP POST delivery to a media router endpoint:
Media Router Settings
- Endpoint URL: Your media router API endpoint
- Authentication Key: 128-character key (auto-generated)
- Content Type: application/xml
- Method: POST
POST Format
POST /api/genetec HTTP/1.1
Host: your-media-router.com
Content-Type: application/xml
X-Auth-Key: [128-character-key]

<?xml version="1.0"?>
<signature>[authentication-key]</signature>
<wink>
    <!-- Genetec data XML -->
</wink>
8.3 Service Management
Installing the Service
- Configure all settings in the Windows Service tab
- Click "Install Windows Service" button
- Accept UAC elevation prompt (required)
- Wait for installation to complete
- Service starts automatically after installation
Service Controls
Once installed, the following controls become available:
| Button |
Function |
Requirements |
| Start Service |
Starts the monitoring service |
Service must be stopped |
| Stop Service |
Stops the monitoring service |
Service must be running |
| Restart Service |
Stops and starts the service |
Service must be installed |
| Uninstall Service |
Removes the service |
Service must be stopped |
Service Status Indicators
- ● Running: Service is active and monitoring
- ● Stopped: Service is installed but not running
- ● Not Installed: Service is not present
Viewing Service Logs
Service activity is logged to Windows Event Log:
- Open Event Viewer (eventvwr.msc)
- Navigate to Windows Logs → Application
- Filter by Source: "WINKSCDataMonitor"
- Review service events and errors
Important: Administrator privileges are required for all service operations. The application will prompt for elevation when needed.
9. Troubleshooting
Common Issues and Solutions
Connection Problems
| Issue |
Symptoms |
Solution |
| Cannot connect to Security Center |
Connection fails immediately |
- Verify server address and port (5500)
- Check firewall settings
- Test network connectivity with ping
- Ensure SDK is installed
|
| Invalid credentials error |
Authentication fails |
- Verify username and password
- Check "Log on using SDK" permission
- Ensure account is not locked
- Try without domain prefix first
|
| Certificate error |
License validation fails |
- Contact WINK support for certificate
- Verify SDK license is valid
- Check certificate in debug mode
|
Data Issues
| Issue |
Symptoms |
Solution |
| Missing IP addresses |
Blank IP/MAC in decoders |
- Enable "View video units" permission
- Check hardware visibility rights
- Run permissions verification test
|
| No cameras visible |
Empty camera list |
- Verify camera viewing permissions
- Check partition assignments
- Ensure cameras exist in system
|
| Cannot update monitors |
Association fails |
- Check modify permissions
- Verify monitors are not locked
- Ensure proper partition access
|
Service Issues
| Issue |
Symptoms |
Solution |
| Service won't install |
Installation fails |
- Run as administrator
- Check for existing service
- Verify .NET Framework 4.8
- Review Event Log for errors
|
| Service stops unexpectedly |
Status shows stopped |
- Check Event Log for errors
- Verify credentials are valid
- Ensure network connectivity
- Check disk space
|
| No email notifications |
Changes not reported |
- Verify SMTP settings
- Check email credentials
- Test with telnet to SMTP
- Review spam folders
|
Diagnostic Tools
Activity Log
The Activity Log provides real-time diagnostic information:
- Connection attempts and results
- API calls and responses
- Error messages with details
- Operation timings
To use the Activity Log effectively:
- Enable verbose logging in Settings
- Clear log before reproducing issue
- Perform the failing operation
- Export log for support
Permission Verification
Always run the Connectivity & Permissions test when troubleshooting to ensure all required permissions are granted.
Support Contact: For issues not covered here, contact WINK Streaming support at support@wink.co with exported logs and system details.
10. Best Practices
Security Best Practices
- Use Dedicated SDK Account
- Create separate account for SDK access
- Grant minimal required permissions
- Use strong, unique password
- Enable password expiration policies
- Secure Network Communication
- Use VPN for remote connections
- Implement firewall rules for port 5500
- Monitor SDK connection logs
- Use encrypted email delivery
- Credential Management
- Never share SDK credentials
- Rotate passwords regularly
- Use Windows authentication when possible
- Review stored credentials periodically
Operational Best Practices
- Regular Maintenance
- Export configurations weekly
- Review unconnected monitors monthly
- Update SDK to latest version
- Clean up old export files
- Change Management
- Document all configuration changes
- Test in non-production first
- Use preview before applying changes
- Maintain change log
- Monitoring
- Review Windows Service logs daily
- Set up email alerts for changes
- Monitor for unauthorized modifications
- Track entity count trends
Performance Optimization
- Limit concurrent connections to Security Center
- Schedule exports during off-peak hours
- Use filtering to reduce data volume
- Close application when not in use
- Regular restart of Windows Service monthly
11. Appendix
Appendix A: XML Export Schema
The Forge XML export format follows this schema:
<wink report_time="datetime" generation_duration="duration">
    <monitors decoder_count="integer" camera_count="integer">
        <monitor_device ipaddress="string" macaddress="string" guid="guid">
            <monitor_unit commandport="integer">
                <decoder name="string" udpport="integer"
                         IsOnline="boolean" guid="guid">
                    <description><![CDATA[text]]></description>
                    <custom_fields><![CDATA[text]]></custom_fields>
                    <connectedcamera name="string" guid="guid">
                        <!-- 58+ camera attributes -->
                    </connectedcamera>
                </decoder>
            </monitor_unit>
        </monitor_device>
    </monitors>
</wink>
Appendix B: Camera Attributes
The export includes these camera attributes:
| Category |
Attributes |
| Basic Info |
Name, Description, GUID, Model, Manufacturer |
| Network |
IP Address, MAC Address, Port, Protocol |
| Video |
Resolution, Frame Rate, Codec, Bitrate |
| PTZ |
Has PTZ, Presets, Tours, Patterns |
| Recording |
Mode, Quality, Retention, Schedule |
| Location |
GPS Coordinates, Building, Floor, Zone |
| Status |
Online State, Last Seen, Connection Type |
Appendix C: Error Codes
| Code |
Description |
Resolution |
| 1001 |
SDK not found |
Install Genetec SDK |
| 2001 |
Invalid credentials |
Verify username/password |
| 3001 |
Network timeout |
Check connectivity |
| 4001 |
Permission denied |
Grant required permissions |
| 5001 |
Certificate error |
Contact support |
Appendix D: Keyboard Shortcuts
| Shortcut |
Action |
| Ctrl+C |
Copy selected data |
| Ctrl+E |
Export current view |
| F5 |
Refresh data |
| Ctrl+F |
Find in current view |
| Alt+C |
Connect to Security Center |
| Alt+D |
Disconnect |