APIBridge Metro is now WINK Security Center Tools. Version 1.0.1.0 is a substantially better release: credentials are encrypted at rest, the Visual C++ runtime is installed for you, the manuals ship with the product, and the Macro Generator gives you server-side routing that is not limited by the SDK session. This page is kept only for operators still running the 0.9 build.
One correction applies to 0.9 as well: the GUI's Apply Associations button renames analog monitors. It does not push video routing. Only the console command WINKSCData.exe --applyassociations invokes the SDK routing action. The 0.9 text below overstated this and has been corrected in place.
APIBridge Metro
Table of Contents
- What's New in 0.9 3
- 1. Introduction 4
- 2. Product Overview 5
- 3. Package Architecture 6
- 4. System Requirements 7
- 5. Installation Guide 8
- 6. Genetec Security Center Configuration 11
- 7. Credentials: users.json 21
- 8. Getting Started 24
- 9. Browse Views 29
-
10. Decoder Tools 34
- 10.1 Associate Monitors Evenly 34
- 10.2 Sync Decoder Names 35
- 10.3 Apply Associations 36
- 10.4 Bulk CSV Association 37
- 10.5 Duplicate Detector 38
- 10.6 Reassociate Unit 38
- 10.7 Camera Stream Cycler 39
- 10.8 Unconnected Decoders 39
- 10.9 Mismatched Connections 40
- 10.10 Add to Partition 40
- 10.11 Organize Areas (SDK 5.11+) 41
- 10.12 Shared Patterns & Scope Picker 41
- 11. Export 42
- 12. Configuration & Windows Service 44
- 13. Permissions Quick Reference 50
- 14. Troubleshooting 51
- 15. Best Practices 55
- 16. File Locations 57
- 17. Performance & Resilience 58
- 18. Console Companion (WINKSCData) 59
- 19. Version History 60
- 20. Appendix 61
- 21. Support 64
WINK-SecurityCenterTools-Setup-0.9.0.0.exe contains both the APIBridge Metro GUI and the WINKSCData console — pick the components you want during setup. For deployment questions email support@wink.co.
What's New in 0.9 v0.9.0.0
Version 0.9 is the largest functional release of APIBridge Metro since the original public build. It introduces a shared credentials file, a combined installer that bundles the GUI and the headless console, a dynamic SDK version display, and an entire new family of Decoder Tools views that move the product from a "browse and rename" utility into an end-to-end commissioning and routing-repair console.
New features
users.jsoncredentials file — both the GUI and the headless console read a shared JSON credentials file from the EXE folder (portable) or%APPDATA%\WINKStreaming\users.json(per-user). The GUI exposes a new Save Credentials button on the Connect view; the console fills missing-h/-u/-parguments from the file, with command-line arguments always taking precedence.- Combined Inno Setup installer — one download for APIBridge Metro and WINKSCData. Component-based: tick the SDK 5.11 GUI build, the SDK 5.9 console build, or both. The standalone console-only installer is retired.
- Dynamic SDK version display — the top-right header now shows the actually loaded
Engine.ProductVersion(e.g.SDK 5.11.0.0) instead of a hardcoded value. This makes mistaken-DLL situations visible at a glance. - Connectivity & Permissions pre-flight — a single view checks SDK login plus the basic and advanced permissions the tool depends on, so missing privileges are diagnosed in seconds.
- Apply Associations & Reassociate Unit — rename analog monitors to record the intended camera-to-decoder pairing. Correction: these GUI views do not push video routing; the console's
--applyassociationsmode is what invokesActionManager.DisplayOnAnalogMonitorandRemoveFromAnalogMonitor. - Bulk CSV Association — upload a two-column
NAME, GUIDCSV, validate, capacity-check, preview, and apply across hundreds of monitors in one sweep. - Duplicate Detector, Camera Stream Cycler, Mismatched Connections, Add to Partition, and (on SDK 5.11+) Organize Areas — new Decoder Tools views for common commissioning and reconciliation tasks.
- Extract Archive State and Parallel Bulk Export — raw TCP
state allqueries (port 5602) that bypass the SDK, and a multi-session bulk exporter for the fastest possible pull on healthy servers. - Unhandled-exception capture — fire-and-forget async tasks now surface failures instead of being silently dropped by the finalizer.
Bug fixes
- Diagnostic telemetry routed to the working transport with deduplication and noise filtering. Previously many capture calls were dead no-ops; now operator-impacting issues actually surface to support.
- Top-right version and SDK indicators are now data-bound to runtime values, so they cannot drift from the loaded DLL again.
- Organize Areas view properly gated to SDK 5.11+, so the SDK 5.9 build compiles and ships cleanly.
- Console exit code 2 when credentials are missing (was previously a cryptic LogOn failure).
Compatibility
v0.9 is a fresh install on top of the previous v0.7 builds — there is no in-place upgrade from the standalone console-only installer of earlier releases. The user-edited users.json and the DPAPI-encrypted Windows Service settings are not destroyed by uninstall, so re-installing v0.9 in a different folder preserves both.
1. Introduction
APIBridge Metro is the WPF graphical operator console for the WINK Streaming Security Center toolset. It connects to Genetec Security Center over the official Genetec SDK and gives operators and integrators a single console for browsing entities, fixing decoder/camera bindings, syncing monitor names, exporting Forge XML for downstream WINK products, and configuring an optional WINKSCDataMonitor Windows Service for unattended change-notification.
This manual is written for operators and integrators who already understand Genetec Security Center concepts (cameras, video units, analog monitors, partitions, the SDK login flow) but need a concrete walk-through of how APIBridge Metro fits in. If you are new to Security Center, work through sections 1–8 in order: the Genetec configuration material in section 6 is the prerequisite for everything that follows.
Conventions Used in This Manual
- File paths in
{install}placeholders refer to the install root (defaultC:\Program Files\WINKStreaming\SecurityCenterTools). - Environment variables (
%APPDATA%,%USERPROFILE%) are written with Windows percent-syntax. - Genetec SDK method names (e.g.
ActionManager.DisplayOnAnalogMonitor) are written as code spans so they can be searched for in Genetec's own SDK documentation. - The naming convention
WF###refers to the WINK Forge analog-monitor patternWF001,WF002, etc.
2. Product Overview
Key Capabilities
- Professional WPF interface built on MahApps.Metro — modern look, multi-monitor friendly, keyboard-shortcut driven.
- Comprehensive entity management — browse and operate on cameras, analog monitors, video units, areas, and partitions.
- Automated monitor association — distribute cameras across analog monitors evenly and write the intended pairing into each monitor name. Routing itself is pushed by the WINKSCData console.
- Routing repair tools — Apply Associations, Reassociate Unit, Bulk CSV Association and Mismatched Connections record the documented intent in the monitor names after a network or server event; the console then pushes that intent back into Security Center as real routing.
- Data export — Forge XML, JSON, JSONL caches; Forge XML is byte-for-byte identical to the console's output, so the same downstream parsing works for both.
- Windows Service integration — scheduled Forge export, diff-on-change detection, email or HTTP POST delivery to a Media Router endpoint.
- Shared
users.jsoncredentials — write once via the GUI, read by both GUI and console; per-user or portable. - Encrypted Windows Service credential storage — service settings are persisted with the Windows Data Protection API (DPAPI) so they can only be read by the same Windows user account that wrote them.
Target Audience
APIBridge Metro is designed for:
- Security Center administrators who manage camera and decoder inventories at scale (typically hundreds to thousands of analog monitors).
- System integrators commissioning new sites and reconciling routing after migrations or major Security Center upgrades.
- Technical support personnel running diagnostics across multi-archiver deployments where the symptom is "video isn't on the monitor it should be on".
- Operations engineers who need an audit trail of what changed in the Security Center inventory between two points in time.
Version Information
| Component | Version |
|---|---|
| APIBridge Metro | 0.9.0.0 |
| WINKSCData (console sibling) | 0.9.0.0 |
| Target framework | .NET Framework 4.8 |
| Genetec SDK shipped with GUI build | 5.11.x |
| Genetec SDK shipped with Console build | 5.9.x |
| Supported Security Center server versions | 5.9, 5.10, 5.11, 5.11.3, 5.12 |
3. Package Architecture
The WINK Security Center Tools package is intentionally structured as two cooperating applications that share state through three contracts:
- A shared
users.jsoncredentials file (per-user or portable). - A shared Forge XML output format — byte-for-byte identical between GUI Export XML and console
--forge. - A shared set of Genetec SDK action calls for routing writes (
DisplayOnAnalogMonitor,RemoveFromAnalogMonitor, name changes).
| Application | Audience | SDK shipped | Use case |
|---|---|---|---|
| APIBridge Metro | Operators and integrators | 5.11 | Interactive browse, fix, rename, configure the Service. |
| WINKSCData (console) | Scripted / scheduled-task / CI use | 5.9 | Headless --forge, --comparenames, --applyassociations, --reassociate. |
| WINKSCDataMonitor (service) | Unattended deployments | (uses console's 5.9 SDK) | Scheduled Forge export every 20 minutes, diff vs previous, email or HTTP POST on change. |
The two applications can run simultaneously on the same machine — each opens its own SDK session — and they do not share JSONL caches. The console writes to its current working directory; the GUI writes to %USERPROFILE%\Documents. This intentional separation prevents a long-running console job from invalidating a cache the GUI is reading mid-operation.
Area.AnalogMonitors / Area.AddAnalogMonitor APIs that the Organize Areas view depends on. Splitting the two applications across the two SDK versions lets the console keep working against legacy 5.9 servers while the GUI gets the modern Area APIs against current 5.11+ deployments.
4. System Requirements
Minimum Requirements
| Component | Minimum | Notes |
|---|---|---|
| Operating system | Windows 10 1809 (build 17763), x64 | Windows Server 2019 and newer also supported; older OS is no longer tested. |
| .NET Framework | 4.8 | Pre-installed on Windows 10 1809+ and all Windows 11. Older OS needs the Microsoft redistributable. |
| Visual C++ 2019/2022 Redistributable (x64) | Latest | Required by the CefSharp browser embedded in the GUI's snapshot viewer. The installer does not yet chain it. |
| Disk | ~350 MB | GUI + console + dependencies. JSONL caches and Forge XML in Documents can grow large. |
| Memory | 2 GB free | Higher recommended on deployments exceeding 1,000 monitors. |
| CPU | Any x64 dual-core | Bulk operations are I/O-bound on the SDK, not CPU-bound. |
| Network | TCP 5500 to Security Center server | Default Genetec SDK port. Extract Archive State also needs TCP 5602. |
Recommended for Production
- Windows 11 or Windows Server 2022
- Intel Core i5 / Ryzen 5 or better
- 8 GB RAM
- 1920×1080 display or higher (the GUI's grid views are dense)
- Wired network to the Security Center server segment (the throttle on SC 5.11.3 is unforgiving on flaky links)
Genetec Security Center Requirements
- Security Center version: 5.9 or later. SC 5.11.3 and newer ship a per-second LogOn throttle that the tool already handles with patient backoff.
- SDK license: Genetec part #
GSC-1SDK-WINK-FORGE(or any other SDK-enabled license). - SDK user account: dedicated, with the privileges enumerated in section 6.2.
- Network access: TCP 5500 (SDK) from this workstation to the Security Center server.
5. Installation Guide
5.1 Combined Installer
Prerequisites
- Ensure system requirements (section 4) are met on the target machine.
- Obtain administrator privileges on the target machine — the installer needs to write into
C:\Program Filesand (optionally) register a Windows Service. - Verify network connectivity to the Security Center server:
Test-NetConnection -ComputerName <sc-host> -Port 5500should succeed. - Have the SDK account credentials handy (you'll save them via Save Credentials on first launch).
Installation Steps
- Download
WINK-SecurityCenterTools-Setup-0.9.0.0.exefrom the link at the top of this page (or from wink.co/binaries/). - Right-click → Run as administrator.
- Accept the license agreement.
- Choose installation directory (default
C:\Program Files\WINKStreaming\SecurityCenterTools). - On the Select Components page, tick the apps you want:
- APIBridge.Metro GUI (Genetec SDK 5.11) — the WPF application this manual covers.
- WINKSCData console (Genetec SDK 5.9,
--forge) — the command-line tool.
- Tick Create a desktop icon if appropriate.
- Click Install.
- At the end of installation a dialog reminds you about
users.json— see section 7.
Post-Installation Verification
- Launch APIBridge Metro from the Start menu or desktop shortcut.
- Confirm the top-right header shows the application version (
Version 0.9.0.0) and the loaded SDK version (e.g.SDK 5.11.0.0). - Open the Settings tab and verify the assembly version, file path, and build date are populated.
- Review the Activity Log panel at the bottom — it should show
APIBridge.Metro v0.9.0.0 starting upand an SDK initialization line. - Run the Connectivity & Permissions verification (section 8.2) against your Security Center server.
5.2 Files Installed
C:\Program Files\WINKStreaming\SecurityCenterTools\
├── Metro\
│   ├── APIBridge.Metro.exe
│   ├── APIBridge.Metro.exe.config
│   ├── users.json                 (blank by default)
│   ├── Genetec.Sdk.dll            (5.11.x)
│   ├── MahApps.Metro.dll
│   ├── CefSharp.*.dll             (snapshot viewer)
│   └── ... ~315 supporting files
├── Console\
│   ├── WINKSCData.exe
│   ├── WINKSCData.exe.config
│   ├── users.json                 (blank by default)
│   ├── Genetec.Sdk.dll            (5.9.x)
│   └── ... ~155 supporting files
└── USERS-JSON-README.txt
5.3 Genetec SDK Notes
Two distinct Genetec SDK assemblies ship inside the installer — one next to the GUI (SDK 5.11) and one next to the console (SDK 5.9). They cannot share an install folder because Genetec.Sdk.dll is loaded by name from the same directory as the EXE.
This split exists for a reason:
- The GUI's Organize Areas view depends on
Area.AnalogMonitors/Area.AddAnalogMonitorAPIs that only exist in SDK 5.11+. - The console is deployed unattended into mixed environments, some of which still run SC 5.9 servers; SDK 5.9 is the broadest-compatibility build that still talks to current SC 5.11.3 servers.
If you connect the GUI to a Security Center 5.9 server, everything except the Organize Areas view works; the Areas view is automatically hidden in that case to avoid confusion.
5.4 Uninstall
Standard Add or Remove Programs entry: WINK Streaming — Security Center Tools 0.9.0.0. Uninstall preserves:
- User-edited
users.jsonfiles (in both{install}\Metro\/{install}\Console\and%APPDATA%\WINKStreaming\) - Cached JSONL data in
%USERPROFILE%\Documents - DPAPI-encrypted Windows Service settings at
%APPDATA%\WINKStreaming\APIBridge\settings.encrypted
The installed WINKSCDataMonitor service, if present, is stopped and removed during uninstall via sc.exe delete.
6. Genetec Security Center Configuration
Before APIBridge Metro can connect to your Security Center server, three things have to be in place on the Genetec side: an SDK-enabled user account, the right privileges on that account's role, and (optionally but strongly recommended) a partition that scopes what the SDK user can see and modify. This section walks through each step in Config Tool, screenshot by screenshot.
6.1 Creating the SDK User
APIBridge Metro requires a dedicated SDK user account. Do not reuse a Security Desk operator account or an administrative account for SDK access — a dedicated account makes the audit trail clean, lets you rotate the SDK password independently, and lets you revoke SDK access without disrupting normal operations.
Step 1: Open Config Tool
- Launch Genetec Config Tool on (or connected to) your Security Center server.
- Log in with administrator credentials — you'll need privileges to create users and modify roles.
- Navigate to the User Management task.
Step 2: Create the New User
- Click Add an entity → User (or right-click in the user tree and select New user).
- Enter the following information:
- Username:
winkSDK(recommended) or a name consistent with your organization's conventions. - First name: WINK
- Last name: SDK User
- Password: Set a strong, unique password. Do not reuse a personal password — this credential will eventually live in
users.jsonin plain text. - Email: Optional. Useful for receiving Genetec lockout notifications.
- Username:
- Enable the User can log on using the SDK option. This is the gate — without it, every other privilege is irrelevant.
- Set Password never expires if appropriate for your security policy. If your policy enforces rotation, plan to update
users.jsonat the same time the SDK password rotates. - Click Apply.

Step 3: Verify the Account
Before granting privileges, verify the account itself is usable:
- From a Windows host with network reach to the Security Center server, open APIBridge Metro.
- Navigate to Setup → Connect to Security Center.
- Enter hostname, the new
winkSDKusername, and the password you set. - Click Test Connection.
At this stage the test should succeed at the connection level but the next sections (browse, decoders, etc.) will be empty because no privileges are granted yet. That is the correct state — proceed to section 6.2.
6.2 Configuring Permissions
The SDK user inherits privileges from its assigned role. The simplest production pattern is to create a dedicated role (e.g. WINK SDK Role) and add the winkSDK user to it, so privilege adjustments do not need to be re-applied per-user as your team scales.
Required Privileges
| Permission Category | Specific Permission | Purpose |
|---|---|---|
| General | Log on using the SDK | Required for SDK authentication. Without this, nothing else works. |
| Entities | View all entity types | Access cameras, monitors, video units, areas, partitions. |
| Video | View video units | Required for IP and MAC address retrieval. Blank IP/MAC in exports almost always indicates this is missing. |
| Video | View cameras | List and inspect cameras (model, resolution, codec, GPS). |
| Video | View analog monitors | Access decoder information. Required for everything in the Decoder Tools section. |
| Video | Modify analog monitor properties | Update monitor Name and Description. Required for Associate Monitors, Sync Decoder Names, Bulk CSV Association. |
| Hardware | View hardware configuration | Access IP and MAC addresses on Video Units. This is the privilege most often missing on restricted SDK accounts. |
| Actions | Display camera on analog monitor | Required for Apply Associations, Reassociate Unit, Bulk CSV Association write paths. |
| Actions | Remove camera from analog monitor | Required for Reassociate Unit and the "Reassociate" buttons in Apply Associations. |
| Partitions | Add member to partition | Required only for the Add to Partition view. |
| Custom Fields | View custom fields | Required only if you rely on custom attributes in the Forge XML output. |
| Geographic | View geographical locations | Required for GPS coordinates on map-aware cameras. |
Setting Permissions
- In Config Tool, navigate to User Management → Roles (or open the role assigned to your
winkSDKuser). - Open the Privileges tab.
- Enable each required permission by checking the appropriate boxes from the table above.
- Pay special attention to these often-overlooked toggles:
- View role properties
- View role resources
- View access control unit properties
- Modify ALPR unit properties (only if you use ALPR cameras)
- Click Apply.
- Switch to the Resources tab to confirm which entities the role can act on; if you are using partitions (section 6.3) restrict the role's resources to the WINK partition.


Verification
Once privileges are applied, re-run APIBridge Metro's Connectivity & Permissions verification (section 8.2). The tool will tell you, per privilege, what the SDK user can and cannot see, which is far faster than guessing from a partial export.
6.3 Setting Up Partitions
For production deployments we strongly recommend creating a dedicated partition for the WINK SDK user. Partitions scope what entities a user can see and act on, and they are the right way to limit blast radius if the SDK credentials are ever compromised or misconfigured.
Creating a Partition
- In Config Tool, navigate to System → Partitions.
- Click Add Partition (or right-click → New partition).
- Configure the partition:
- Name:
winkStreaming - Description: WINK Streaming SDK access — scope for APIBridge Metro and WINKSCData
- Parent partition: Select the appropriate parent (typically the system root or your top-level operational partition).
- Name:
- Save the partition.
Assigning the SDK User to the Partition
- Select the
winkSDKuser. - Navigate to the Partitions tab on the user (or on the user's role).
- Add the
winkStreamingpartition to the user's accessible partitions. - Set appropriate permission levels within the partition (typically Accepted for everything you want the SDK user to manage).

Populating the Partition
The partition is empty by default. Move the entities the SDK user should manage into it:
- The Video Units (archivers) whose decoders APIBridge Metro will modify.
- The Analog Monitors that will be renamed and routed.
- The Cameras that will be displayed on those monitors.

Partition Benefits
- Security isolation — limits SDK user access to specific entities. A compromised SDK password cannot affect entities outside the partition.
- Audit trail — easier tracking of SDK-initiated operations; everything the integration touches is in one named partition.
- Resource management — control which cameras and monitors are accessible per integration.
- Multi-tenant support — separate different client configurations under one Security Center server.
winkStreaming" — so it does not get lost during a future audit.
6.4 Configuring Analog Monitors
If you are using analog monitors (virtual decoders, in Genetec parlance), the way you name them in Security Center directly affects how every Decoder Tools view in APIBridge Metro behaves. This section covers the conventions APIBridge Metro is designed around.
Creating Analog Monitors
Analog monitors are created against a Video Unit (archiver) in Config Tool. Each monitor represents one "decoder slot" the archiver can route a camera to.

Naming Convention
APIBridge Metro's Associate Monitors Evenly, Sync Decoder Names, and Bulk CSV Association views all assume a structured naming convention. The reference pattern used throughout the WINK Forge ecosystem is:
WF### Where ### is a zero-padded three-digit number (WF001, WF002, … WF999). After APIBridge Metro associates a camera with a monitor, the monitor name takes the canonical form:
{CameraName} - {WF###}-{UdpPort}For example: Front Entrance - WF301-8001 where 8001 is the monitor's UDP port.
This convention has three benefits:
- It is parseable. The trailing
WF###-{port}fragment lets the console's--applyassociationsmode and the GUI's Apply Associations view rediscover the intended routing from the monitor name alone, even after a routing wipe. - It is human-readable. Operators in Security Desk see a name that tells them both the camera and the destination slot at a glance.
- It is sortable. Sorting by name in any list view groups monitors by destination slot.

Renaming Monitors via APIBridge Metro
When you trigger a rename operation in APIBridge Metro (for example via Sync Decoder Names or Associate Monitors Evenly), Security Center may prompt to rename related devices if the monitor is part of a multi-decoder unit. The dialog looks like this:

After the operation completes, the monitor list reflects the new names immediately:

Original:. This means you can always recover the historical name without consulting an external log.
UDP Port Assignment
By convention, monitor UDP ports are assigned sequentially starting at a base (commonly 15000 or 8000) per Video Unit. The deterministic ordering used by Bulk CSV Association is (IP, UDP) ascending — so when CSV input cameras are paired with empty monitors, they go to the lowest-numbered free slot on the lowest-IP unit first. If you want a different ordering, sort the CSV before loading it.
7. Credentials: users.json
Both APIBridge Metro and the WINKSCData console can read a users.json file at startup so operators do not have to retype host, username, and password every launch. The file is shared between the two applications — write it once via the GUI and the console uses it next time you run a scripted job.
7.1 Search Order
The file is searched for in two locations, first match wins:
- Same folder as the EXE (portable mode) — useful for per-deployment or USB-stick installs:
{install}\Metro\users.json{install}\Console\users.json
- Per-user:
%APPDATA%\WINKStreaming\users.json— shared by both apps; this is the path the GUI's Save Credentials button writes to.
The two locations are independent. A portable users.json next to the EXE wins over the per-user one — useful when you want to override a saved per-user credential for a specific deployment without disturbing the operator's saved login.
7.2 Schema
{
  "host": "10.18.183.20",
  "username": "YOUR_SDK_USER",
  "password": "YOUR_PASSWORD",
  "useDemoCertificate": false
}
| Field | Type | Notes |
|---|---|---|
host | string | IP or DNS name of the Genetec Security Center server. |
username | string | SDK-enabled account (must have Log on using the SDK privilege). |
password | string | Plain text password. |
useDemoCertificate | boolean | true for the Genetec demo certificate, false for production. |
A blank template ships in this package and in the installer's USERS-JSON-README.txt.
7.3 Saving Credentials from the GUI
- Open APIBridge Metro.
- Navigate to Setup → Connect to Security Center.
- Fill in Hostname, Username, Password, and the Use Demo Certificate checkbox if applicable.
- Click Save Credentials.
The credentials are written to %APPDATA%\WINKStreaming\users.json. The current source path is shown under the buttons as Credentials source: <path> so you always know where the prefilled values came from. On the next launch the fields are pre-filled automatically.
7.4 Console Credential Precedence
The console always honors command-line arguments first; users.json only fills in whatever was not passed on the command line. This preserves scripted use — a scheduled job can override a saved credential without disturbing the file.
| Command line | users.json | Effective values |
|---|---|---|
-h X -u Y -p Z (all three) | (anything) | Uses CLI values; --democert only if passed. |
-h X only | has username, password, useDemoCertificate | Uses CLI host + file user / pass / cert. |
| (none) | complete | Uses file values. |
| (none) | empty | Console exits with code 2 and prints the schema example. |
7.5 Security
users.json stores credentials in plain text. It inherits NTFS permissions from %APPDATA%, which is per-user by default on standard Windows installations — that is, by default another standard user on the same machine cannot read it, but anyone with administrative privileges can.
If stronger protection is required:
- Do not save credentials. Pass them on the command line for scripted invocations, or rely on the DPAPI-encrypted Windows Service store for unattended deployments (section 12.2).
- Use Windows ACLs. If you must save plain text credentials, lock the file ACL down to just the user account that runs the integration.
- Rotate regularly. Treat the SDK password the same as any other long-lived service credential — quarterly rotation is a reasonable baseline.
users.json is plain text by design. It is convenient for operators but is not a replacement for DPAPI-encrypted storage in production unattended deployments. The Windows Service uses DPAPI; if you need DPAPI for interactive use, do not save credentials.
8. Getting Started
8.1 First Launch
On first launch, APIBridge Metro presents the main interface with the following components:
- Header: WINK Streaming branding, app version (
Version 0.9.0.0), the actually loaded Genetec SDK version (e.g.SDK 5.11.0.0), and a live connection pill (red = not connected, green = connected). - Navigation panel: left sidebar grouped into five sections — Setup, Browse, Decoder Tools, Export, Configuration.
- Content area: the main pane displaying the current view.
- Activity Log: bottom panel showing real-time operation logs with timestamp, severity (Info / Warning / Error / Debug), and message.
- Footer: Privacy Policy, PCI-DSS Compliant indicator, Contact Us, and Genetec partner link.
Initial Setup Checklist
- Verify the loaded Genetec SDK version in the top-right header matches the SDK build you installed (5.11 for the Metro GUI).
- Ensure you have Security Center connection details ready:
- Server hostname or IP address
- SDK username and password (from section 6.1)
- Port number (default 5500 — not configurable in the GUI, change only if your Security Center server uses a non-default SDK port)
- Confirm network connectivity to the Security Center server:
Test-NetConnection -ComputerName <sc-host> -Port 5500. - Review any banner shown at the top of the Connect view — it surfaces SDK initialization warnings and helps catch DLL-blocking issues from downloaded files.
8.2 Connectivity & Permissions Verification
Before attempting to connect and perform operations, use the Connectivity & Permissions view to ensure the environment is correctly configured. This single view diagnoses 90 % of new-deployment issues before they become support tickets.

Running Connectivity Verification
- Click Connectivity & Permissions in the Navigation panel.
- Enter your connection details:
- Server Address: Security Center server hostname or IP.
- Username: the SDK user (e.g.
winkSDK). - Password: the SDK user's password.
- SDK Version: usually leave at auto-detected; override only if you need to force 5.9 vs 5.12 query patterns.
- Use Domain Authentication: check if your environment uses Windows authentication for SDK access.
- Use Demo Certificate: check only for dev/test against the Genetec demo cert.
- Click Test System (top-right) or Run Verification.
- Review the results in the panels that appear (Connection Information, Permission Check Results).

Understanding the Results
| Test Item | Expected Result | If Failed |
|---|---|---|
| Connection Status | Connected | Check server address, network, firewall, port 5500. |
| View Cameras | Permitted | Grant View cameras on the SDK user's role. |
| View Analog Monitors | Permitted | Grant View analog monitors. Without it, every Decoder Tools view returns empty. |
| View Video Units | Permitted | Critical for IP addresses — grant View video units. |
| View Hardware Configuration | Permitted | Required for MAC addresses and unit IP retrieval. |
| Modify Analog Monitor | Permitted | Required for monitor association and rename operations. |
| View All Entity Types | Permitted | Covers Areas, Partitions, custom entities used in advanced views. |
Re-running After Permission Changes
If you adjust privileges in Config Tool after a failed verification, you do not need to restart APIBridge Metro. Click Run Verification again — the SDK rechecks privileges live on the existing session.
8.3 Connecting to Security Center
After verifying connectivity, proceed to the Connect view to establish a full session that the rest of the application can use.
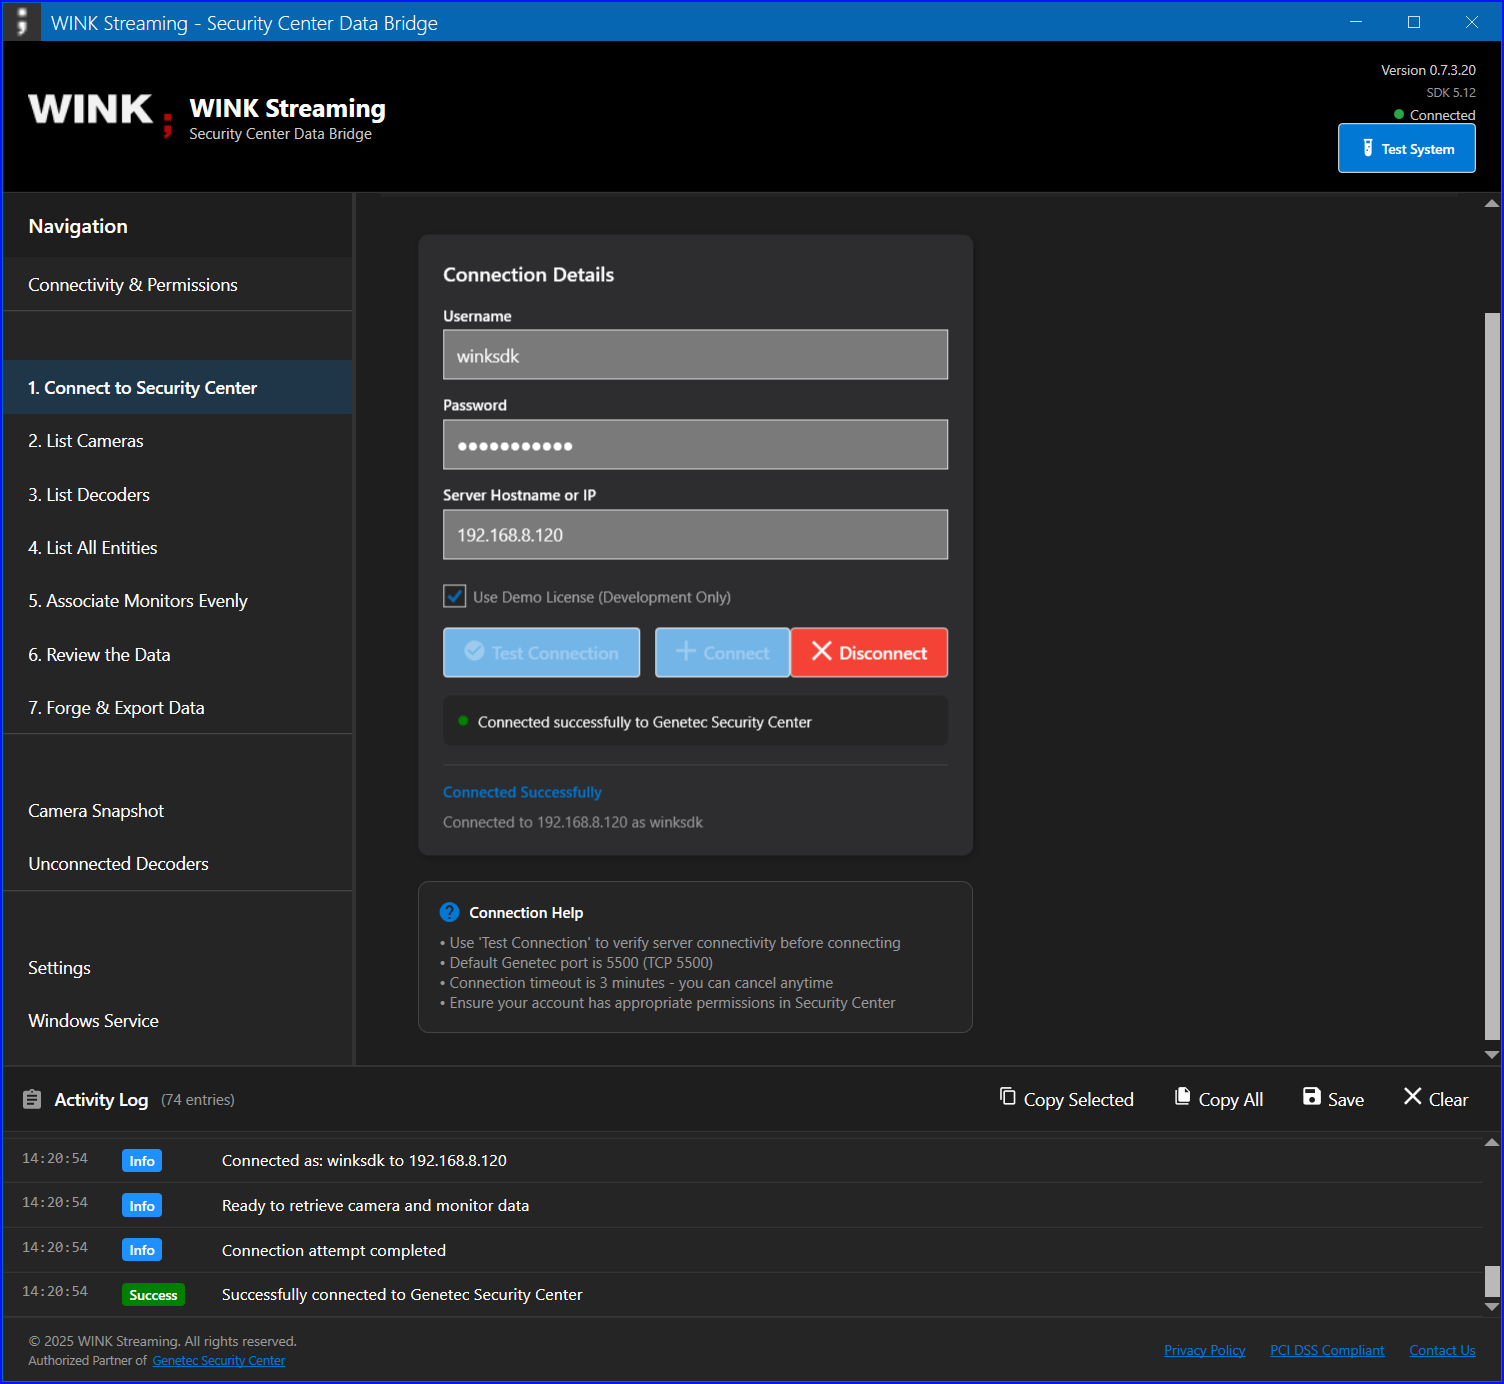
%APPDATA%\WINKStreaming\users.json.Connection Process
- Navigate to Setup → Connect to Security Center.
- If you have already saved credentials, the fields are pre-filled — the source path is shown under the buttons.
- Otherwise enter:
- Hostname or IP: your Security Center server
- Username: SDK user credentials
- Password: SDK user password
- Use Demo Certificate: only for dev/test environments
- Click Test Connection to verify reachability without a full
LogOn(optional). - Click Connect to establish the session.
- Monitor the Activity Log for connection status — you should see
Connecting to <host>:5500…followed byConnected as <user>. - Optional: click Save Credentials to write the current fields to
%APPDATA%\WINKStreaming\users.json.
Connection States
- Disconnected (red pill): no active session.
- Connecting (yellow pill): connection in progress; Cancel aborts.
- Connected (green pill): SDK session established; all Decoder Tools become available.
- Reconnecting (yellow pill): a transient SDK disconnect occurred and the tool is backing off (0 / 30 / 60 / 120 / 300 / 600 s).
Troubleshooting Connection Issues
| Error Message | Possible Cause | Solution |
|---|---|---|
| InvalidCredential | Wrong username or password | Verify in Config Tool. Try once without a domain prefix. |
| NetworkError | Cannot reach server | Check network reachability and firewall on port 5500. |
| SDKNotFound | Genetec SDK assemblies missing or blocked | Verify Genetec.Sdk.dll is present next to the EXE; right-click → Properties → Unblock if downloaded. |
| CertificateError | License or certificate issue | Verify the SDK license on the server; contact WINK support if persistent. |
| DeniedByFirewall | SC 5.11.3 per-second LogOn throttle | Wait 5 minutes; the throttle clears on its own. The tool retries automatically with backoff. |
9. Browse Views
The four Browse views are read-only — no writes happen here. Use them to inventory the deployment, validate SDK privileges, and identify discrepancies before touching anything with the Decoder Tools.
9.1 List Cameras
The List Cameras view provides a comprehensive grid of all cameras in your Security Center deployment that the SDK user has visibility into.

Available Information
- Name — camera display name in Security Center
- Description — additional camera details (often free-form)
- Status — Online / Offline indicator
- Resolution — current video resolution (e.g. 1920×1080)
- Codec — H.264 / H.265 / MJPEG
- Frame rate — current FPS
- Manufacturer and Model
- GPS — latitude / longitude if the camera is geo-tagged
Features
- Sorting — click any column header.
- Filtering — type in the search box to filter by any field substring.
- Export — export the current filtered/sorted view to CSV.
- Refresh — re-query the server (the button offers both a Bulk/Fast and a Slow/Thorough mode — see section 10.12 for the difference).
Usage Tips
- Double-click a camera row to view full details including PTZ capabilities and recording configuration.
- Use Ctrl+Click to select multiple cameras for bulk operations.
- Right-click for the context menu (copy GUID, copy as JSON, copy as CSV row).
- Export regularly for documentation and change-tracking purposes.
9.2 List Decoders
The List Decoders view displays every analog monitor (virtual decoder) the SDK user can see, with its current camera binding and the parent video unit's network identity.
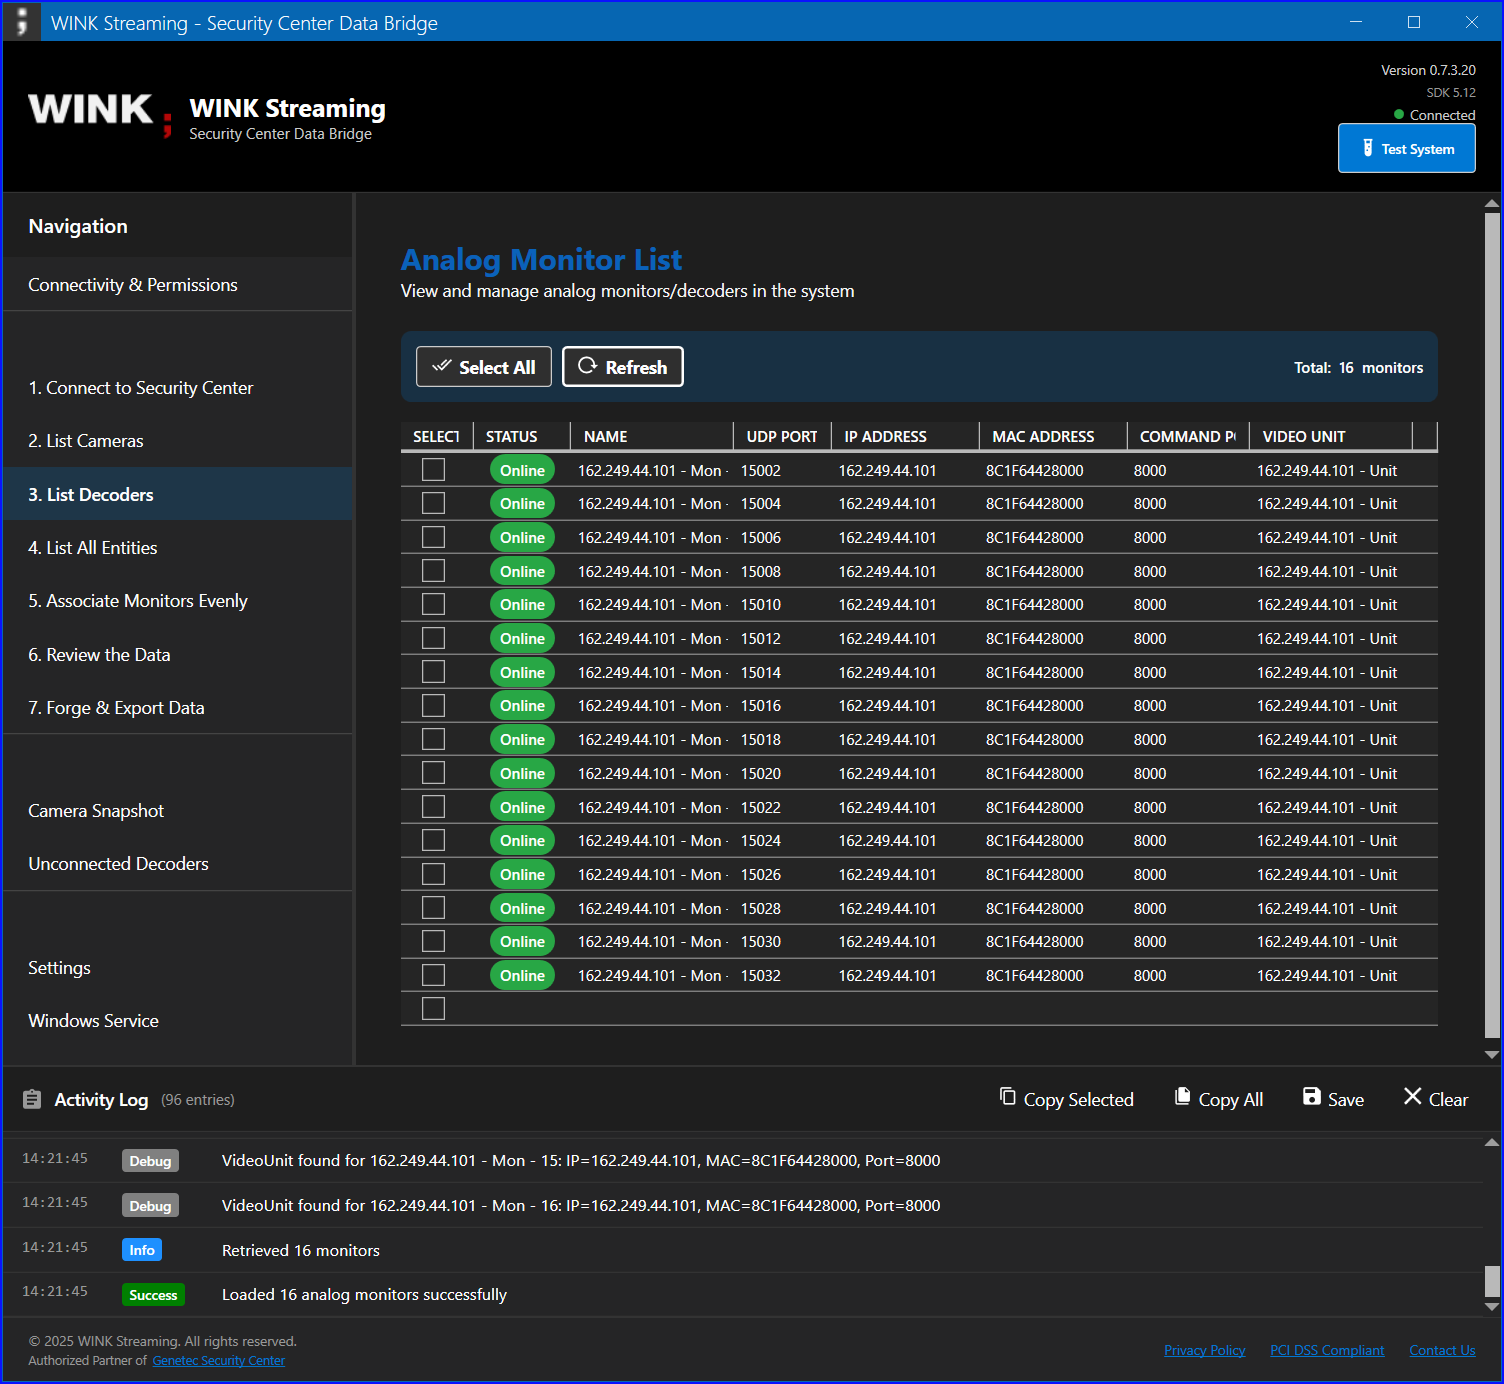
Decoder Information
| Field | Description |
|---|---|
| Monitor Name | Display name of the analog monitor. Follows the canonical {Camera} - WF###-{port} pattern after Sync Decoder Names runs. |
| UDP Port | Network port for the video stream destined to this slot. |
| Video Unit | Parent archiver name. |
| IP Address | Network address of the parent video unit (blank if the SDK user lacks View hardware configuration). |
| MAC Address | Hardware address of the parent video unit (same privilege requirement). |
| Connected Camera | Currently routed camera, or blank for unconnected slots. |
| Status | Online / Offline. |
| Running State | SDK-reported runtime state of the decoder. |
| Signal State | Current signal state (useful for spotting decoders with stuck streams). |
Common Use Cases
- Identify unconnected monitors for capacity planning (or drill into them via the dedicated Unconnected Decoders view).
- Verify monitor configurations match the canonical naming convention.
- Check network settings across archivers — sort by IP to spot misconfigured units.
- Export for network documentation — feed CSV into Visio, asset databases, or change-management tickets.
9.3 List All Entities
The List All Entities view provides a mixed-entity grid for ad-hoc exploration. Use it when you suspect an entity exists but cannot find it in any of the typed views (cameras, monitors, etc.) — it surfaces orphaned and atypical entities other views filter out.
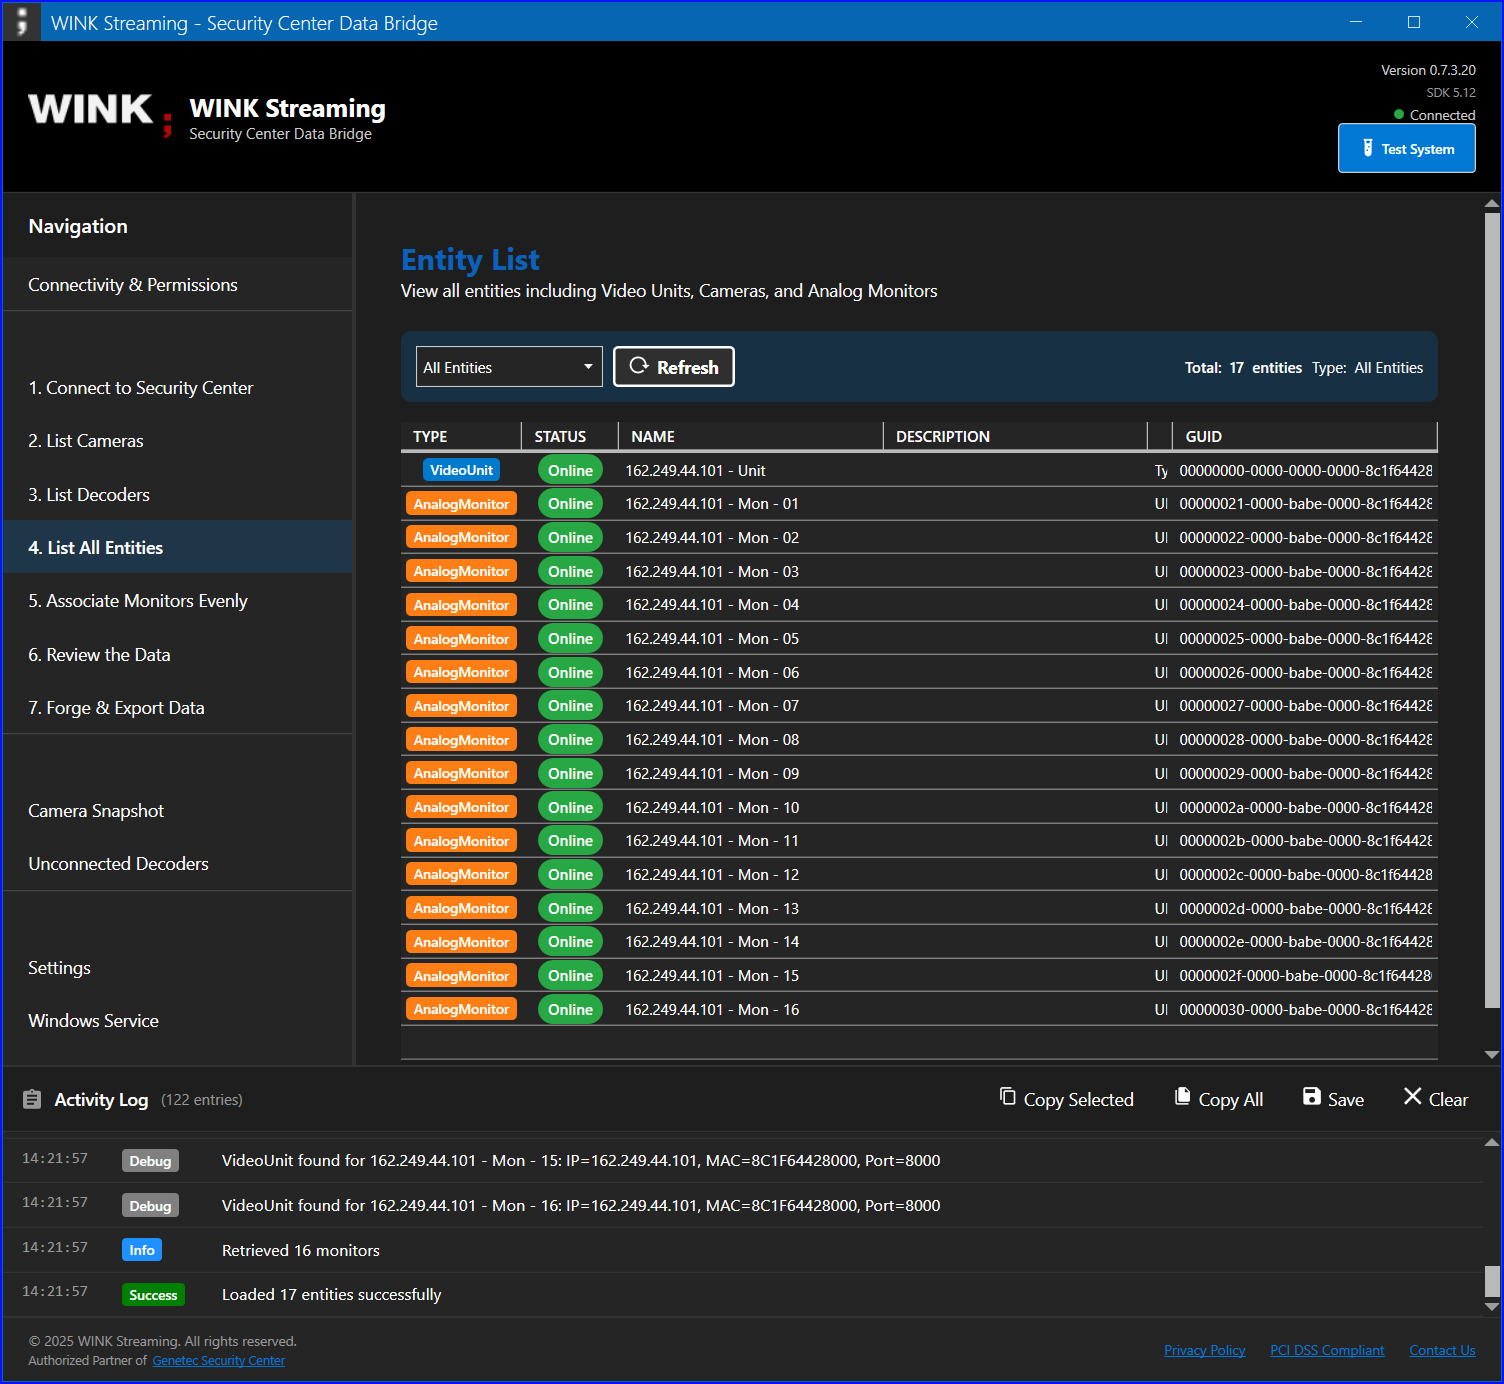
Entity Types Surfaced
- Cameras — all video sources
- Analog Monitors — decoder slots
- Video Units — archiver hardware
- Alarms — Security Center alarm definitions
- Areas — logical groupings (Areas are first-class on SDK 5.11+)
- Doors — access control points (read-only)
- Custom entities — anything the deployment defines via custom entity types
Entity Details
For each entity, the following information is available:
- GUID (unique identifier — the canonical handle for SDK calls)
- Name and description
- Type classification
- Parent entity relationships
- Custom field values
- Current status
Navigation
- Use the type filter tabs at the top to limit to one entity type at a time.
- Expand tree nodes to view hierarchies (e.g. unit → decoders).
- The search box filters across all entity types simultaneously.
- Export selected entity types to CSV.
9.4 Review Data
The Review Data view provides a tabbed at-a-glance summary across Cameras, Monitors, and Associations. Use it as the single page to validate a deployment before signing off, or to brief a stakeholder on the current state without making them navigate three separate views.

Review Sections
Cameras Tab
- Complete list of all cameras with online state and resolution.
- Total count and online/offline split.
- Export to CSV.
Monitors Tab
- All analog monitors with current camera binding.
- Network identity (IP, MAC, port).
- Connection status per monitor.
- Count of connected vs unconnected slots.
Associations Tab
- Current camera-monitor pairs.
- List of cameras not currently routed anywhere.
- List of monitors with no connected camera.
- Configuration summary.
Validation Use Cases
Use this view to:
- Verify configurations before triggering an export or a write operation.
- Identify configuration issues (cameras with no destination, monitors with no source).
- Confirm rolling commission progress — count of correctly-named monitors over time.
- Brief stakeholders on system completeness in one screenshot.
10. Decoder Tools
Decoder Tools is the operational heart of APIBridge Metro. Every view in this section can modify Security Center configuration. The tab order below mirrors the navigation menu, and the views are grouped roughly by intent: naming → routing → reconciliation → housekeeping.
10.1 Associate Monitors Evenly

Rename-only workflow. Distributes a set of cameras across a set of decoders by name pattern (the WF### convention) and writes the planned name into each AnalogMonitor's Name field. Does NOT actually route video — it just updates the names so an administrator can match them up manually in Security Desk, or so the console's --applyassociations mode (or the GUI's Apply Associations view) can later push the routing.
How It Works
- Load current configuration — retrieves all cameras and monitors from the SDK.
- Calculate distribution — evenly distributes cameras across the set of decoders matching
WF###. - Preview changes — shows proposed monitor → camera pairs before any write.
- Apply updates — writes new names to AnalogMonitor.Name and preserves the previous value in Description.
Association Steps
| Step | Action | Result |
|---|---|---|
| 1 | Click Preview Associations | See the proposed distribution table. |
| 2 | Review assignments | Verify each camera/monitor pair is sensible. |
| 3 | Enable Only WF-prefixed (if needed) | Filter to monitors matching the canonical pattern only. |
| 4 | Click Apply Associations | Updates monitor names; original names preserved in Description. |
Important Limitations
WINKSCData.exe --applyassociations.
Result Format
After association, monitor names follow the canonical form:
{Camera Name} - {Monitor Prefix}{###}-{UDP Port}Example: Front Entrance - WF301-8001
10.2 Sync Decoder Names
Finds analog monitors whose name does not match the connected camera and renames them to the canonical form {prefix}{Camera} - VF{N}-{cmdPort}-{udpPort}. Useful after manual routing changes in Security Desk to bring names back in sync with reality.
Workflow
- Discover Units — populate the scope dropdown (uses cache if available, otherwise queries SDK).
- Pick scope — All Units, IP group, or single VideoUnit.
- Analyze — finds monitors with a name/camera mismatch and previews the proposed new names.
- Rename Selected or Apply All — writes the new names.
The view is resume-aware: rows already marked Renamed are skipped on re-click, so it survives a mid-run disconnect.
Configurable Options
- Prefix (default
VD -) — prepended to the canonical name. - Similarity threshold slider — when fuzzy-matching camera names to monitor names, controls how close the match has to be (Levenshtein distance normalized to 0–1) for the tool to consider it an existing-intent match rather than a fresh assignment.
10.3 Apply Associations
Actually pushes video routing via the SDK's ActionManager.DisplayOnAnalogMonitor and RemoveFromAnalogMonitor calls. Use this view when monitor names already correctly indicate which camera should be displayed, but the actual video stream is not on the monitor — typical after a server restart, a routing wipe, or a migration to new archivers.
Commands
- Discover Units — populate the scope picker.
- Load Unit — pull every monitor in the selected scope and resolve the camera named in each monitor's name.
- Apply Selected — apply the routing only for the highlighted row.
- Apply All — apply routing for every loaded row.
- Reassociate Selected / Reassociate All — disconnect first, then reapply (use when a routing assignment is "stuck" and a plain Apply does not take).
How Camera Resolution Works
Apply Associations parses the monitor name to find the camera fragment — anything before the WF### or VF{N}-{cmdPort}-{udpPort} trailing component. It then searches for a camera in Security Center whose name matches that fragment exactly (case-insensitive). If exactly one match exists, the routing is applied; if zero or multiple matches exist, the row is marked Ambiguous and skipped.
This is why the canonical naming convention from section 6.4 matters — it guarantees the parse is deterministic.
10.4 Bulk CSV Association
Upload a CSV with two columns (NAME, GUID), pick a scope, then walk through validate → preview → run. Designed for new-site commissioning where you have a master inventory from an external source (Excel, asset database, AutoCAD) and need to materialize it as Security Center routing in one sweep.
CSV Format
NAME,GUID
Front Entrance,12345678-1234-1234-1234-123456789012
Parking Lot A,23456789-2345-2345-2345-234567890123
Loading Dock,34567890-3456-3456-3456-345678901234
...
The GUID column is the camera's Security Center GUID. The NAME column is the camera display name (used in the resulting monitor name).
Workflow
- Browse CSV — loads the file and validates each row's GUID against Security Center. Invalid GUIDs are flagged so you can fix the CSV before proceeding.
- Check Capacity — confirms there are enough empty AnalogMonitors in the chosen scope to receive all CSV cameras.
- Preview — pairs each CSV camera with the next empty monitor in deterministic
(IP, UDP)order. Shows the planned monitor → camera mapping. - Run — applies the associations and renames monitors to
{prefix}{CSV name} - VF{N}-{cmdPort}-{udpPort}.
Cancel/resume aware — rows already marked Done are skipped on re-click. A Refresh invalidated (N) pill appears whenever the SDK reports pending changes and lets you drain only the changed entries without a full re-query.
10.5 Duplicate Detector
Finds analog monitors that are duplicates within the same VideoUnit — multiple monitors with overlapping camera assignments or identical UDP-port-plus-name pairings — and lets you clean them up.
Commands
- Scan — analyse cached data for duplicate groups.
- Refresh from Server — re-pull before scanning.
- Delete All High Units — for each group, remove the duplicate(s) with the higher UDP port, keeping the lowest as canonical.
Each group expands to show the monitors involved with their camera thumbnails so you can confirm before destructive action.
10.6 Reassociate Unit
Per-unit "disassociate then reassociate" sweep. For every AnalogMonitor on the selected unit (or All Units): logs the current camera GUID, calls RemoveFromAnalogMonitor, then immediately calls DisplayOnAnalogMonitor with the same camera.
Use this when the entire unit's routing is out of sync after a network event. The live operation log shows GUID-level activity so you can confirm what is happening in real time. Safer than a manual reboot of the archiver because it preserves the existing camera-to-monitor mapping rather than relying on Security Center to re-derive it.
10.7 Camera Stream Cycler
For each camera in scope: saves the current PreferredConnectionType, switches to BestAvailable (or Unicast if already on BestAvailable), dwells N seconds (configurable, default 5), then restores the original setting. Useful for forcing a renegotiation on cameras whose RTSP stream has stuck.
This is a common remediation for "the camera shows but the video is frozen" — toggling the connection type forces a fresh RTSP DESCRIBE/SETUP/PLAY cycle, which usually clears the stuck-pipeline state without a hard reboot.
10.8 Unconnected Decoders

Lists analog monitors without a connected camera — the "virtual decoder" slots. Renames them to a virtual-decoder format that includes the unit IP, command port, and UDP port, so they are identifiable in Security Desk even when nothing is routed to them.
CSV export available for tracking commissioning progress over time.
10.9 Mismatched Connections
Identifies decoders whose currently displayed camera differs from the camera named in the monitor's Name field. Useful when routing has drifted from documented intent — every row tells you what is named versus what is actually displayed, with both camera details side by side. Read-only — the fix lives in Apply Associations or Reassociate Unit depending on whether one row or many rows are wrong.
10.10 Add to Partition
Two-list (Available / Staged) editor. Adds cameras and the parent VideoUnit of selected AnalogMonitors to a target partition.
Partition.AddMember requires IPartitionSupport, which AnalogMonitor does not implement. The tool transparently substitutes the parent VideoUnit when you stage a monitor — which adds every sibling camera/monitor on that unit too. This is documented per-row in the Result column so there are no surprises.
10.11 Organize Areas SDK 5.11+ only
Bulk-assigns analog monitors into Area entities, optionally creating a nested area hierarchy in the process. The view auto-generates area names from monitor IPs (e.g. Site - 162.249.44.30) so each archiver gets its own area without manual typing.
Hidden on the SDK 5.9 build because Area.AnalogMonitors and Area.AddAnalogMonitor do not exist in SDK 5.9. If the tab is missing from your install, install the SDK 5.11 component via the combined installer.
10.12 Shared Patterns & Scope Picker
Every Decoder Tools view inherits a small set of shared patterns. Learning them once means every new view is immediately familiar.
Discover / Refresh Buttons
- Discover Units (cache) — populates the scope dropdown from local JSONL caches in
Documents. Instant, no SDK calls. Use this for fast navigation when you already have a recent cache. - Refresh (Bulk/Fast) — re-queries the server in one batch. Fastest when the SDK user has full View privileges and the server is healthy.
- Refresh (Slow/Thorough) — falls back to per-row batched queries with reconnect between batches. Slower (20–60 min for 1,800 monitors) but reliably complete on restricted users where the bulk path returns partial results, and on SC 5.11.3 where the firewall throttle drops the bulk session.
- Cancel — stops at the next iteration boundary; re-clicking Run resumes (rows already marked Done are skipped).
Scope Picker
Where applicable, the scope dropdown offers three levels:
- All Units — operate over every cached entity.
- IP group (e.g.
** ALL on 162.249.44.100 **) — every entity on a given archiver IP. - Single VideoUnit — per-unit precision; the surgical option when you only want to touch one archiver.
11. Export
11.1 Forge & Export Data
Generates GenetecForge_<timestamp>.xml in Documents. Matches the console's --forge format exactly — the downstream WINK Forge and Media Router products consume both interchangeably. Three button groups:
Inspect
- Update Counts — live tally (decoder count, camera count, online/offline) without any writes. Use this to sanity-check what an export will contain before running it.
Dump JSONL Caches
- Dump All (chained), Dump Monitors, Dump VideoUnits, Dump Cameras, Fill Missing Camera Data.
- JSONL files land in
%USERPROFILE%\Documentsand feed the cache-first Discover paths in the Decoder Tools tabs. - The chained Dump All respects resume points — if the previous run died mid-dump, it picks up where it left off.
Export Forge XML
- Export XML — single-session full export.
- Bulk Export — chunked for very large deployments (1,800+ monitors); writes incremental files so progress is preserved on disconnect.
- Full Export Filtered — filter by Archiver IP for per-unit runs; useful when you only need a fresh export for one archiver after a configuration change.
11.2 Extract Archive State
Raw TCP state all query against each discovered decoder unit on port 5602. Per-unit text dumps plus a single appended CSV at Documents\WINKStreaming\ArchiveExtracts\archive_extract_log.csv.
This view bypasses the Genetec SDK entirely (it opens a TCP socket directly), so it keeps working through SDK disconnects. Settings (port, command, timeout, CSV path) are snapshotted at the start of each batch so mid-run edits cannot corrupt the run.
Use it when you need to compare what the archiver reports about itself with what Security Center reports about the archiver — divergence between the two is a common root cause of "the SDK says everything is fine but operators see broken video" tickets.
11.3 Parallel Bulk Export
Spins up multiple independent SDK sessions in parallel (default 4) and distributes the four export jobs (AnalogMonitors / Cameras / VideoUnits / Forge XML) across them. Output goes to separate *_parallel_<ts>.jsonl files so it never collides with the single-session dumps.
Use this for the fastest possible bulk pull on a healthy server. Drop the parallel session count to 2 if you are seeing DeniedByFirewall errors on SC 5.11.3 — the throttle is per-second LogOn frequency, not total session count.
12. Configuration & Windows Service
12.1 Settings View

The Settings view is read-only — it shows you exactly which Genetec SDK assembly is loaded, where it was loaded from on disk, and when it was built. Use it as the first stop when reporting an issue: a screenshot of this view tells support what build of the SDK is actually running, which often diagnoses the problem before any back-and-forth.
Information Displayed
- Assembly version — the
Engine.ProductVersionreported by the loadedGenetec.Sdk.dll. - File path — absolute path of the loaded DLL on disk.
- Build date — when the DLL was built (file modification time).
- Build symbol — the internal build flag (release / debug).
12.2 Windows Service Setup
The optional WINKSCDataMonitor Windows Service performs the same --forge export on a schedule (default every 20 minutes), compares it against the previous run, and sends an email or HTTP POST when entities change. Use it for unattended change-detection in production deployments.

%APPDATA%\WINKStreaming\APIBridge\settings.encrypted.Service Features
- Automated monitoring — checks for changes every 20 minutes (interval is configurable in the service settings before installation).
- Change detection — identifies new, modified, or removed entities by diffing the current Forge XML against the previous run.
- Notifications — email or HTTP POST on change.
- History tracking — maintains a rolling 7-day change history on disk.
- DPAPI-encrypted credentials — service settings are encrypted with the Windows Data Protection API, readable only by the same Windows user account that wrote them.
Configuration Steps
- APIBridge Metro → Configuration → Windows Service.
- Tick Use Windows Service.
- Select the delivery method (Email or HTTP POST) and fill in its fields (section 12.3).
- Fill in the Security Center credentials the service will use (separate from the GUI's runtime login — the service needs its own copy so it can run when the GUI is closed).
- Generate or paste an Authentication Key (128 characters, auto-generated).
- Click Install Windows Service.
- Approve the UAC prompt — the installer uses
sc.exeto register the service with automatic startup.
Service Information
| Property | Value |
|---|---|
| Service name | WINKSCDataMonitor |
| Display name | WINK Security Center Data Monitor |
| Startup type | Automatic |
| Run as | Local System (default; configurable post-install via services.msc) |
| Check interval | 20 minutes (configurable) |
| Settings storage | %APPDATA%\WINKStreaming\APIBridge\settings.encrypted (DPAPI) |
| Forge XML output | %PROGRAMDATA%\WINKStreaming\Service\ForgeExports\ |
12.3 Delivery Methods
Email Notifications
Configure email delivery for change notifications:
Email Settings
- SMTP server — your mail server address.
- Port — 587 (STARTTLS) or 465 (SSL/TLS).
- Username — email account username.
- Password — email account password (encrypted in DPAPI alongside the SDK credentials).
- Encryption — SSL/TLS, STARTTLS, or None.
- To address — recipient email.
- CC addresses — additional recipients (comma-separated).
Default WINK Streaming SMTP Configuration
If you do not have your own SMTP relay, the WINK Streaming default works out of the box:
| Setting | Value |
|---|---|
| Server | mail.wink.co |
| Port | 587 |
| Username | winkscdata@wink.co |
| Encryption | STARTTLS |
| CC | apifeed@wink.co (so WINK can support you if change-detection misfires) |
HTTP POST (Media Router)
Configure HTTP POST delivery to a WINK Media Router endpoint (or any compatible HTTP receiver). This is the standard delivery method for production WINK Forge deployments.
Media Router Settings
- Endpoint URL — your Media Router API endpoint (e.g.
https://router.example.com/api/genetec). - Authentication Key — 128-character key (auto-generated; matches the receiving end's expected key).
- Content Type —
application/xml. - Method — POST.
POST Request Format
POST /api/genetec HTTP/1.1
Host: your-media-router.example.com
Content-Type: application/xml
X-Auth-Key: [128-character-key]

<?xml version="1.0"?>
<signature>[authentication-key]</signature>
<wink>
    <!-- Genetec data XML — same Forge schema as section 11.1 -->
</wink>
The receiving Media Router validates the signature against its configured key, then accepts or rejects the payload. The full Forge XML body lets the Router rebuild its internal camera registry on every change rather than diffing — simpler and more robust than a delta protocol.
12.4 Service Management
Installing the Service
- Configure all settings in the Windows Service tab.
- Click Install Windows Service.
- Accept the UAC elevation prompt (required — service registration needs admin).
- Wait for installation to complete (typically < 5 seconds).
- The service starts automatically after installation.
Service Controls
Once installed, the following buttons become available in the same tab:
| Button | Function | Requirements |
|---|---|---|
| Start Service | Starts the monitoring service | Service must be stopped |
| Stop Service | Stops the monitoring service | Service must be running |
| Restart Service | Stops and starts the service | Service must be installed |
| Uninstall Service | Removes the service via sc.exe delete | Service must be stopped |
Service Status Indicators
- Running — service is active and monitoring.
- Stopped — service is installed but not running.
- Not installed — service is not present on the machine.
Viewing Service Logs
Service activity is logged to the Windows Event Log:
- Open Event Viewer (
eventvwr.msc). - Navigate to Windows Logs → Application.
- Filter by Source:
WINKSCDataMonitor. - Review service events, change-detection summaries, delivery results, and errors.
Each cycle also writes a structured run summary to %PROGRAMDATA%\WINKStreaming\Service\Logs\service-<date>.log — text format, useful for sweeping with findstr or grep from PowerShell.
13. Permissions Quick Reference
One-page cheat sheet for the privileges APIBridge Metro requires. Use this when handing requirements to a Genetec administrator who does not need the full context of section 6.
| Privilege | Required for |
|---|---|
| Log on using the SDK | Everything (gate) |
| View cameras | List Cameras, all Decoder Tools, Forge export |
| View analog monitors | List Decoders, all Decoder Tools, Forge export |
| View video units | IP address retrieval, Decoder Tools scope picker |
| View hardware configuration | MAC address retrieval, all unit-level operations |
| View areas | Organize Areas, List All Entities |
| View partitions | Add to Partition, List All Entities |
| Modify analog monitor name/description | Associate Monitors Evenly, Sync Decoder Names, Bulk CSV Association, Unconnected Decoders rename |
| Display camera on analog monitor | Apply Associations, Bulk CSV Association write, Reassociate Unit |
| Remove camera from analog monitor | Reassociate Unit, Reassociate Selected/All in Apply Associations |
| Add member to partition | Add to Partition |
| Modify camera (PreferredConnectionType) | Camera Stream Cycler |
14. Troubleshooting
Connection Problems
| Issue | Symptoms | Solution |
|---|---|---|
| Cannot connect to Security Center | Connection fails immediately or hangs at "Connecting…" |
|
| InvalidCredential | Authentication fails on Connect |
|
| DeniedByFirewall | Retried LogOn attempts fail with throttle error |
|
| CertificateError | License validation fails |
|
Data Issues
| Issue | Symptoms | Solution |
|---|---|---|
| Missing IP addresses | Blank IP/MAC in decoders or Forge export |
|
| No cameras visible | Empty camera list |
|
| Cannot update monitors | Association fails or rename rejected |
|
| Bulk Refresh returns a partial list | Some monitors missing from the grid after a refresh |
|
| "Organize Areas" tab missing | Tab is not visible in the navigation |
|
| CefSharp / snapshot viewer fails | Error opening camera snapshot |
|
Service Issues
| Issue | Symptoms | Solution |
|---|---|---|
| Service will not install | Installation fails or UAC errors out |
|
| Service stops unexpectedly | Status shows Stopped without manual intervention |
|
| No email notifications received | Changes are happening but no emails arrive |
|
| HTTP POST returns 401 | Media Router rejects the change notification |
|
Diagnostic Tools
Activity Log
The Activity Log panel at the bottom of the application provides real-time diagnostic information:
- Connection attempts and results (timestamp, severity, message)
- API calls and their responses
- Error messages with detail
- Operation timing for long-running tasks
To use it effectively when reproducing an issue:
- Enable verbose logging in Settings.
- Clear the log before reproducing the issue.
- Perform the failing operation.
- Click Save on the log panel to export it.
- Attach the export to your support case.
Permission Verification
Always run the Connectivity & Permissions test when troubleshooting any read or write failure — most "the export is broken" tickets are missing privileges, and the verification view diagnoses them in seconds.
Settings View Screenshot
A screenshot of the Settings view (section 12.1) is the single most useful diagnostic for SDK-version issues. Include it in every support case.
15. Best Practices
Security Best Practices
- Use a dedicated SDK account.
- Create a separate account named
winkSDK(or per your conventions). - Grant only the privileges enumerated in section 13.
- Use a strong, unique password — do not reuse a human operator's password.
- Enable password rotation policies appropriate to your environment.
- Create a separate account named
- Secure network communication.
- Use a VPN for remote SDK connections.
- Implement firewall rules to scope port 5500 access to the workstations that need it.
- Monitor SDK connection logs on the Security Center side.
- Use encrypted email (STARTTLS or SSL/TLS) for service delivery.
- Credential management.
- Never share SDK credentials between humans.
- Rotate the SDK password quarterly (or per your policy).
- When you rotate, update
users.jsonat the same time on every machine that has it saved. - Treat the Windows Service DPAPI store as the canonical credential for unattended use — re-enter via the Configuration → Windows Service tab after every rotation.
- Partition scoping.
- Create a dedicated
winkStreamingpartition (section 6.3). - Only place entities the integration needs to manage inside it.
- This is your last line of defense if the SDK credentials are ever compromised.
- Create a dedicated
Operational Best Practices
- Regular maintenance.
- Export Forge XML weekly for archival.
- Review unconnected monitors monthly.
- Update to the latest APIBridge Metro release when announced.
- Clean up old export files quarterly to keep
Documentstidy.
- Change management.
- Document all configuration changes in your CMDB or change-tracking system.
- Test in a non-production environment first when possible.
- Always use Preview before Apply.
- Maintain a change log — the Activity Log export captures most of it for you.
- Monitoring.
- Review Windows Service logs daily, or set up email forwarding for change notifications.
- Set up email alerts for high-volume change events.
- Monitor for unauthorized modifications by diffing weekly Forge exports.
- Track entity-count trends — sudden drops are a sign of permission regression or hardware failure.
Performance Optimization
- Limit concurrent connections to Security Center — the SDK enforces per-second LogOn limits on SC 5.11.3.
- Schedule full Forge exports during off-peak hours.
- Use IP-filtered exports when you only need data for one archiver.
- Close APIBridge Metro when not in use (the active SDK session consumes a license slot).
- Restart the Windows Service monthly to clear any accumulated SDK session state.
- Prefer Refresh (Bulk/Fast) on healthy servers; fall back to Slow/Thorough only when the bulk path returns partial data.
16. File Locations
| Path | Contents |
|---|---|
{install}\Metro\ | GUI executable, dependencies, portable users.json |
{install}\Console\ | Console executable, dependencies, portable users.json |
{install}\USERS-JSON-README.txt | Credentials file quick reference |
%APPDATA%\WINKStreaming\users.json | Per-user credentials (written by the GUI's Save Credentials) |
%APPDATA%\WINKStreaming\APIBridge\settings.encrypted | DPAPI-encrypted Windows Service settings |
%USERPROFILE%\Documents\GenetecForge_*.xml | Forge XML exports |
%USERPROFILE%\Documents\AnalogMonitors_*.jsonl | JSONL cache of analog monitors |
%USERPROFILE%\Documents\Cameras_*.jsonl | JSONL cache of cameras |
%USERPROFILE%\Documents\VideoUnits_*.jsonl | JSONL cache of video units |
%USERPROFILE%\Documents\WINKStreaming\ArchiveExtracts\ | Archive Extractor CSV log + per-unit text dumps |
%PROGRAMDATA%\WINKStreaming\Service\ForgeExports\ | Windows Service Forge exports |
%PROGRAMDATA%\WINKStreaming\Service\Logs\ | Windows Service text logs |
17. Performance & Resilience
Batched Queries with Reconnect
Cameras and AnalogMonitors are pulled in batches of 5 by default. After each batch, the SDK session liveness is rechecked; if dead, the tool auto-reconnects using cached credentials with progressive backoff (0 / 30 / 60 / 120 / 300 / 600 seconds) and resumes from the next batch. This is the same logic the console uses, sharing a single retry policy across both applications.
Resume from Partial Runs
Bulk Export and the console's --forge mode cumulatively append to a GenetecForge_progress.jsonl file. If a run dies mid-way, simply re-run — the next invocation reads the progress file as a starting cache and only re-queries entities not yet collected. Successful completion renames the progress file to GenetecForge_completed_<ts>.jsonl.
Expected Wall-Clock Times
For a healthy SC 5.11.3 server with a privileged SDK user:
| Inventory size | Full Forge export |
|---|---|
| ~100 monitors | < 30 seconds |
| ~500 monitors | ~2 minutes |
| ~1,800 monitors | ~5–10 minutes |
| ~1,800 monitors on a restricted SDK user (permission cascades) | 20–60 minutes |
Use Parallel Bulk Export (section 11.3) to shave additional time on healthy servers — drop the parallel session count to 2 if you start seeing DeniedByFirewall from the throttle.
18. Console Companion (WINKSCData)
APIBridge Metro ships alongside WINKSCData, a headless command-line tool that performs the same reads and (selectively) the same writes from a script, scheduled task, or CI pipeline. Both tools share:
- The same Genetec SDK assemblies (per the component you install).
- The same
users.jsoncredentials file (and search order). - The same Forge XML output format — byte-for-byte identical.
- The same SDK action calls for routing writes (
DisplayOnAnalogMonitor,RemoveFromAnalogMonitor).
What the console does not share with the GUI:
- JSONL caches — the console writes to the current working directory; the GUI writes to
%USERPROFILE%\Documents. - SDK version — the console ships SDK 5.9 by default; the GUI ships SDK 5.11. They cannot share an install folder for this reason.
Both can run at the same time without conflict — each opens its own SDK session.
Read the dedicated WINKSCData Console Manual for the full option reference, scripting cookbook, scheduling guidance (Task Scheduler, CI), and exit codes.
19. Version History
0.9.0.0 Current — 2026-06-28
- New:
users.jsoncredentials file (portable + per-user search) read automatically by both GUI and console. - New: Save Credentials button in the GUI's Connect view.
- New: top-right header shows the actual loaded Genetec SDK version (no more hardcoded "5.9.3").
- New: console banner shows actual
Engine.ProductVersion;--sdkis now auto-detected from the loaded DLL. - New: combined installer (Metro + Console) — Inno Setup based.
- New: Decoder Tools — Apply Associations, Bulk CSV Association, Duplicate Detector, Reassociate Unit, Camera Stream Cycler, Mismatched Connections, Add to Partition, Organize Areas (SDK 5.11+).
- New: Extract Archive State and Parallel Bulk Export in the Export group.
- Fix: diagnostic telemetry routed to the working transport with deduplication and noise filtering.
- Fix: top-right SDK + Version are now data-bound instead of hardcoded.
- Fix: Organize Areas view properly gated to SDK 5.11+ so the SDK 5.9 build compiles cleanly again.
- New: captures unhandled exceptions in fire-and-forget tasks (silently dropped before).
0.7.3.23 Legacy
- Previous generally-available release. Did not include the Decoder Tools family beyond Associate Monitors Evenly, and used a hardcoded SDK version display.
- Standalone console-only installer; combined installer is new in 0.9.
20. Appendix
A. Forge XML Schema
The Forge XML export format follows this schema:
<wink report_time="datetime" generation_duration="duration">
    <monitors decoder_count="integer" camera_count="integer">
        <monitor_device ipaddress="string" macaddress="string" guid="guid">
            <monitor_unit commandport="integer">
                <decoder name="string" udpport="integer"
                         IsOnline="boolean" guid="guid">
                    <description><![CDATA[text]]></description>
                    <custom_fields><![CDATA[text]]></custom_fields>
                    <connectedcamera name="string" guid="guid">
                        <!-- 58+ camera attributes -->
                    </connectedcamera>
                </decoder>
            </monitor_unit>
        </monitor_device>
    </monitors>
</wink>
All string fields are XML-escape-safe (&, <, >, ", ' handled) and wrapped in CDATA where appropriate. JSON output (-j on the console) emits the same data with camelCase keys.
B. Camera Attributes
Each <connectedcamera> element in the Forge XML carries these attribute groups:
| Category | Attributes |
|---|---|
| Basic info | Name, Description, GUID, Model, Manufacturer |
| Network | IP address, MAC address, port, protocol |
| Video | Resolution, frame rate, codec, bitrate, key-frame interval, quality |
| PTZ | Has PTZ, presets, tours, patterns |
| Recording | Mode, quality, retention, schedule |
| Location | GPS latitude / longitude, building, floor, zone |
| Status | Online state, last seen, current signal state, running state, connection type |
| Security | Encryption type, is-blocked, is-in-maintenance |
| Operational | Time zone, monitor group GUID, custom fields |
C. Error Codes
| Code | Description | Resolution |
|---|---|---|
| 1001 | SDK not found | Verify Genetec.Sdk.dll is next to the EXE and not blocked |
| 2001 | Invalid credentials | Verify username/password and SDK logon privilege |
| 3001 | Network timeout | Check connectivity, firewall, port 5500 |
| 4001 | Permission denied | Grant the required Genetec privilege (section 13) |
| 5001 | Certificate error | Contact WINK support for a certificate refresh |
D. Keyboard Shortcuts
| Shortcut | Action |
|---|---|
| Ctrl+C | Copy selected data |
| Ctrl+E | Export current view |
| F5 | Refresh data |
| Ctrl+F | Find in current view |
| Alt+C | Connect to Security Center |
| Alt+D | Disconnect |
21. Support
- Email: support@wink.co
- Web: https://www.wink.co
- Documentation library: https://www.wink.co/resources/documentation/
- Console manual: WINKSCData Console User Manual
When opening a support case, please include:
- The full top-right header text (version + SDK)
- A screenshot of the Settings view (section 12.1)
- The contents of the Activity Log panel (use the Save button to export)
- The Genetec Security Center server version (About dialog in Security Desk, or
WINKSCData.exe -l) - A description of the action that failed, the scope it was operating on, and what you expected to happen